Competency B3: Commission Fuel Gas Delivery Systems
Learning Task 2
Purging Low Volume Gas Piping Systems
After the gas lines have been pressure tested they must be purged to eliminate the risk of a forming a dangerous flammable air/gas mixture within the pipeline. Purging the gas line means removing the air from the pipeline by using the pressurized gas supply to force it out.
On high volume commercial and industrial gas systems were the appliances may have inputs over 400000 Btu/h (120 kW) the purging procedures will be performed or supervised by a Class A gas fitter. These systems will often have piping over 2 psig and or over 2” nominal size which will need to first be purged with an inert gas. The inert gas is needed to separated the air in the piping from the incoming gas and the flow speed is controlled at supervised purge burner located outdoors.
Low volume residential and small commercial gas piping systems may be purged to an indoor space. Check the gas code to verify the conditions in which indoor purging are allowed.
Indoor purging procedures
Before the low volume system is purged it is assumed the appliances are connected, the stage two leak test has been completed, and the system has been charged with gas pressure. Additionally, the service and line pressure regulators’ static pressures have been checked to ensure the appliance inlet pressures are correct (Figure 6).

When conditions allow it, indoor purging may be performed in one of two ways:
- To an open burner such as a range
- Using a purging assembly with an automatic shutoff release
If the building is equipped with a gas range it should be used for the initial system purge. The piping layout will dictate how much of the piping system is purged from this location. When purging at the open burner hold a continuous flame up to the burner. Use a lighted taper or torch that will enable you to keep your hand a safe distance from the burner ports. The air/gas mixture is flared off at the burner until a stable flame is established.
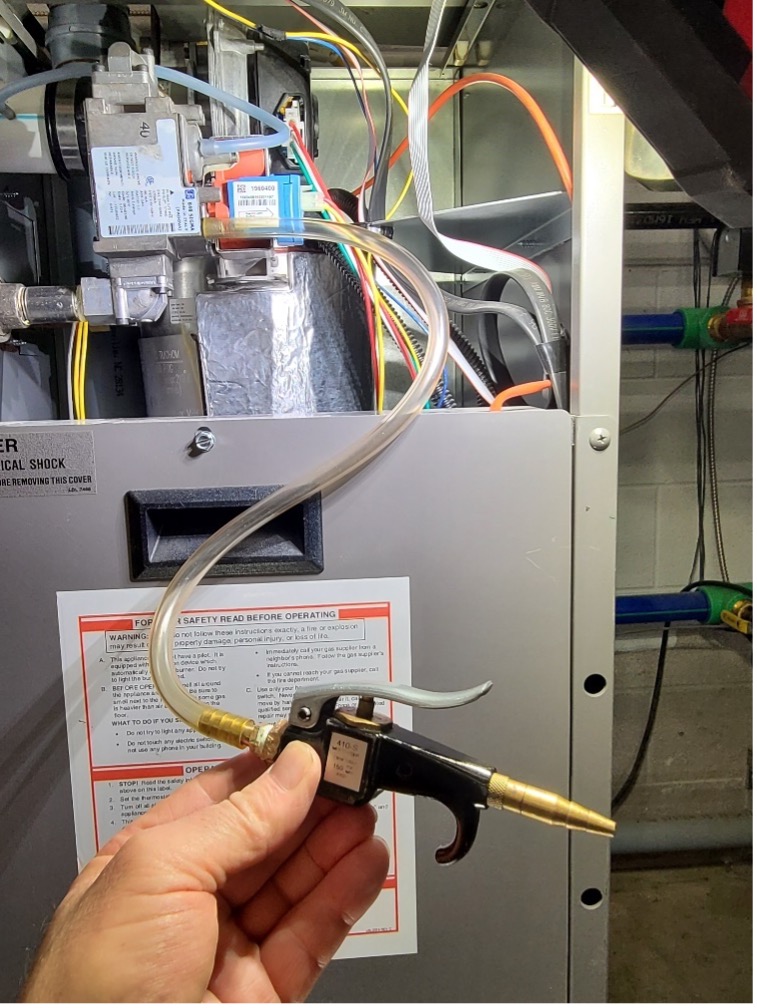
For the other gas appliances, without open burners, a hosed purge assembly can be connected as close as possible to appliance. The drip pocket or control valve inlet pressure port are two convenient locations that may be used. One of these may have already been used to check the appliance inlet pressure.
The following hose purging assembly method may only be used under the following conditions:
- The appliance must be located in a well-ventilated area
- All potential sources of ignition must be removed or shutoff
- Maximum pipe size of NPS 1 or tube size of NTS ¾
- Longest run of piping or tubing is 100 ft (30 m)
- Maximum system pressure is 2 psig
- Maximum pressure at the purge point is 11 in. w.c.
If the gas piping system does not meet any of these conditions then it must be purged to outdoors as per the gas code or good engineering practice.
The purging hose assembly must have an automatic shutoff release valve to ensure the gas outlet is monitored continuously and is not able to be left in the open position (Figure 7).

Use the following steps to complete the purging procedure:
- Ensure the appliance manual shut-off valve is closed.
- Connect the purging assembly at the appliance inlet.
- Verify the appliance automatic control valve is closed.
- Open the appliance manual shut-off valve.
- Leak (bubble) test all of the purge assembly connections.
- Use the gas code appendix or engineering tables to determine the approximate purge time. Ensure that the purge does not exceed 100 seconds.
- Begin purging by depressing the spring-loaded automatic shut-off valve lever in a continuous and uninterrupted manner.
Caution: the automatic shut-off valve must not be fixed in the open position. - Release the purge valve when you detect a smell of gas from the purge valve outlet or when the approximate purge time has elapsed.
- Close the appliance manual shut-off valve and disconnect the purging assemble and fittings.
- Reassemble the piping or reinstall control valve plug
- Open the appliance manual shut-off valve and soap test the affected joints
There will still be a small amount of air in the gas valve train that will need to be purged during the appliance start-up procedure, but this should be expelled immediately into the combustion chamber and still enable the gas appliance to light quickly and smoothly.
Pipeline repair purging
Whenever an existing gas pipeline needs to be removed for repair, alteration or abandonment the same code purge procedures are applied to purge the combustible gas from the piping.
 Now complete Self-Test 2 and check your answers.
Self-Test 2
Self-Test 2
Media Attributions
- Figure 6. “Checking appliance control valve inlet pressure” by Rod Lidstone is licensed under a CC BY-NC-SA licence.
- Figure 7. “Purge hose with automatic shutoff release valve” by Rod Lidstone is licensed under a CC BY-NC-SA licence.

