Competency F2: Commission and Service Water Services and Distribution Systems
Learning Task 4
Describe the troubleshooting and repair of water service and distribution systems
Troubleshoot
When troubleshooting a water service pipe, it involves identifying and addressing issues or problems related to the pipe’s functionality, performance, or integrity.
Verify Reported Problem
Determine the specific problem or symptoms associated with the water service pipe. This could include low water pressure, leaks (Figure 9), unusual noises, discoloration, or other irregularities.
Use a pressure gauge to measure the water pressure at different faucets or fixtures within the property. Compare the readings with the recommended pressure range for your area. Low or inconsistent pressure could indicate a problem within the water service pipe.
Conduct a thorough leak detection process. This can involve checking for visible leaks, listening for the sound of running water when no fixtures are in use, or using specialized leak detection equipment, such as electronic leak detectors or thermal imaging cameras, to identify hidden leaks.
Ensure that the water supply to the property is turned on and functioning correctly. Verify if other faucets or fixtures in the building are experiencing similar issues, as this can help determine if the problem is isolated to a specific area or if it affects the entire system.

Inspection
Visually inspect the visible portions of the water service pipe, both indoors and outdoors, for any signs of damage, leaks, or loose connections. Look for wet spots, corrosion, or rust on the pipes, fittings, or valves. Examine the valves, fittings, and connections associated with the water service pipe. Ensure they are properly installed, not damaged, and free from obstructions or blockages that could restrict water flow.
If you observe issues with water discoloration, odor, or taste, test the water quality to determine if it meets the desired standards. Water quality problems can be caused by issues within the service pipe, such as corrosion or contamination.
Isolation
Isolating a leaking pipe is crucial to prevent further water damage and address the issue effectively.
It is important to locate and shut off the water supply to the affected area as quickly as possible. Depending on the situation, there may be different options to consider like an individual pipe shut-off valve or the main water shut-off valve. When trouble-shooting water service piping the municipality may be required to shut down a portion of the main water supply.
Carefully examine the leaking pipe to determine the cause and severity of the leak. Identify the source of the leak, such as a crack, loose fitting, or damaged joint. Assessing the damage will help decide on the appropriate repair method.
Repair
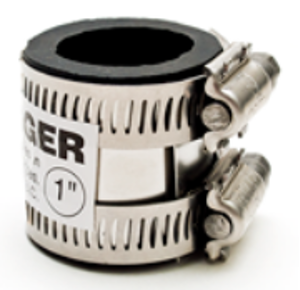
Depending on the severity of the leak and the available resources, a temporary repair may be needed until a permanent solution can be implemented. This can involve using pipe clamps (Figure 10) or rubber patches to temporarily seal a leak.
When a permanent repair can be performed there are several factors to be considered such as:
- Access to the pipe
- Type of materials
- Permits and AHJ
- Personnel requirements
If the pipe is more than 4’ below the surface, excavation and shoring will need to be arranged.
Make sure to have plenty of fittings, pipe, and tools on hand before isolating the piping to limit the amount of time the supply is out of service and limit the time it takes going back and forth from a wholesaler.
Always inform the proper authorities of the work to be done before beginning. Road closures or even flaggers could be needed if the repair will affect traffic patterns.
Go over repair plans with the crew or crews before isolating the piping and ensure safety and emergency procedures are understood.
Safe Work Practices
Remember to prioritize safety during troubleshooting and repairs. If you encounter any hazardous situations or suspect significant damage to the water service pipe, it is important to take appropriate precautions to keep yourself and others safe.
Confined space
A confined space refers to an enclosed or partially enclosed area with limited means of entry and exit and is not intended for continuous human occupancy. Confined spaces are typically characterized by limited access points, restricted airflow, and the potential for hazardous conditions to develop. These spaces can pose risks to the health and safety of individuals who enter or work within them.
Examples of confined spaces are:
- Tanks (e.g., storage tanks, fuel tanks)
- Silos
- Vessels (e.g., boilers, pressure vessels)
- Pipelines
- Sewers
- Tunnels
- Underground vaults
- Ductwork or utility access points
It is important to note that not all enclosed spaces are considered confined spaces. For a space to be officially classified as a confined space, it must meet specific criteria defined by applicable regulations and standards, such as the presence of hazardous atmospheres, limited entry or exit, or other recognized hazards.
Working in confined spaces requires careful planning, hazard assessment, and appropriate safety precautions. Employers and workers must be trained on the potential risks associated with confined spaces and follow established procedures for entry, ventilation, communication, personal protective equipment (PPE), and emergency response. Regulatory bodies often have specific guidelines and regulations in place to ensure the safety of individuals working in confined spaces.
Shoring
It is crucial to consult with a qualified engineer or shoring specialist to determine the most appropriate shoring method based on the specific soil conditions, trench dimensions, and regulatory requirements. Following proper shoring practices and ensuring regular inspections of the shoring system during excavation work are essential for the safety of workers and the prevention of trench collapses. If an excavation is required to access piping, shoring will be required if that excavation will create a trench more than 4’ deep.
Tools and Equipment
During the commissioning of the water service pipe and distribution piping, there may be a need for certain tools and equipment. Ones to have available are:
- Pipe Cutter
- Pipe Wrench
- Adjustable Wrench
- Teflon Tape
- Pipe Thread Sealant
- Pressure Gauge
- Pressure Test Pump
- Safety Gear
Also keeping an inventory on hand of common pipe fittings such as couplings, elbows, tees, and valves is always a good practice.Bottom of Form
Repair or Replace Components
As discussed above, once the problem has been identified and the decision has been made to repair or replace the affected piping, collecting a list of required tools, materials, and personnel will be necessary. The problem piping will be isolated, and the piping will be removed and replaced. After a successful repair, testing will be done and documentation will be completed.
Testing
Once the repair is complete, close any open components. Then slowly turn the main water shut-off on to gradually restore water flow. As the water flows back into the pipes, it is common for air to become trapped in the system. Open the highest and furthest components connected to the isolated section of the pipes and let the water run until a steady flow of water is achieved. This process helps release any trapped air and ensures proper water circulation. Check for any leaks or irregularities in the repaired section and make sure the repair has been successful.
Return to Service
Before a repair or replacement can be considered complete, test the water pressure at various points connected to the isolated section of the pipes. Confirm that the pressure is within the normal range. If there are significant pressure fluctuations or other issues, it may indicate a problem within the system that requires further investigation or adjustment. Depending on the duration of the isolation period and the condition of the water in the pipes, it may be necessary to flush and purge the system. Run water through the pipes for an extended period to remove any stagnant water or sediments that may have accumulated. If this is a repair to a main, it may require a boil water notice to the affected houses. This will need to be coordinated with the proper local authorities.
Documentation
Documenting the testing process provides a clear record of the activities performed, verifies compliance with regulations, and serves as a reference for future maintenance or troubleshooting. It is important to follow any specific documentation requirements or guidelines provided by local authorities, regulatory bodies, or industry standards when testing a water service pipe.
 Now complete Self-Test 4 and check your answers.
Self-Test 4
Self-Test 4
Media Attributions
- Figure 9. “Water main break” by Jim Barton is licensed under a CC BY-SA 4.0 licence.
- Figure 10. “Temporary pipe repair clamp“ from Rollee is used for educational purposes under the basis of fair dealing.
