Competency F4: Install Hydronic Systems
Learning Task 3
Describe the maintenance of hydronic systems, components, and controls
Proper maintenance of a hydronic system helps keep it efficient and reliable. Regular maintenance helps prevent issues, extends the system’s lifespan, and maintains comfort levels.
Routine visual inspections of system components, including pipes, valves, pumps, and heat emitters (radiators, baseboard heaters, underfloor heating, etc.) should be performed to keep a system running smoothly. Always look for signs of leaks, corrosion, or damage.
Manufacturers’ Specifications
Always refer to the manufacturer’s specifications before making any repairs or alterations to a system.
Schedules
A maintenance schedule helps track that all necessary tasks are performed at the appropriate intervals. The specific maintenance schedule for each hydronic system may vary depending on factors like system size, complexity, and local conditions. Some items typically included in preventative maintenance schedules in typical intervals are as follows:
Daily or Weekly Maintenance
Visual inspection – visual inspection of the system components for any issues such as leaks, loose connections, or unusual noises.
Pressure and temperature checks – monitor system pressure and temperature and compare to system expectations outlined in the manufacturer’s specifications.
Monthly Maintenance
Air vent inspection – check air vents for proper functioning and bleed air from radiators or heat emitters.
Check for leaks – Inspect the entire system for water leaks, especially at pipe connections, valves, and around pumps.
Quarterly Maintenance (Every 3 Months)
Flushing and cleaning – flush and clean the system to remove sediment, debris, or corrosion buildup especially in heat exchangers, strainers, and filters.
Inspect expansion tank – check the expansion tank’s pressure and condition. Test that it’s not waterlogged. If it is, drain and recharge or replace it.
Inspect and clean filters – if the system includes filters or strainers, check and clean them regularly to prevent blockages and maintain system efficiency.
Clean heat emitters – clean radiators, baseboard heaters, or underfloor heating components to remove dust and debris that can hinder heat transfer.
Annual Maintenance
Pumps – Inspect and service the circulator pumps, lubricating and cleaning them as necessary.
Verify that zone valves, control valves, and other system controls are functioning correctly.
Water quality analysis – test the water quality, including pH levels and mineral content. Treat the water as needed to control pH levels and prevent scaling or corrosion.
Heating Season (Fall/Winter)
Before the heating season begins, ensure that the system is in good working order. Check and calibrate thermostats and verify that all zone valves are functioning correctly.
Cooling Season (Spring/Summer)
Before the cooling season begins, inspect, and test the system components used for cooling, such as chillers, cooling towers, or fan coil units.
Periodic Maintenance
Balancing Zones – adjust zone valves, control settings, or balance the system as needed to ensure even heating or cooling distribution to all areas of the building.
Sensory Inspection
As discussed in Learning Task 2, use senses to detect potential issues. Seeing leaks, hearing odd noises, and feeling for irregularities, are all effective ways to gather information about the condition of a hydronic system. That information can be used to help perform maintenance on the system and troubleshoot problems when they arise.
Lubrication
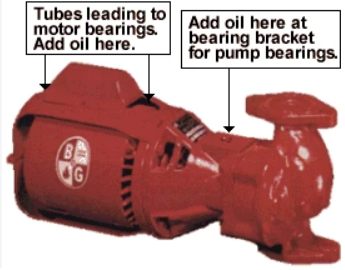
Lubricating a centrifugal pump typically means lubricating the pump’s bearings. (Figure 11) It is important to note that specific lubrication requirements and procedures may vary depending on the pump manufacturer and model. Always refer to the manufacturer’s instructions and guidelines for lubrication and maintenance.
When lubricating a pump, the procedure often goes as follows:
Turn off the pump and check that the electrical power to the pump motor is disconnected to prevent accidental startup. Find the locations of the pump bearings. Centrifugal pumps normally have two bearings: the drive-end bearing and the non-drive-end bearing. Before applying lubricant, clean the bearing housings and surrounding areas to remove any dirt, dust, or debris that could contaminate the lubricant. Consult the pump manufacturer’s recommendations to select the appropriate lubricant for your specific pump. The lubricant should be compatible with the pump’s operating conditions, temperature, and type of bearings (e.g., ball bearings or sleeve bearings). Depending on the type of lubrication system your pump uses, you may need to prepare lubrication equipment, such as a grease gun or oiling system, to deliver the lubricant to the bearings.
If using grease, apply the appropriate amount of grease to a grease gun. Attach the grease gun to the grease fitting or nipple on the bearing housing. Pump the grease into the bearing until you see fresh grease emerging from the bearing seals or until the manufacturer’s recommended quantity is reached. Stop pumping when you observe the purged grease, as over-greasing can cause damage.
If using oil, ensure the oil reservoir is filled to the recommended level. Properly prime and deliver a continuous flow of oil to the bearings. While applying lubricant, check the pump and bearings for any signs of excess heat, unusual noise, or vibration. If you notice any abnormalities, stop the lubrication process, and investigate the issue. After lubricating the bearings, confirm that the lubricant has been evenly distributed and is visible at the seals or oiling points. Once lubrication is complete and the lubrication system is functioning correctly, reconnect electrical power to the pump motor.
Fluids
Poor water quality, including high mineral content and contamination, can contribute to the degradation of system components. Proper water treatment and filtration can help reduce wear and tear on the system.
If glycol is used in the system for freeze protection, monitoring and maintaining the correct glycol concentration is crucial. Inadequate glycol levels can lead to freezing and damage to components.
Wear
Over time, several components will experience wear and degradation. The pipes in a hydronic system are subjected to temperature fluctuations and the flow of water or glycol over time. Pipes may develop corrosion, rust, or scale buildup, which can reduce their efficiency and lead to leaks. The bearings and seals in pumps can wear out, leading to reduced pump efficiency or even pump failure. Boilers can experience wear and tear due to the constant heating and cooling cycles. Components like heat exchangers may develop scale or corrosion, reducing their efficiency. Regular maintenance and descaling can help mitigate these issues. Control valves and zone valves will wear in their seals and moving parts, leading to leaks or reduced functionality. The diaphragm or bladder inside the expansion tank can degrade, affecting the tank’s ability to perform its function. Air vents can become less effective, potentially allowing air to accumulate in the system. Pressure relief valves can wear out or become corroded, leading to improper operation. The insulation on pipes, valves, and components can degrade over time, leading to heat loss and reduced system efficiency. Electrical components such as control panels, thermostats, and wiring may degrade over time due to factors like temperature fluctuations and wear.
Noise
Unusual noises in a hydronic heating or cooling system can be indicative of various problems that need attention. Gurgling or bubbling sounds typically indicate the presence of air in the system. This can lead to reduced heat transfer and inefficient operation. Air trapped in the pipes or radiators, insufficient system purging or bleeding, leaks that allow air to enter the system may all be the culprit.
Hissing or whistling sounds could indicate high water velocity or flow restrictions within the system. This can result from obstructed or partially closed valves, overly high pump speed, blockages in pipes, from mineral deposits or debris or inadequate system balancing.
Loud banging or hammering noises, also known as water hammer, are typically caused by sudden changes in water pressure. This can occur when water flow is abruptly stopped or redirected, check valves or zone valves close rapidly or there are loose or damaged pipe hangers or supports.
Clicking or ticking sounds may be due to thermal expansion and contraction of metal components as the system heats up and cools down. This is a normal occurrence but can be amplified if the system lacks proper expansion tanks or if there are loose or poorly insulated pipes.
Harsh sounds like grinding or screeching noises suggest issues with system components, like the pumps or circulators. Other causes could be worn or damaged bearings in the pump, misaligned or damaged impellers or lack of pump lubrication.
Cavitation is often described as a gravel-like noise and occurs when air is drawn into the pump, causing bubbles to collapse. This results from low water levels in the system, leaks or air infiltration, or a pump operating at too high a speed.
Boiling or kettle-like noise, indicates that the system is overheating. This is caused by insufficient water flow through the boiler or heat source, scaling or mineral buildup on heat exchanger surfaces or incorrect temperature settings on the boiler.
Vibrations and rattling sounds occur when components, such as pipes or radiators, are not securely fastened or when there is inadequate insulation to dampen vibrations.
Leaks
Leaks in a hydronic system are visual indicators of issues. When a water stain, or puddle of water is found, make sure to do a thorough investigation for the cause. Some leaks need to be monitored over time as they are hard to track back to the source. Small water spots can be marked and watched for enlargement, while larger or active leaks must be dealt with quickly. Pressure drops, temperature fluctuations, and noises can all be indicators of leaks.
When trying to find a leak, a dye test can be used if all else fails. Dye testing involves adding a fluorescent dye to the system’s water or glycol. The dye is not visible under normal lighting conditions but fluoresces under UV light. After adding the dye, inspect the system with a UV light source. Any leaks will be visible as fluorescent traces.
 Now complete Self-Test 3 and check your answers.
Self-Test 3
Self-Test 3
Media Attributions
- Figure 11. “Lubrication ports in a pump” from Xylem is used for educational purposes under the basis of fair dealing.
