Main Body
Bringing It All Together
Click play on the following audio player to listen along as you read this section.
1. Return to WeVideo at www.wevideo.com. You may need to log in again with your email and password. Once you’re in your account, you should see the video you last edited. It is probably called Untitled Video. Click CONTINUE EDITING.
2. Now you are looking at the Editor. Let’s get to know each feature of the Editor.
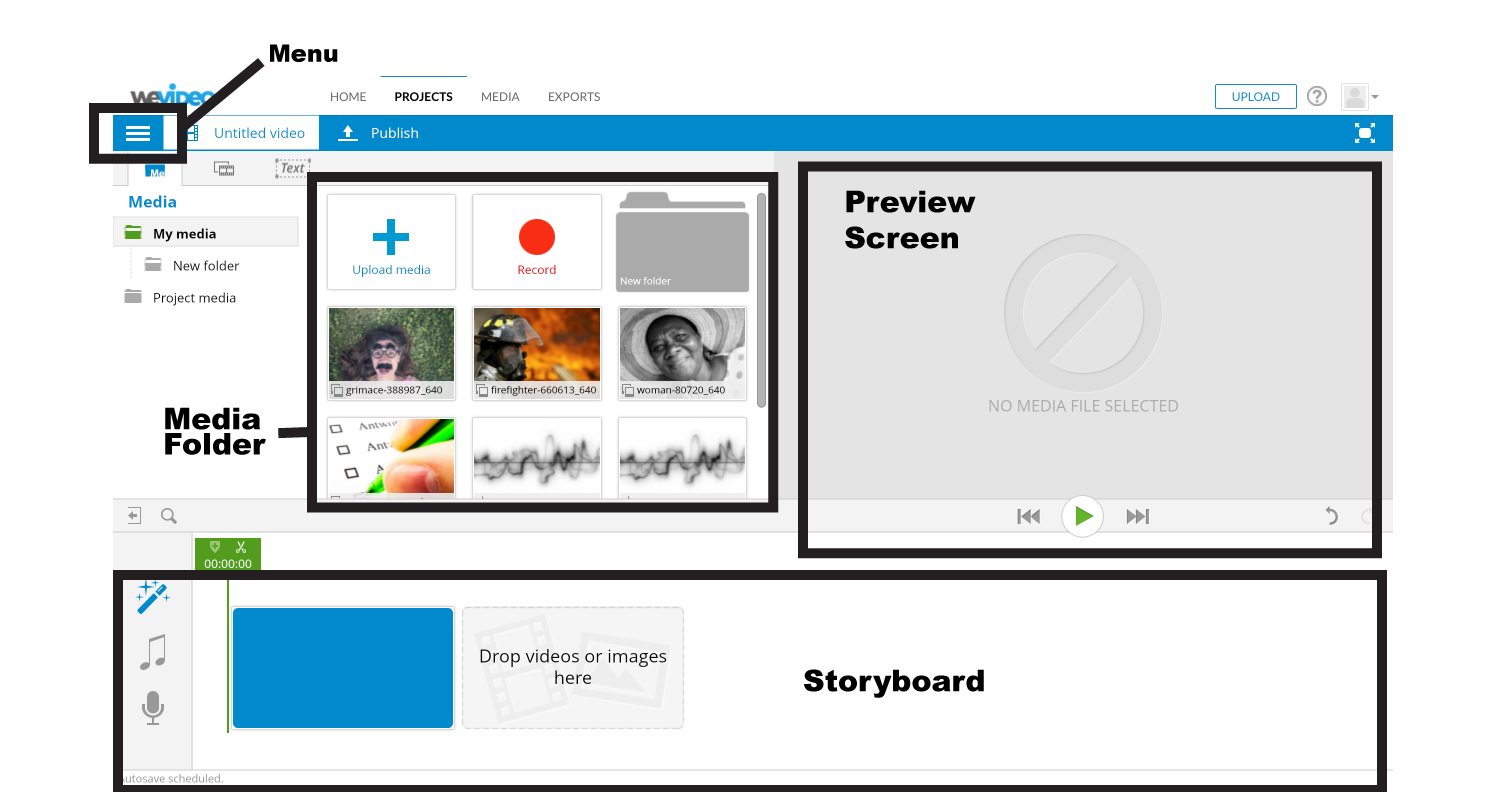
a. On the top left of the Editor is the Menu. Click on it to see a number of options, such as SAVE. Click anywhere else on the screen and the Menu will disappear.
b. Below the Menu is a folder called MyMedia. It displays all of the visual media you have uploaded. There is a grey scroll bar on the right side of the area that holds all your visual media. If you click down on it and don’t release your finger, you can move that bar up and down to see all of your media. Try this.
c. Beside the media panel is a Preview Screen. It has a button to rewind, play, and fast-forward. This space allows you to see what your digital story looks like while you build it. Press play and watch what happens.
d. Along the bottom of the Editor is a Storyboard, similar to the one you made on paper. This is where you arrange your visual media in the right order, decide how long each image will appear, and add a soundtrack.
If you are using a print version of this book, refer to the online version for videos that guide you through the steps below.
Giving Your Digital Story a Title
1. Find the first box in the storyboard. Hold your mouse pointer over it.
2. Click the EDIT button that appears.
3. Click in the grey box. Type in a title for your digital story.
4. Click the green DONE EDITING box.
5. Click on the Menu and click SAVE.
Adding Images to the Storyboard
1. Note what image is supposed to appear first.
2. Find the image in your MyMedia folder. Hold your mouse pointer over it.
3. Click the ADD button that appears. The image will appear in the storyboard at the bottom of the screen.
Changing the Order of Images in the Storyboard
1. Hold your mouse pointer over the image you want to move. Move your mouse pointer to the sides of the image until the pointer turns to four arrows.
2. Left-click and keep holding the mouse button down. The four arrows will turn to a grabbing hand. Move the mouse to position the image in the right spot. Let go of the button when the image is in the right position.
Deleting Images from the Storyboard
1. Hold your mouse pointer over the image in the storyboard you want to delete.
2. Click the trashcan button.
Changing the Timing of an Image
Your goal is to get the images to match the voiceover in the way you planned on your paper storyboard.
1. Click the rewind button under the preview screen. It looks like two arrows pointing backwards.
2. Click the play button. Watch the video to see how the image matches up with the voiceover. Decide whether the image appears for too much time or too little time. Press the play button again to stop the preview.
3. Hold your mouse pointer over the right side of the first box in the storyboard. The pointer will change to two arrows. Click down on the mouse button and don’t let go. Drag the mouse to the left to make the image appear for a shorter time. Drag the mouse to the right to make the images appear for a longer time.
4. Click the rewind button.
5. Click the play button. Watch the video to see whether the image appears for the right amount of time. Press the play button again to stop the preview.
6. Repeat steps 1 to 5 until the image shows for the right amount of time. When that image is done, work on the next image right beside it.
Continue these steps until the images match the voiceover in a way you are happy with.
Adding a Soundtrack
1. Click the MUSIC NOTE button on the left side of the storyboard.
2. Click the FREE MUSIC folder.
3. Choose a folder with a name that matches the tone of your story, such as “Serious, sad, worried” or “Exploring, tension.”
4. Click on a song and listen to how it sounds. Repeat until you find one you like.
5. Turn the volume down so viewers will be able to hear your voiceover above the soundtrack. To do this, click on the volume slider and don’t let go of the button. Drag the slider to the left to make the soundtrack quieter.
6. Click the USE THIS TRACK button.
7. Rewind your digital story.
8. Press the play button to see how everything looks and sounds together.
You can repeat these steps to choose a different song.
Exercises
Nazbah Tom is a Two-Spirit person from the Diné Nation. A Two-Spirit person is an Aboriginal person who has both a masculine and feminine spirit. Mountain of Stories is a digital story about when Nazbah came out to her mother as Two-Spirit. “Coming out” is the process of telling someone you are queer*, trans, or Two-Spirit. When people come out, they may experience the loss of friends and family, unfair treatment, and violence. As a result, coming out can be a difficult process.
As you watch Nazbah’s story, think about these questions:
- How do the images help you understand the story?
- How does the music help you understand the story?
- How does Nazbah’s voice help you understand the story?
- What tone do the images, music, and Nazbah’s voice work together to create?
Watch Mountain of Stories.
*Queer can be used to refer to people whose sexual orientations and gender identities fall outside of what society traditionally expects. This term has been — and still is — used in hateful ways, so some people feel uncomfortable with it. It is important to use this word with care.
Media Attributions
- Filmstrip © Erbs55 is licensed under a Public Domain license
- Features-of-Editor © WeVideo adapted by Shantel Ivits
Not named
Put something where people can see it
A bar along the bottom or side of a computer window that you move with a mouse to see parts of the window that are hidden
An example of what something will look like
To become visible
An arrow that is on a screen and can be moved with a mouse
Notice or pay attention to
Related to boys and men
Related to girls and women
