Chapter 4 – Remove Facial and Nape Hair
4.1 Introduction to the Straight Razor Shave
The straight razor provides the closest, smoothest shave possible. It is a sharp tool that should be used with caution, as it requires skill and a steady hand.
Before we get started with the straight razor shave service, let’s first review the following topics:
- The pre-shave consultation
- Razor handling
- Razor strokes and corresponding shaving areas
- Types of shaves
- How to hone and strop the razor
The Pre-Shave Consultation
During the pre-shave consultation, the barber/stylist will assess:
- The skin
- Growth patterns
- Medical issues/concerns
- Skin sensitivities
Keep in mind that face shape and head shape need to be considered if a partial shave is to be performed, such as a beard shave with a moustache shaping.
Before assessing the client’s skin and growth patterns, it is a good idea to inquire about their use of facial products and/or medications. Some medications and skin care products, such as Accutane and Retinol, can cause the skin to be more sensitive and easily irritated by the shave process. This is also the time to find out if the client has had other sensitivities in the past, such as a reaction to shaving products, an acne breakout after shaving, or whether they have an aversion to the application of hot or cold towels.
Now it’s time to assess the skin prior to the straight shave service. Carefully check the area that is to be shaved for blemishes, moles, or any lesions of the skin. Additionally, if you plan to perform an outline and nape shave, be sure to check the nape area, sides of neck, and behind the ears. Provided there is no communicable skin diseases, open wounds, or skin irritation, it is safe to perform the shave service. Always use caution when working around moles and any other raised areas of the skin.
Razor Handling
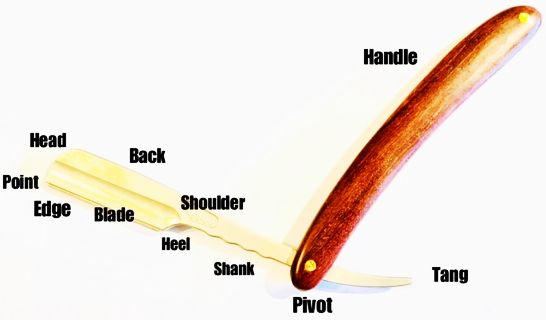
Razor Components
Before moving on to the razor handling procedure, take a moment to familiarize yourself with the components that make up the standard straight razor. If you have your own razor, lay it open on the table in front of you and identify its parts using the diagram below:
Razor Handling Procedure
Once you have familiarized yourself with the components of the razor, have a look at the images and instructions below. We suggest that you follow along to practice the procedures to open, hold, and close the razor.
Once you have familiarized yourself with the components of the razor, have a look at the images and instructions below. We suggest that you follow along to practice the procedures to open, hold, and close the razor.
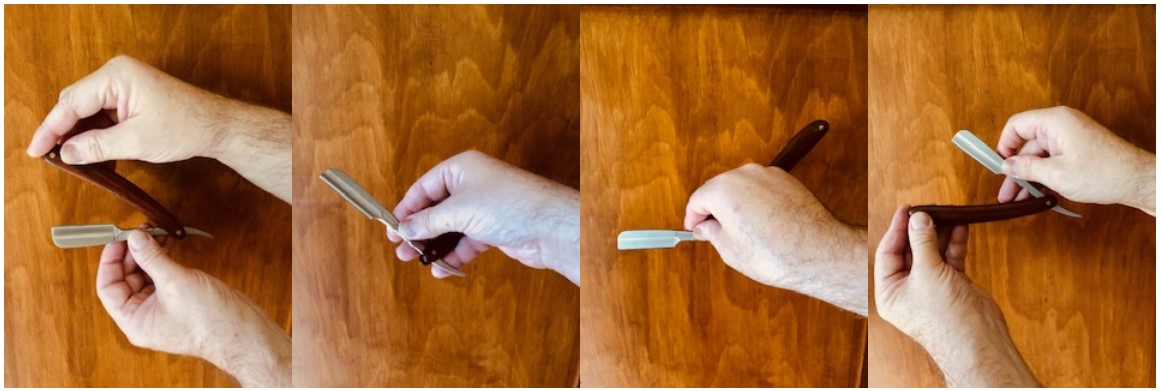
- Open the razor using the thumb and index finger from your dominant hand to grip the back of the blade. Thumb on one side, index finger on the other side.
- The pivot allows for the blade and handle to separate. At this time, shift the little finger of your dominant hand to place it on the tang while the handle is poised into an upward position.
- The razor must be held by the shank near the shoulder of the blade with the thumb on one side and the index finger on the other side, with the blade shoulder between them. Place the second and third fingers to rest along with the little finger being used to brace the razor.
- When you wish to close the razor, simply allow your little finger to release, then bring the handle back up to the blade. Be sure that the handle is not struck by the cutting edge while closing.
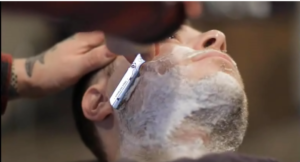
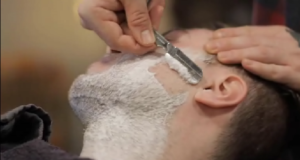
Razor Strokes and Positions
The term razor stroke is used to describe the razor while it is in motion and shaving the skin’s surface.
The way in which the barber/stylist holds the razor in their hand to perform a stroke is called the position. The position will determine the angle of the blade and the direction in which the strokes will be performed. The optimal angle for the blade while shaving the skin is 30 degrees, with the point of the razor leading the stroke.
It is not recommended to shave against the grain of the hair growth pattern, therefore the razor should be positioned to shave with the grain.
There are four razor positions that barbers use to perform shaving services:
- Freehand
- Backhand
- Reverse freehand
- Reverse backhand
Let’s review each of the four razor strokes in further detail, followed by the areas of the face in which each stroke is utilized.
Freehand Stroke
 Use your dominant hand to hold the razor. Rest the handle between the third and fourth fingers, while resting the little finger on the end of the tang. The thumb should rest firmly on the side of the shank close to the shoulder of the blade.
- The hand should be turned somewhat outward from the wrist with the elbow at a level that is comfortable.
- Be sure the fingers of your other hand are clean and dry, so as to allow you to hold or stretch the skin without slipping.
Backhand Stroke
 At the pivot, hold the shank of the razor securely between your thumb and first two fingers while holding the razor in a reasonably straight position.
- Rest your third and fourth fingers on the backside of the handle.
- Position the back of your hand away from you while bending the wrist slightly downward. Your elbow should be raised in order for your arm to be able to have the freedom of movement.
Additional approach: With a slightly bent handle, rest the third finger on the end of the tang, while the fourth finger is bent into the palm. This position is used when the barber/stylist favours performing the backhand stroke with movement of the arm versus the movement of the wrist. If wrist movement is preferable simply do not hold the arm as high.
- Be sure the fingers of your other hand are clean and dry, so as to allow you to hold or stretch the skin taut without slipping. The skin under the razor should be stretched opposite the direction of the stroke.
- Strokes are to be lead by the point of the razor as you are performing short, gliding strokes away from you in a forward movement.
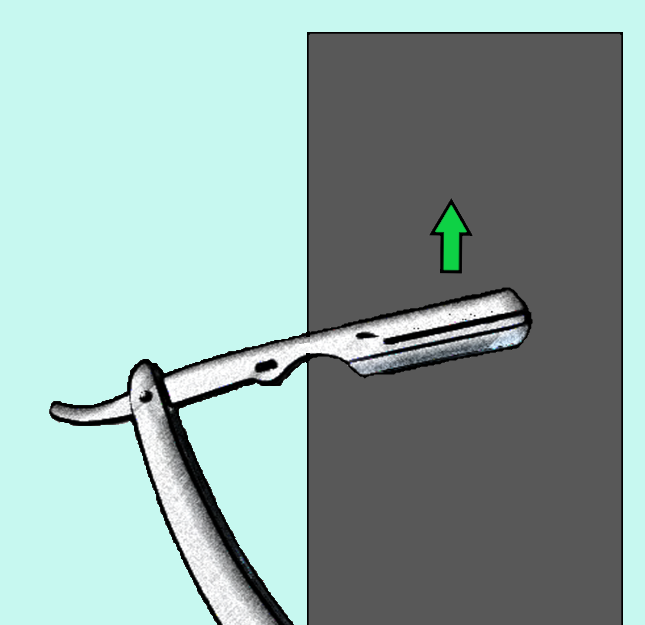
Reverse Freehand
 Securely hold the razor in the freehand position.
- Turn your hand towards you so that the edge of the razor is facing upwards.
- Be sure the fingers of your opposite hand are clean and dry, so as to allow you to hold or stretch the skin taut without slipping while the razor strokes are performed.
- Place your fingers below or on the backside of the razor opposite to the edge of the blade, as well as the direction of the stroke.
- Perform gliding movements towards you while using semi-curved strokes.
- To perform this movement, use the forearm with little twist to your wrist.
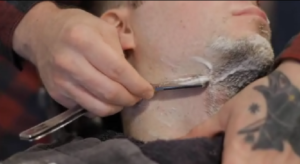
Reverse Backhand Stroke
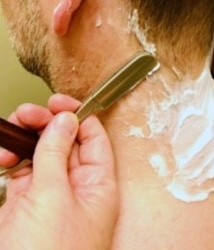 Securely hold the razor in the backhand position while turning the wrist so that the palm is positioned upwards.
- Allow the elbow to fall downwards so it is positioned to the side.
- Your opposite hand should be positioned comfortably so as to pull the skin taut when the razor strokes pass over the skin.
- With your hand positioned on top of the razor, you will perform fluid gliding movements.
- You will perform downward strokes down the sides of the neck.
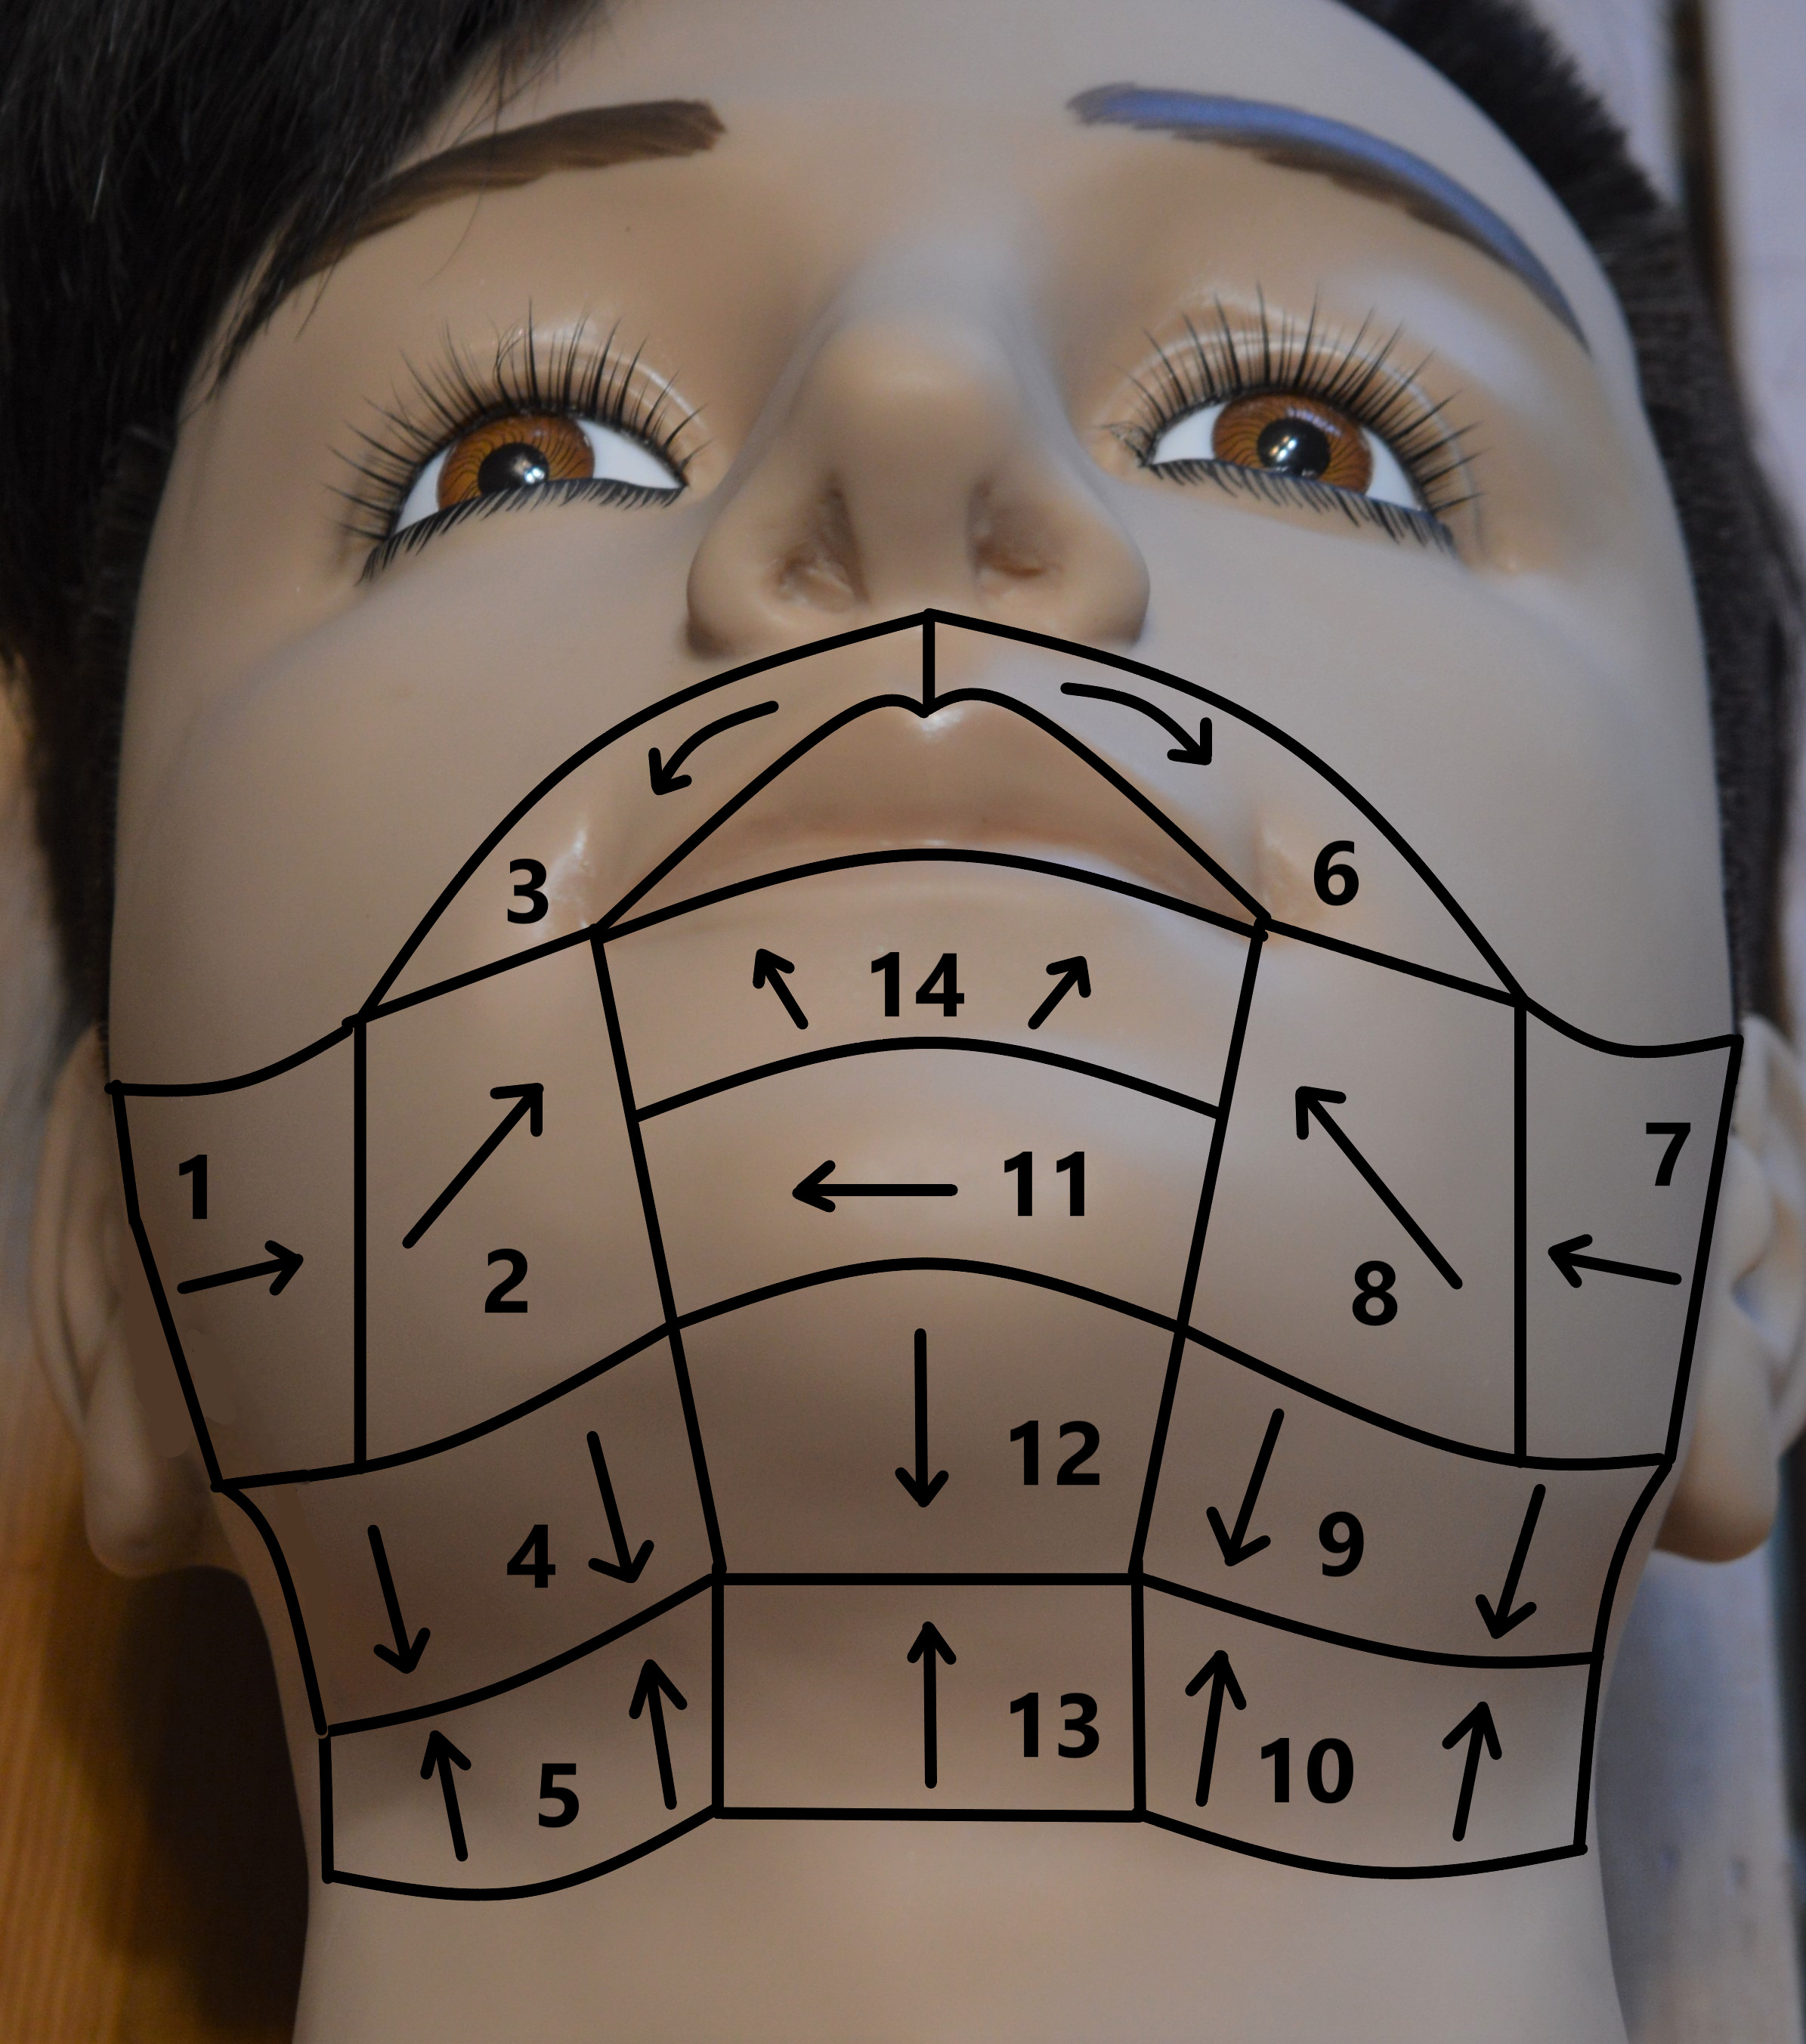
Shaving Areas
In order to perform a facial shave in a systematic way, the shave zones are divided into fourteen specific areas. It is important to learn the order and direction in which each of these fourteen areas are to be shaved, as well as knowing which razor stroke is to be used in each area.
The diagram photo below outlines the fourteen areas of the facial shave and shows which stroke is used in each. A left handed barber will invert the diagram, beginning on the left side.
 Free-hand
- Back-hand
- Free-hand
- Free-hand
- Reverse free-hand
- Back-hand
- Back-hand
- Free hand
- Back-hand
- Reverse free-hand
- Free-hand
- Free-hand
- Reverse free-hand
- Reverse free-hand
Exercise
Sketch and label the diagram above on a head sheet or a mannequin to familiarize yourself with the fourteen shaving areas.
The table below has been created as a quick reference guide to assist the student stylist/barber in learning the strokes and directions that are to be used in each of the fourteen areas. The left of this chart informs the right handed barber of the appropriate stroke and direction; whereas the right side of the chart informs the left handed barber.
| Shaving Area | Position and Stroke | Stroke Direction | Right-Handed Barber: Area of Face | Left-Handed Barber: Area of Face |
|---|---|---|---|---|
| 1 | Freehand | Down | Start at RIGHT sideburn move towards the jawbone and angle of mouth. | Start at LEFT sideburn move towards the jawbone and angle of mouth. |
| 2 | Backhand | Down | From the angle of the mouth move towards the chin. | From the angle of the mouth move towards the chin. |
| 3 | Freehand | Down | From the centre of the upper lip towards the RIGHT corner of the mouth. | From the centre of the upper lip towards the LEFT corner of the mouth. |
| 4 | Freehand | Down | RIGHT jawbone to grain change. | LEFT jawbone to grain change. |
| 5 | Reverse Freehand | Up | RIGHT side of neck up towards the grain change. | LEFT side of neck up towards the grain change. |
| 6 | Backhand | Down | From the centre of the lip to the LEFT side of the mouth. | From the centre of the lip to the RIGHT side of the mouth. |
| 7 | Backhand | Down | From the LEFT sideburn towards the jawbone and angle of the mouth. | From the RIGHT sideburn towards the jawbone and angle of the mouth. |
| 8 | Freehand | Down | From angle of the mouth towards the point of the chin. | From angle of the mouth towards the point of the chin. |
| 9 | Backhand | Down | From the LEFT jawbone to the grain change. | From the RIGHT jawbone to the grain change. |
| 10 | Reverse Backhand | Up | LEFT side of the neck to the grain change. | RIGHT side of the neck to the grain change. |
| 11 | Freehand | Across | Across the chin from LEFT to the RIGHT. | Across the chin from RIGHT to the LEFT. |
| 12 | Freehand or Backhand | Down | Under the chin to the grain change. | Under the chin to the grain change. |
| 13 | Reverse Freehand | Up | Centre of the neck to the grain change. | Centre of the neck to the grain change. |
| 14 | Reverse Freehand | Up | Under the lower lip. | Under the lower lip. |
Types of Shaves
There are three main types of shaves traditionally practiced in barbershops:
- The first time over: The standard shave service performed in barbershops today. It is performed using a lather on the beard and by shaving in the direction of the grain. This shave removes all visible hair growth and leaves the skin smooth and without irritation.
- The second time over: This shave is performed immediately after the first time over to create a closer shave by removing any remaining hair. The second time over shave is generally performed on dampened skin with no lather, while working with or across the grain.
- The close shave: A shave that is typically not practiced, unless the client has a particularly challenging beard or growth pattern, in which the first time over and second time over shaves were not enough to adequately remove all of the hair. This shave is performed against the grain, therefore it is not commonly performed as it is more likely to cause irritation, ingrown hairs, and the possibility of infection.
How to Hone and Strop the Razor
Honing and stropping the razor is what maintains its sharp edge. If the razor begins to pull while shaving, and the resulting shave is not smooth, then it is time to hone and strop your blade.
Honing is the first step to sharpening the blade and consists of lightly passing the razor, leading with the edge, over a gritted stone. Hones come in various grits ranging from coarse to fine. Generally, a razor will be passed over a larger grit first, then a smaller grit, in order to gradually work down the delicate edge.
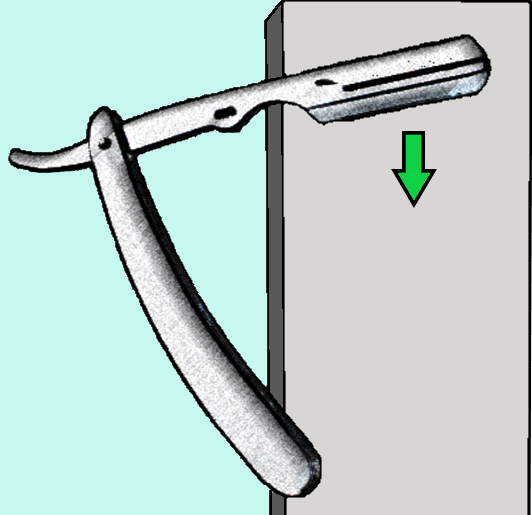
Stropping is the second and final step to sharpening the blade. To strop the razor, the blade is passed, leading with the back, along a canvas or leather strap. This action refines and smooths the honed blade into a precise cutting implement.
In the video below, you will see the honing and stropping procedure:
Video: Honing and Stropping with Straight Razor
Note: This video has no dialogue.
Media Attributions:
- Razor Components by Gary Franceschini is licensed under a CC BY 4.0 Licence.
- Razor Handling by Gary Franceschini is licensed under a CC BY 4.0 Licence.
- Razor Strokes by Michael Kluthe is licensed under a CC BY 4.0 Licence.
- Shaving Areas Diagram by A. Magtiza is licensed under a CC BY 4.0 Licence.
- Honing and Stropping by A. Magtiza is licensed under a CC BY 4.0 Licence.
- Honing and Stropping with Straight Razor by gentscom is licensed under a Standard YouTube License.
When referring to hair, the grain is the direction in which the hair grows from the follicle.
Ingrown hairs are the result of dead skin cells congesting the hair follicle. This causes the hair to grow sideways or turn back onto itself underneath the skin, rather than growing upward to the skin's surface as expected.
