Section 3: Consent & Sexual Violence Training Guide
Slide Deck Outline
This section complements the facilitator notes included in the slide deck. It provides suggestions on alternative ways of facilitating activities and how to “go deeper” into topics depending on time available, audience interest, and goals for the training.
Activity #1: Participatory Group Agreement (Slide 4)
Time: 8 minutes
Measurable objectives: Promote safety and learners’ engagement. Identify learners’ needs.
F2F
Materials needed: sticky notes and pens, flipchart paper with the heading: Group Agreements.
Activity description: Place the flipchart in the middle of the room or in a place where all learners can see it, invite learners to write down what they need to feel comfortable and safe in this training onto their sticky notes and place them on the flipchart. Facilitator reads aloud the sticky notes and asks learners to provide examples, if needed. Express appreciation for the learners’ engagement and input into such an important first activity of the training.
Online
Needed: Zoom white board feature, slide title: Group Agreement on the white board.
Activity description: Share your Zoom screen using the white board feature. Guide learners step-by-step on how to access the whiteboard from their own computer. (You may want to have a test run before the activity). Type the heading “Group Agreement” on the whiteboard and invite learners to type out what they need to feel comfortable and safe in this training. Type out the group agreements listed on slide 4 and invite learners to add stickers (hearts, stars, thumbs up) to the agreements they value and connect with. Read aloud each statement written and provide some examples on what this might look like during the training. Express appreciation for the learners’ engagement and input into such an important first activity of the training.
Facilitator tips: Some learners may take up more space than others. Pay attention to this dynamic from the start of the session and encourage everyone to participate in ways they feel comfortable. Provide different options for participation such as writing in the chat box. Remind people to share space and encourage learners that have not participated with a gentle reminder such as “Let’s hear from folks that haven’t shared yet.”
Activity #2: Self Care Assessment (slide 5)
Time: 5 minutes
Measurable objectives: Build emotional safety for learners in order to engage with training material. Provide a space for learners to check in with their own wellness and self-care supports.
F2F
Materials needed: Paper for learners, writing materials.
Activity description: Pass out materials to learners. Explain the graphic on the slide as the wellness wheel (download PDF below), which shows us each dimension of factors that can support wellness.
Explain that the wellness wheel aligns with Indigenous traditional practices that view individuals holistically, recognizing that wellness means being in a state of balance with the physical, emotional, academic/career, social, creative, spiritual, environmental, financial, and intellectual aspects of your life.
Let learners know that the group will be taking approximately 3 minutes individually to reflect on our own personal wellness and self-care strategies. Either go through the questions on the slides together or let learners read and reflect on how they will care for themselves during and after the workshop. Acknowledge that the group today is its own small community and that if people have capacity, they can also think about how care may be extended to those around them.
Online
Materials needed: Send learners a pdf version of the Wellness Wheel (download below) or encourage learners to take a screenshot of the wellness wheel if they would like to refer to it later. Learners can use paper or another strategy to keep a note of their wellness/self-care strategies.
Activity description: Explain the graphic on the slide as a wellness wheel, which shows us each dimension of factors that can support wellness.
Explain that the wellness wheel aligns with Indigenous traditional practices that view individuals holistically, recognizing that wellness means being in a state of balance with the physical, emotional, academic/career, social, creative, spiritual, environmental, financial, and intellectual aspects of your life.
Let learners know that the group will be taking approximately 3 minutes individually to reflect on our own personal wellness and self-care strategies. Either go through the questions on the slides together or let learners read and reflect on how they will care for themselves during and after the workshop. Acknowledge that the group today is its own small community and that if people have capacity, they can also think about how care may be extended to those around them.
Facilitator tips: Take some time to think about this for yourself as well. Facilitating trainings of this nature can be a reminder of our own personal experiences and present challenges we may have not anticipated. Think of who and what may be able to support you through this.
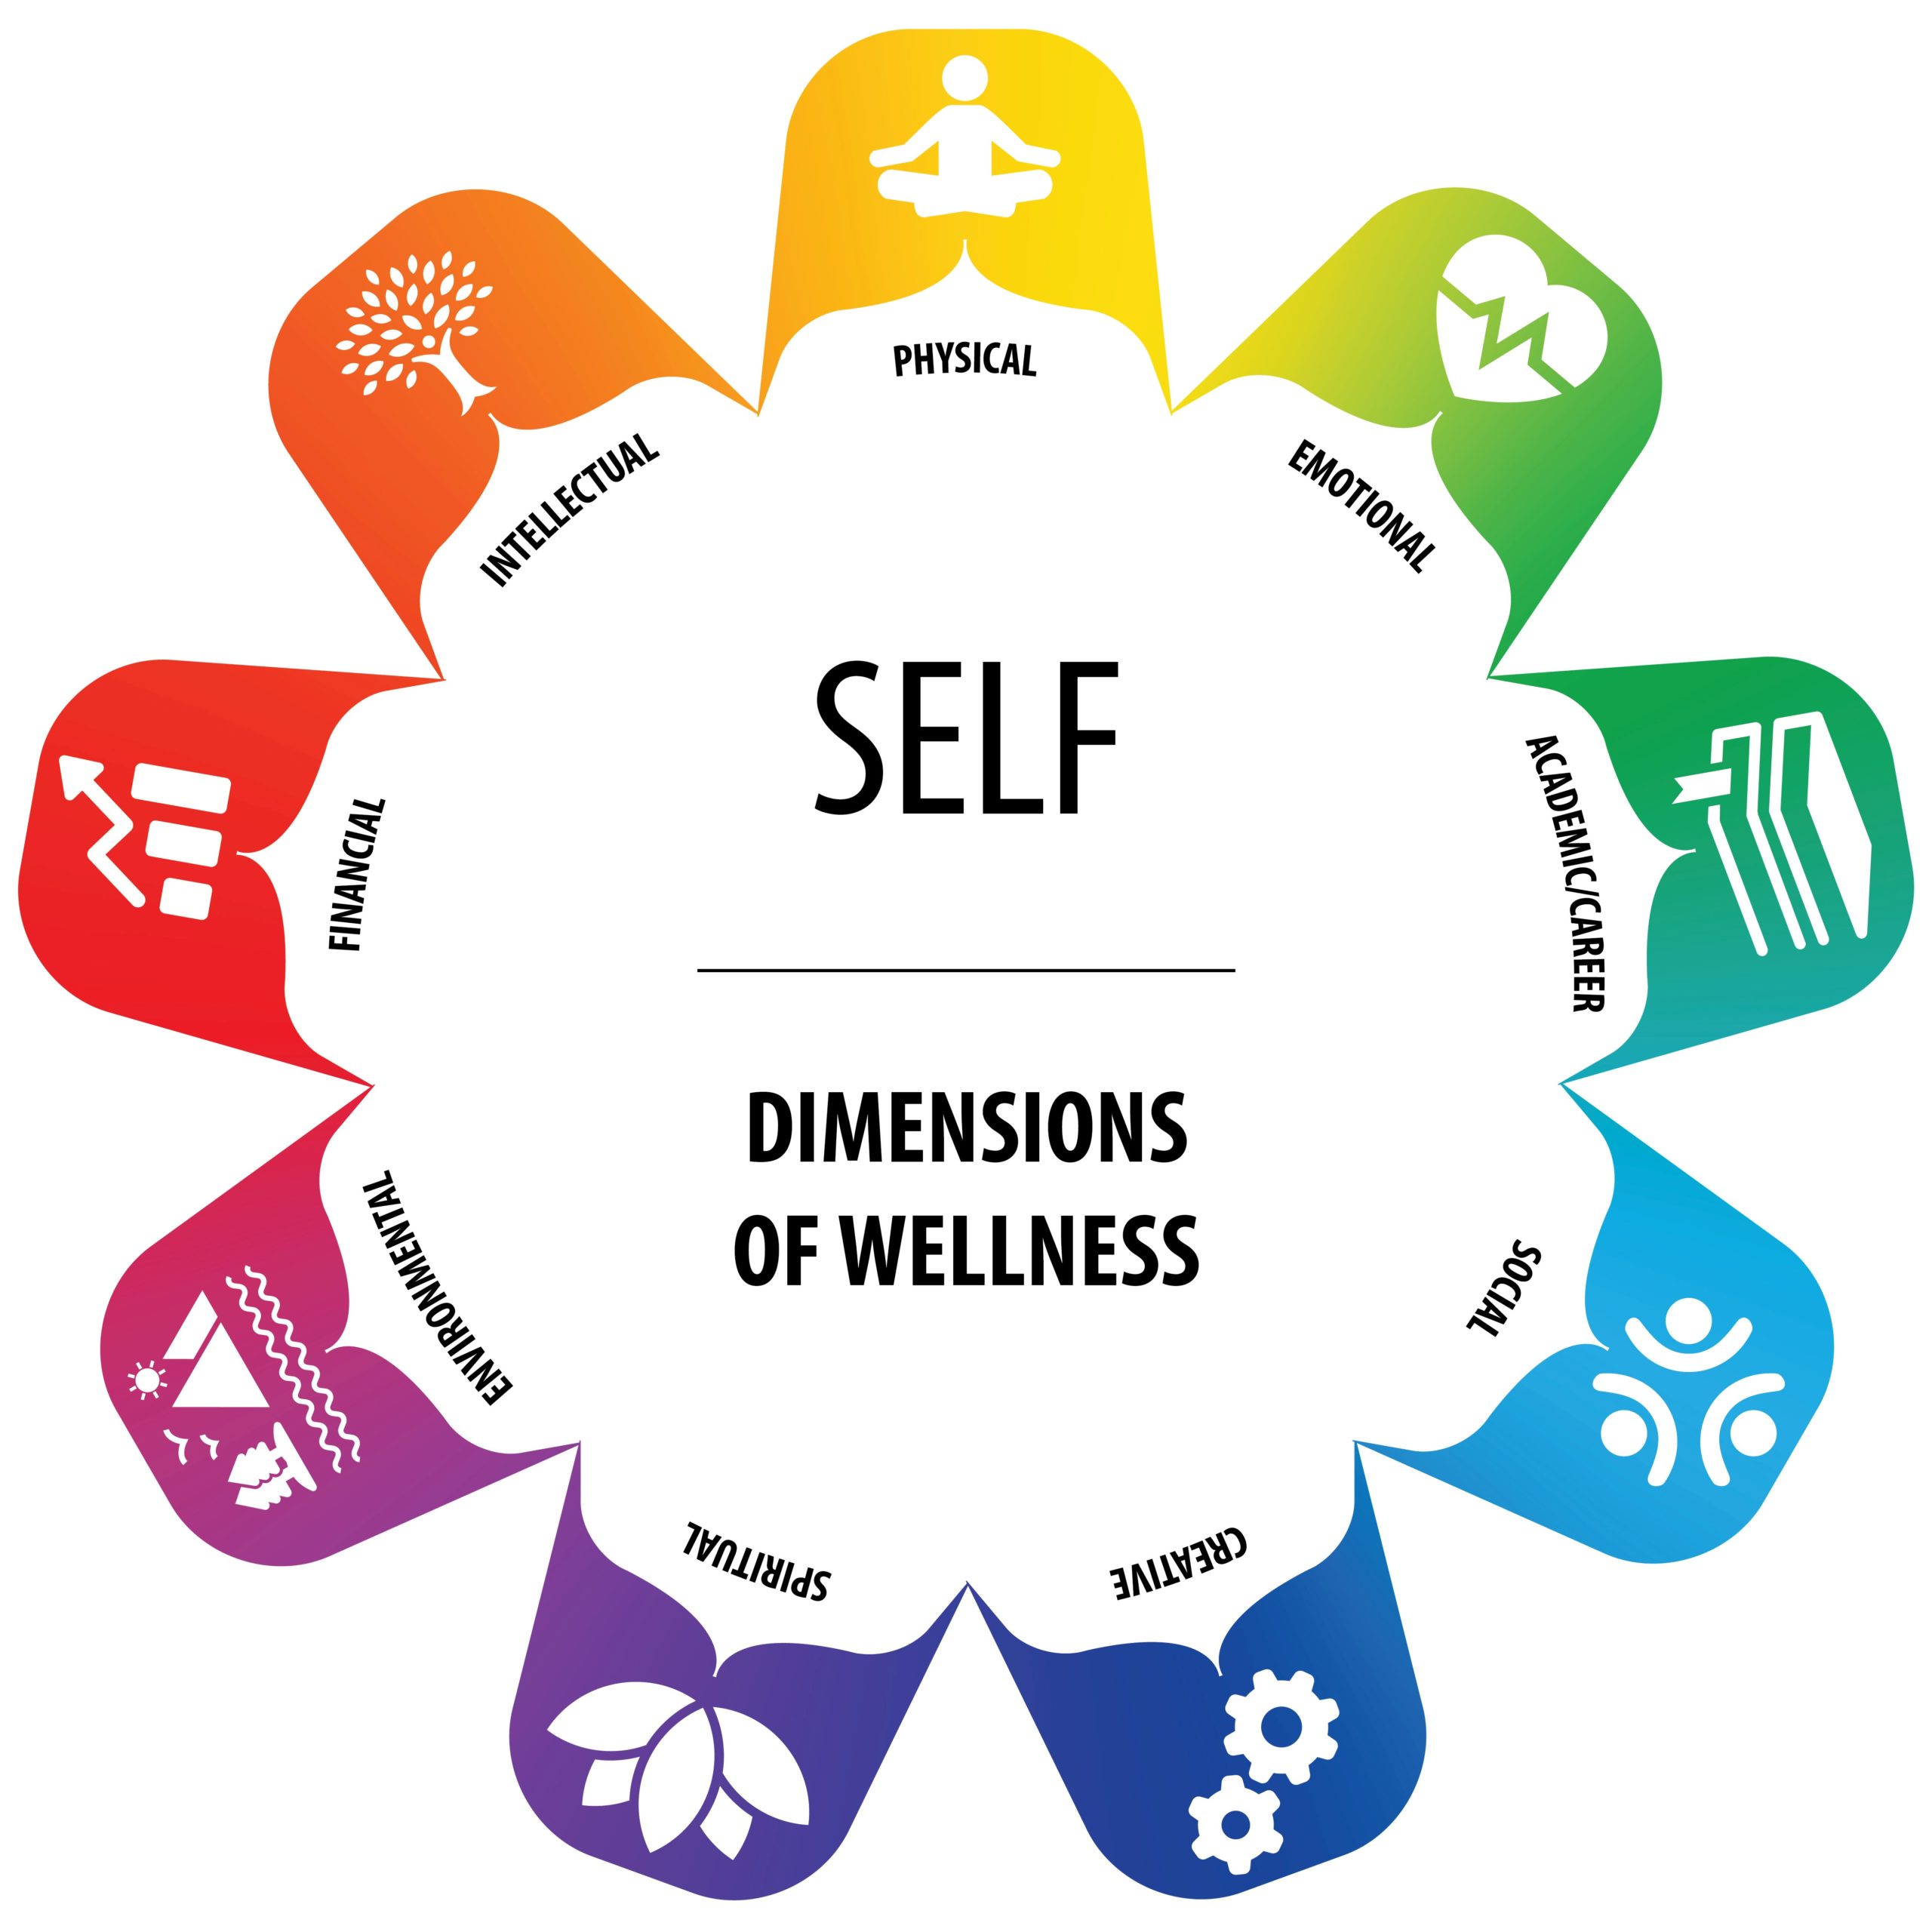
This Wellness Wheel was developed by Jewell Gillies, Musgamgw Dzawada’enux (they/them/theirs), and aligns with Indigenous traditional practices that view wellness holistically. You can download a handout version to share with learners here: BCcampus Wellness Wheel Worksheet [PDF].
Activity #3: Where Are You and Your Ancestors from? (slide 6)
Time: 5 minutes
Measurable objectives: Build trust among learners, promote and give space to diversity in the learners’ identities and backgrounds.
F2F
Materials needed: Large world map, sticky notes.
Activity description: Read the title of the activity and let learners know that this is an icebreaker activity aiming to give space to the diversity present in the learning space. Remind people that this is a quick visual group activity and we will not be diving into any explanations about their backgrounds due to the time limitations.
Encourage learners to put a sticky on their family’s place of origin in case they were born in Canada. Once everyone has completed stamping their place of origin, find a couple of statements that will bring this activity to a close such as: “Thank you for participating and sharing with us where you come from. There is such vast and wide cultural knowledge present in the space and this is really exciting.” The facilitator can also acknowledge how consent is influenced and shaped by different societies and cultures.
Online
Materials needed: Activate annotation on zoom, slide 6.
Activity description: Read the title of the activity and let learners know that this is an icebreaker activity aiming to give space to the diversity present in the learning space. Remind people that this is a quick visual group activity and we will not be diving into any explanations about their backgrounds due to the time limitations.
Encourage learners to sticker/stamp their family’s place of origin in case they were born in Canada. Once everyone has completed stamping their place of origin, find a couple of statements that will bring this activity to a close such as: “Thank you for participating and sharing with us where you come from. There is such vast and wide cultural knowledge present in the space and this is really exciting.” The facilitator can also acknowledge how consent is influenced and shaped by different societies and cultures.
Facilitator tips: Check-in with yourself on your level of comfort locating your ancestry and background. If this is a triggering place/conversation for you, find ways and supports to debrief this with someone in preparation for the activity.
Activity #4: Where Do You Place Yourself in Terms of Discussing Sexual Violence? (slide 7)
Time: 2 minutes
Measurable objective: Briefly assess the learner’s existing knowledge range (pre-evaluation).
F2F
Materials needed: A tool like Poll Everywhere where you can set up a poll that learners can respond to anonymously using their smartphones.
Activity description: Explain to learners that it’s helpful to get a sense of what we all know about sexual violence and our comfort in engaging with this issue. Encourage them to choose a dot and place it in the section that fits where they are today.
Remind learners not to judge themselves or others about their comfort or knowledge. Everyone is here to learn together.
Online
Materials needed: Activate the Annotation function on Zoom or use another polling tool.
Activity description: Explain to learners that it’s helpful to get a sense of what we all know about sexual violence and our comfort in engaging with this issue. Encourage them to choose a dot and place it in the section that fits where they are today.
Remind learners not to judge themselves or others about their comfort or knowledge. Everyone is here to learn and unlearn together.
Facilitator tips: This information will be good to keep in the back of your mind as you go through the rest of the presentation. You may wish to modify the content you had planned, or the way that you deliver the information based on this knowledge. Research and utilize anonymous annotation platforms:
Activity #5: What is Sexual Violence? (slide 8)
Time: 5 minutes
Measurable objective: Identify the learners’ own definition of sexual violence. Meet them where they are at and utilize their language to build up the definition.
F2F
Materials needed: Flipchart, markers.
Activity description: Invite learners to share in their own words how they define sexual violence. Encourage everyone to share either by writing it down on sticky notes or discussing aloud. Remind people to share space if the facilitator notices that the same people are participating.
Once everyone has shared or the flipchart is almost full, continue to connect examples into ideas and define them with the formal definitions of sexual violence.
Online
Materials needed: Activate annotation on Zoom with anonymous features.
Activity description: Invite learners to share in their own words how they define sexual violence. Encourage everyone to share either by writing it down in the anonymous Annotation or open chat. Remind people to share space if the facilitator notices that the same people are participating.
Once everyone has shared or the screen is almost full, continue to connect examples into ideas and define them with the formal definitions of sexual violence.
Facilitator tips: Become familiar with the definitions and examples of sexual violence in order to hold this space for learners. Also identify different definitions of violence such as “any action that causes harm to another person or group of people.” Types of violence: emotional, physical, verbal, sexual, mental, spiritual and financial. Sexual violence is an umbrella term utilized to cover the action of targeting an individual’s sexuality, gender identity or gender expression without that individual’s consent. Sexualized violence can mean different things to different people, depending on time, place, and things you’ve been taught.
Activity #6: Sexual Violence, Consent, and Power & Control (slide 15)
Time: 10 minutes
Measurable objective: Explore how sexual violence is informed by multiple systems of power and control.
F2F
Materials needed: Flipchart and markers.
Activity description: Take time going through each layer of the wheel. Explain that this wheel helps us connect sexual violence to forms of power and control in our society that intersect with people’s personal experiences of violence. It is important to name and address these forces in order to come together and build communities free of violence.
The first layer of the wheel describes aspects of our identities that impact how we are all located in our communities and in society. Some of these factors may change throughout our lives, like our income, our age, our geographic location. Some will not change.
The second layer of the wheel describes types of discrimination and oppression that interact with these personal aspects of our own individual experiences. *Go through and name these forms of oppression. Tell learners that these forms of oppression are held in place by systems and structures in our society, including colonization, enslavement, queerphobia, transphobia, and other aspects of our economic and political systems to name some of these forces.
Lead learners through an activity on the flipchart where you encourage sharing of thoughts on how these layers may impact people’s experiences of sexual violence and consent. You may want to offer an example to prompt more sharing.
For example, many of us may have heard the stereotype of an “angry woman of colour” either in the media, the workplace, or in communities we are a part of. We can note how this stereotype is both gendered and racialized and often used to silence valid criticism coming from Black women and other women and colour about oppression that they are experiencing. We can imagine how this example would be compounded if we add other barriers presented in the wheel such as disability, immigration status, income, etc.
Online
Materials needed: Annotation function on zoom.
Activity description: Take time going through each layer of the wheel. Explain that this wheel helps us connect sexual violence to forms of power and control in our society that intersect with people’s personal experiences of violence. It is important to name and address these forces in order to come together and build communities free of violence.
The first layer of the wheel describes aspects of our identities that impact how we are all located in our communities and in society. Some of these factors may change throughout our lives, like our income, our age, our geographic location. Some will not change.
The second layer of the wheel describes types of discrimination and oppression that interact with these personal aspects of our own individual experiences. *Go through and name these forms of oppression. Tell learners that these forms of oppression are held in place by systems and structures in our society, including colonization, enslavement, queerphobia, transphobia, and other aspects of our economic and political systems to name some of these forces.
Lead learners through activity where you encourage sharing of thoughts on how these layers may impact people’s experiences of sexual violence and consent. Learners can add thoughts with the annotation function on zoom.
For example, many of us may have heard the stereotype of an “angry woman of colour” either in the media, the workplace, or in communities we are a part of. We can note how this stereotype is both gendered and racialized and often used to silence valid criticism coming from Black women and other women and colour about oppression that they are experiencing. We can imagine how this example would be compounded if we add other barriers presented in the wheel such as disability, immigration status, income, etc.
Facilitator tip: Take time to familiarize yourself with this wheel and reflect on what it means to you. Check in with your comfort around presenting material on anti-oppression, and take time reading through material on intersectionality and sexual violence in order to hold space for learners’ reflections. See Section 2: Sexual Violence: Key Concepts and Facilitation Strategies.
Activity #7: Video (options) (slide 21)
Time: 5 minutes
Measurable objective: Participatory reflection on consent.
F2F
Activity description: Invite learners’ comments, questions or “takeaways” from the video presented. Help them expand and change their definition of consent.
Online
Material needed: share screen and computer sound.
Activity description: Invite learners’ comments, questions or “takeaways” from the video presented. Help them expand and change their definition of consent.
Facilitator tips: watch the video before the facilitation and write down your own questions/ reflections. Seek out answers to your questions. Some platforms don’t share video well – the audio can be problematic. Facilitators could share the link and allow learners to take a short break, watch the video, and come back at a set time.
Video Options:
- “Consent: Have the Conversation”. This video was created by the University of Carleton and contains an encouraging, diverse and assertive message promoting the practice of consent. (2012, 1:36)
- “Let’s Talk About Consent”. Written, produced, and directed by NYU students and alumni, this short video reflects 18 hours of interviews with students and recent grads at NYU and across New York City who shared what consent means to them, and the importance of starting a brave conversation on campus (2014, 3:43)
- “Consent”. This animated video developed by Thompson Rivers University defines consent and describes consent in both everyday and sexual relationships (2018, 3:01).
- “Tea Consent”. This viral video asks viewers to think about consent as a cup of tea. (2014, 2:50)
Activity #8: Building communities of consent (slides 24-30)
Time: 40 minutes
Measurable objective: Practice as a group strategies for expressing personal boundaries around consent and saying no.
F2F
Materials needed: Flipchart paper and marker.
Online
Materials needed: Breakout rooms, enable annotation function on Zoom. Slides with scenarios written on them.
Activity description: Connect this activity to the previous slide, mentioning that now we will practice some consent strategies together in small groups of 3 (or more). Put slides of scenarios up on display. Encourage learners to take 5-10 minutes together to go through each and allow each member to practice how they might respond in such a situation.
“There are many opportunities to practice consent in our everyday lives and hopefully after this activity you will have some skills you can take with you, to have in your back pocket to reference and practice with others. This experience is a learning and practice opportunity to obtain consent and to practice setting boundaries.”
Scenarios
- How would you respond if a stranger on the street asked you on a date and you were not interested?
- What if someone asked you the same at a party or a club? How might this impact how you feel expressing this?
- How about if the same thing happened, but this time it was someone at your workplace, or in your classroom/lab?
- How would you respond to someone on a dating app or social media?
Facilitator tips:
- While this activity can be done in groups of two, having three or more people in a group can often lead to deeper discussion and reflection.
- Person 1: Asks for consent.
- Person 2: Practices setting a boundary or saying “no.”
- Person 3: Witnesses the interaction between Person 1 and 2 and offers feedback, e.g., what went well or suggestions for alternate approaches.
If there are more than three people in a group, learners can rotate through the different roles as they move through the scenarios.
- Give learners the opportunity to add details to the scenarios to make them more relevant to their context. (Or, you can create more detailed scenarios ahead of time). Encourage people to keep safety in mind. Although they have agency to play with the scenarios and roles, they should also make sure that all members of the group feel comfortable with the ideas.
- Set some guidelines for the activity. For example, if a group member is not comfortable with a particular role, role model that this is ok; we do not make assumptions or judgement but rather accommodate the needs arising in each group. Encourage group members to offer suggestions from an encouraging and supportive place. You can “visit” with each of the groups to see if anyone needs support or has questions and to assess safety. Group members, remember to offer suggestions from an encouraging and supportive place as you reflect on the activity.
Additional Scenarios
Depending on your audience’s needs, interests, and concerns, you might want to use the following scenarios or to develop your own additional scenarios.
- Scenario 1: You are a student in a rural community or a small city, your vehicle is not working because the temperature dropped during the day (winter season) and a new peer/ a school staff offers you a ride home after a long day of class. You have noticed that this person has been overly friendly with you in the last little while and you are not sure what their intentions are. How would you respond to their ride offer?
- Scenario 2: You are an international student and it is your first year of university/ college. You have joined the LGBTQ2IA+ student’s yoga club to meet new friends, and the instructor whom also identifies as a member of the community has been asking you out on a dinner date for a couple of Fridays in a row. How would you respond to their invitation?
Debriefing
F2F
After completing the activity, use flipchart paper to lead the large group through debrief. Ask how the activity was group by group and ask if one speaker from each group would like to share insights. Write up reflections on paper.
Online
After completing the activity, the facilitator can use the annotations function to write up learners’ reflections from the activity. Lead the large group through this by asking how the activity was group by group and ask if one speaker from each group would like to share insights. Write up reflections on the whiteboard or in a Word document using the shared screen function.
After completing the activity, use flipchart paper to lead the large group through debrief. Ask how the activity was group by group and ask if one speaker from each group would like to share insights. Write up reflections on paper.
Here are some suggestions for debriefing the scenarios activity.
- Ask learners: What went well? What was difficult? What else might you try?
- The first scenarios asked learners to practice saying “no” and sometimes this can reinforce the idea that consent is always a “negative.” Ask learners how they might communicate saying “yes.”
- This activity focuses on helping learners set boundaries. You can also ask learners to reflect on how to respond to someone when they say ‘no’ to an invitation or if they’re not sure what the person is communicating. E.g.,
- “We don’t have to ____. I don’t want to pressure you to do anything you don’t want to.”
- “I respect that. Thanks for letting me know.”
- “Thanks for telling me. I want to make sure we’re both into this.”
- “No worries. If you change your mind, let me know.”
- Discuss verbal and non-verbal communication. See Section 3: Facilitation Considerations: Facilitating Discussions about Consent.
- Remind learners that consent is ACTIVE, A CHOICE, A PROCESS, BASED ON EQUAL POWER.
- Remind learners that consent is not ASSUMED, PRESSURED, SILENT, INCAPICITATED.
- Ask learners how this activity might influence how they ask for and give consent in the future.
- Many learners might have “real world” questions like how to give and ask for consent while using alcohol or other substances or when there might be a power difference between them and the other person (e.g., the other person is much younger or older than they are). Help learners come up with suggestions for addressing these concerns by asking other learners for ideas and also share additional resources (e.g., websites, articles, on-campus resources) that they might be interested in reviewing after the training.
Activity #9: Community Actions towards the Elimination of Sexual Violence (slide 32)
Time: 5 minutes
Measurable objective: Learners’ post training evaluation.
F2F
Activity description: Ask the learners for their takeaways, to provide an example of an action or something they will implement in their lives to practice consent.
Online
Activity description: Ask the learners for their takeaways or to provide an example of an action or something they will implement in their lives to practice consent.
Facilitator tips: Make sure to celebrate the learners’ engagement in today’s session. If possible make yourself available after the workshop ends for any questions or follow ups. Be prepared with resources and do not rush your way out the workshop. Give at least 30 minutes post training to “hang around” physically or in the online space.
