Micro-Credential Lifecycle
Chapter Audience:
 Administrators
 Program Managers
 Faculty
Overview of the Micro-credential Life Cycle
Developing any new program in a post-secondary setting requires more or less the same steps. ADDIE (Analysis, Design, Development, Implementation, and Evaluation) is a commonly used framework for thinking through the stages from the initial idea for a program all the way to its retirement (Branson, 1978).
That said, micro-credentials, by virtue of their goals, the population they serve, and their business model (i.e., funding structure), may be a little different to an institution’s standard offerings. For instance, it’s been observed that the mindset adopted when developing a micro-credential may be more similar to how companies develop new products than a typical academic offering (Young, 2017). For this reason, some of the steps may be a little different.
Outlined below are 10 phases in the micro-credential life cycle:
- Ideation
- Team Formation
- Feasibility
- Design
- Approval
- Marketing
- Build
- Launch and Delivery
- Recognition of Learning
- Evaluation
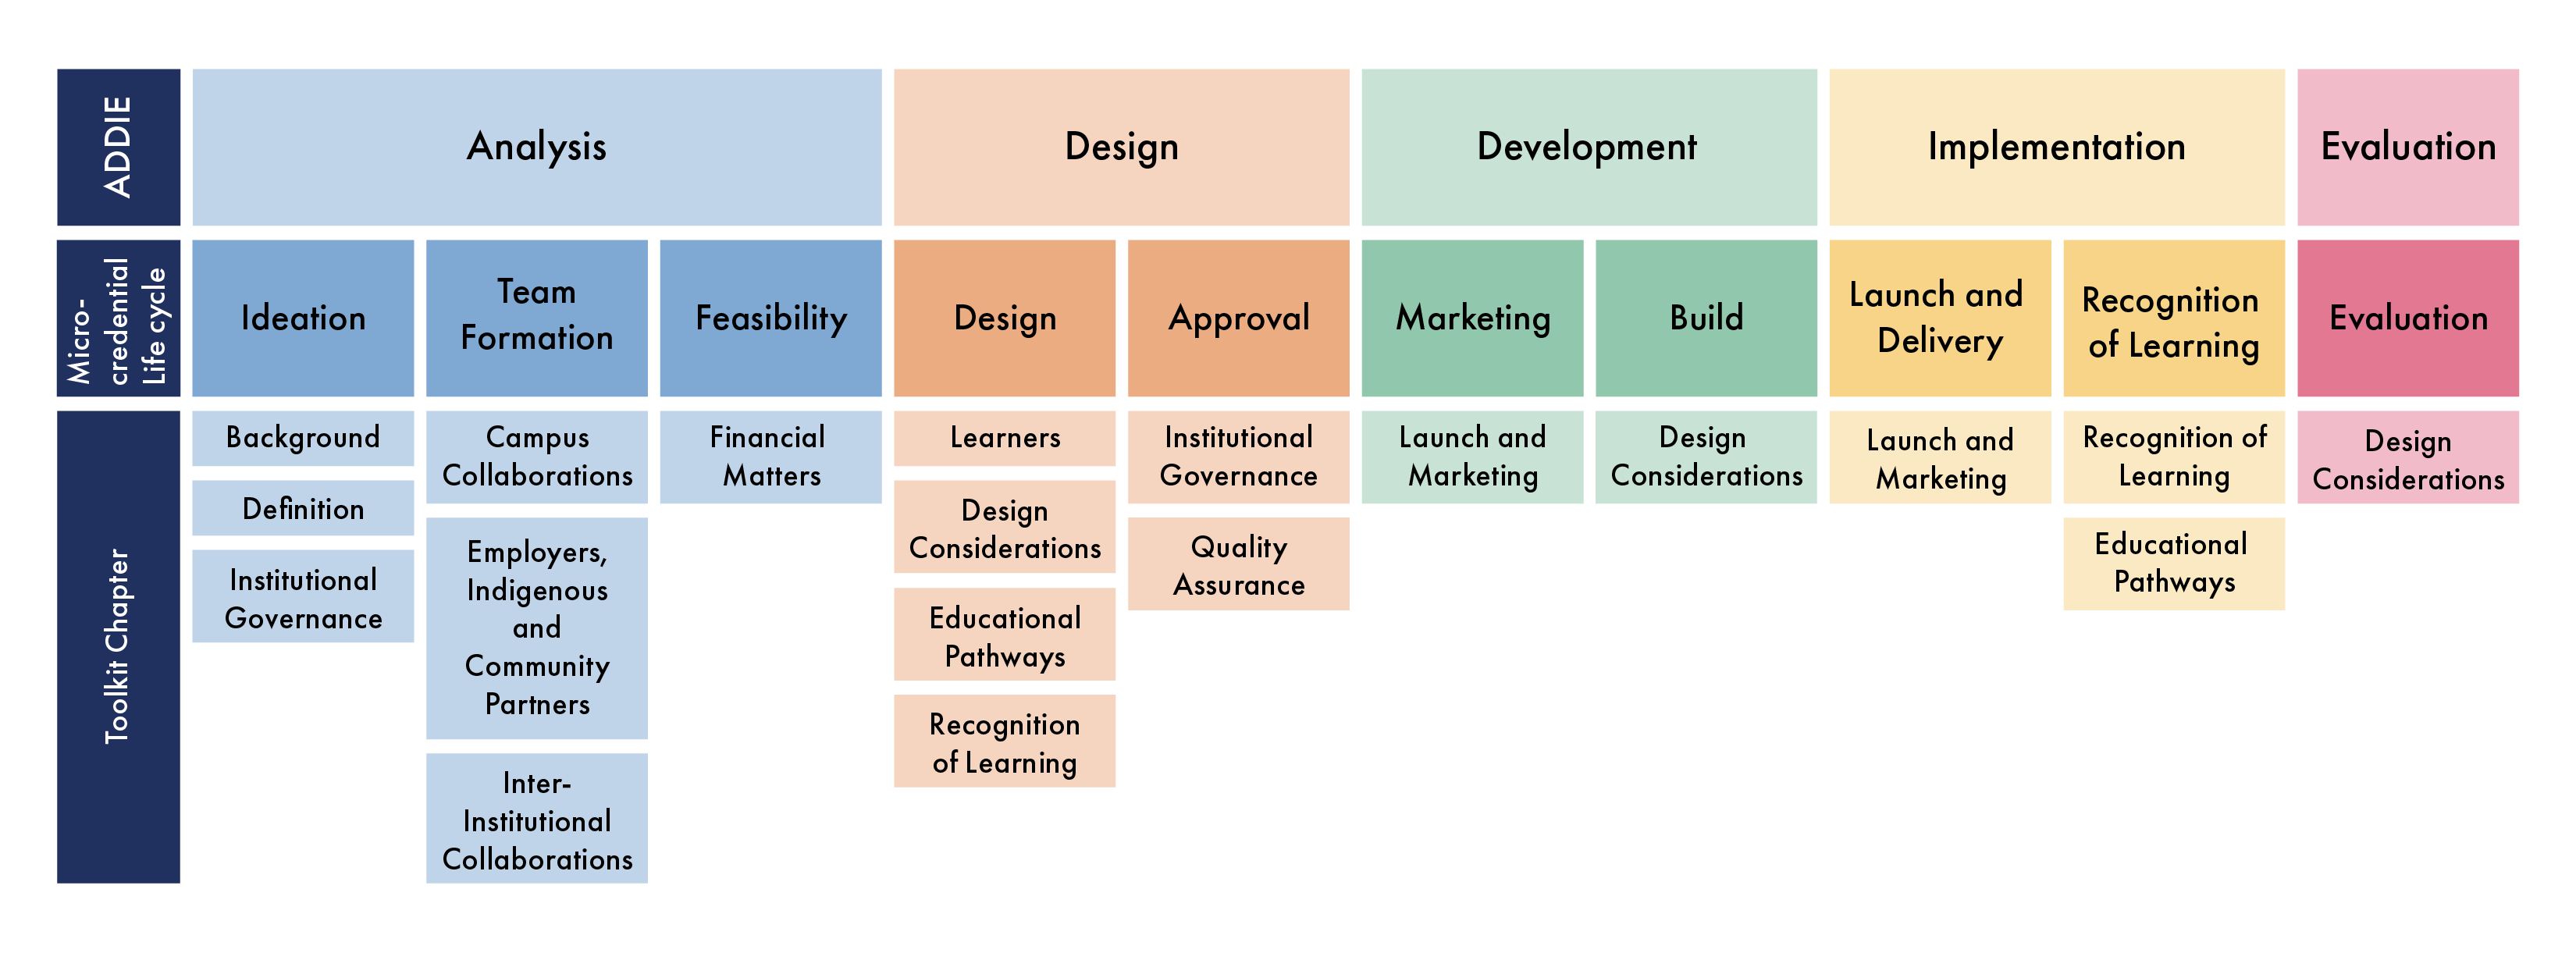
Figure 1 shows how the 10 phases align with the familiar ADDIE framework as well as to the chapters in this toolkit. While these steps are presented in a linear fashion, it should be acknowledged that the development and offering of a micro-credential may be envisioned as a circular process where the last step, which is evaluation, serves as a springboard to inform the next iteration of the same (or another) micro-credential. Also note that the chronology of the phases may differ in some institutions. For example, each institution’s governance processes may position the approval step in a different place.
Phases of the Micro-credential Life Cycle
1. Ideation
Micro-credentials can be initiated in a variety of ways: by employers to solve an industry gap, or by an institution, community, or learner need.
- Explore and learn about micro-credentials in B.C. and beyond. Begin with the Micro-credential Framework for B.C.’s Public Post-Secondary Education System. Read about the current state of design and implementation. Investigate exemplars to inspire your thinking.
- Consider what your institution is known for. What are its programmatic strengths? This area may be a good place to start when looking for a micro-credential topic as the institution’s reputation will help you market the program.
- Talk to the target population you are hoping to serve. What are their pain points? What stands in the way of their goals and success? What are their wants and aspirations? What educational needs do they have?
- Use information such as job postings and labour market outlook reports to conduct labour market research to identify employer or community training needs. The government and certain professional associations periodically conduct surveys of their membership and publish reports on job market trends and outlook in a region (e.g., WorkBC’s Research the Labour Market site). Perusing a list of available training grants may also suggest priorities and workforce development needs.
- Talk to faculty at your institution who regularly engage with industry. What do their contacts notice as trends and training needs? Speak with senior leaders at your institution – they regularly engage with leaders outside the institution and may be able to not only inform your thinking but also provide industry contacts.
- Connect with local employers and professional bodies to inquire if they are interested in participating in a focus group. From these discussion sessions, determine what necessary knowledge, skills, and attributes (i.e., competencies) these industries would like their employees to have.
- Conduct an environmental scan of educational opportunities offered by other post-secondary institutions and private trainers. From this, identify the unique opportunity that you may serve.
- Review your institution’s offerings to determine what already exists and what gaps may be filled.
- Identify the purpose of a micro-credential, or what needs the micro-credential will address. Articulate your “why” clearly. Prepare an elevator pitch or a one-pager – this will come in handy in the next phase.
- Identify the target audience and at what level the micro-credential could be offered (e.g., is it aimed at professionals who already have a degree? Or, is it aimed at undergraduates who are currently completing a program of study?)
2. Team Formation
Once you have an idea for a micro-credential, socialize it. Engage in conversations with potential stakeholders in and out of your institution to build awareness and test whether the idea has merit. In doing this, you will identify potential allies who share your vision and encounter critics whose objections you will need to carefully consider. Use this period to identify who could collaborate on the project. This includes internal members of the project team who will be directly involved, but also stakeholders within and outside of your institution whose input will be critical to the success of the project.
- Identify leaders within your institution who will champion and support the project.
- Identify the people who will be tasked with the primary responsibility of bringing this project forward. These could be a project manager, faculty, instructional designers, and a project lead.
- Identify the departments within the institution that would be impacted by the launch of a micro-credential and reach out to them to inquire about their perspective on the project and considerations for their participation (e.g., timelines, resources). This may include your institution’s marketing team, registrar’s office, prior learning assessment and recognition (PLAR) office, school of continuing education, senate or deans’ council, centre for teaching and learning, etc.
- Engage external partners such as employers who may provide expertise about the field to gauge their interest in collaborating on a micro-credential.
- Contact potential students to ask for their opinion on a prospective program.
- If the goal is to offer the micro-credential across the province, consider partnering with other post-secondary institutions. Which institution could make a good partner, and why?
- Discuss the idea with potential funders to identify available or upcoming funding opportunities.
Assembling a Micro-credential Team
Typically, the design of a micro-credential is a team-based effort. Members of a micro-credential internal team usually involve the following members:
Project Lead
The project lead coordinates the activities of each member of the team to ensure that the project moves forward. This person initiates the project and holds it together. They should be aware of each aspect of its development. This person should be a good problem solver, able to navigate internal processes and external collaborations.
Project Manager
The development of a micro-credential is a team-based activity with many stakeholders and moving parts. It is also often done under tight deadlines. To ensure success, many micro-credential teams employ a dedicated project manager who monitors progress and ensures communication across the team. Depending on the team’s composition, this is a function that is sometimes performed by a dedicated person, sometimes by the project lead, and sometimes by the instructional designer.
Employer Engagement Lead
Getting employers and external partners such as other institutions on board early is critical. This person should have a track record of successful partner engagement and be able to speak their language and get calls returned. When a dedicated person cannot be assigned to this role, it usually falls to the project lead.
Subject Matter Expert (SME)
The subject matter expert is a content expert who knows the discipline or topic that will be the focus of the micro-credential. They participate in the design and development of the micro-credential. This person may be a faculty member employed by the institution or they may be industry or community experts who have experience “on the ground.”
Instructional Designer
This person (sometimes called an educational or curriculum or program developer) has a background in adult learning and can guide the design and development of the program. They work closely with the subject matter expert(s) and industry partners to harness the content knowledge and convert it into learning experiences and the evaluation of competencies. Depending on the needs of the micro-credential, they will also have expertise in learning management systems or other digital tools to design online learning. They may be attached to your institution’s centre for teaching and learning. It may be helpful for them to have access to your institution’s systems (e.g., student registration system) to input program information and communicate with other departments such as the registrar’s office.
Champion
Sooner or later, you’re going to need this person — someone at the director, dean, or vice president level who believes in what you’re doing and can advocate at high levels.
3. Feasibility
Once the idea has been socialized and there is enthusiasm about moving forward, it’s time to work on determining whether the micro-credential is feasible.
- Consider how the micro-credential aligns with institutional priorities (e.g., academic plan, strategic mandate agreements), institutional micro-credential policies, and unit plan resourcing priorities. Ask yourself whether the micro-credential fits within the scope and scale of the institution’s vision for these programs.
- Familiarize yourself with your institution’s policies and procedures for rolling out a micro-credential. If there are initial steps to presenting a new program for approval to your institution’s governing bodies, do it.
- Create an initial budget. Consider the sources of revenue and costs. You may need to create two budgets: one to develop the initial program and one to offer the program once it is created. Identify your business model. For example, will this program be offered on a cost-recovery basis? Will it be revenue-generating? Identify your costs, including marketing, partner consulting fees, cost of developing materials, etc. Connect with your collaborators for these items (e.g., your marketing team can estimate the level of resources a program will need to be successful). Also be mindful of the B.C. Tuition Limit Policy for credit-based programming, to ensure that the initial tuition fees are sustainable in future years. As you set the pricing for tuition, consider learner and employer pricing sensitivity.
- Identify and apply for internal or external funding opportunities to support the design of the micro-credential. Consider also whether you should apply for funding to support the learners (e.g., some funding programs can provide daycare subsidies or support the cost of supplies for learners).
- Map out your unit’s resources, and plan when such a new program could be developed and launched. Identify the timelines and deliverables.
- Secure resources to carry out the project. Find qualified people and assign a team to the project. Ensure that they will have the resources they will need to complete the project.
- Formalize the partnership with outside organizations. This may involve the development of a memorandum of understanding (MOU) or general service agreement (GSA) outlining roles and responsibilities. Negotiate fees for the consulting services.
4. Design
Once all of the pieces are in place, the resources are available and the initial approval is secured, it’s time to build the program’s structure. Typically, the instructional designer will take the lead in facilitating conversations between stakeholders to create the framework for the program. This is usually a team effort, and not the work of a single person.
- Engage in consultation with employers or community partners, subject matter experts, and other stakeholders to identify:
- The competencies that will be targeted by the micro-credential.
- Evidence that a learner has achieved a satisfactory level of mastery of these competencies.
- Build a learner profile to make informed decisions. Talk to prospective learners about their expectations to inform the design of a micro-credential to meet their needs. For example, do they expect to have work-integrated learning (WIL) opportunities? Do they prefer to learn using videos, activities, or text? If video, what level of production polish do they expect? What is their comfort with engaging in formal education, and what are their abilities for independent learning?
- Determine what prior knowledge, work experience, or credential a learner will need to enroll in the micro-credential. Identify the level of the micro-credential and situate it within your institution’s credential framework.
- Determine the best delivery method for the micro-credential: online, hybrid, or face to face. If online, will this be a self-paced training program or a cohort-based model? If in-person, identify where it will be offered and when. Determine if there is a set instructional time (e.g., this is a 45-hour micro-credential), and if not, how long a learner will have to complete the training (e.g., they may complete the training within six months of registering). Also discuss the target population’s availability to engage in the program (e.g., do they have full-time jobs that would prevent them from attending during the day? Is a bootcamp format more appropriate?)
- Investigate and purchase appropriate resources to develop the micro-credential, such as a suitable learning management system (LMS), video production or graphics design services, and digital badging software.
- Consider how best to structure the program to achieve the competencies. Should it be modularized into separate short courses that can be stacked towards one micro-credential? Do several micro-credentials build towards a larger credential? Should the micro-credential be credit-bearing (making it easier to ladder into other learning pathways) or part of the non-credit offerings at your institution (which usually benefits from quick approval processes leading to nimble and responsive curriculum development). Articulate the rationale for your choices.
- Will the micro-credential ladder into another educational pathway at your institution, or other institutions? If so, this may require engaging teams from other departments, such as those that will accept the micro-credential into their program, or from your institution’s PLAR office (if there is one), to develop these agreements.
- Design the micro-credential plan (sometimes called the blueprint), which should include a description of its target competencies and goals, how learners can demonstrate their mastery of these competencies, and activities to help them develop them. Consider whether a learner must complete the entire program if they can demonstrate that they begin the program with some existing (demonstrated to be satisfactory) competencies. Design the structure of the program and its activities.
- It may be a good idea to keep the lines of communication open with the rest of the institution during this stage, so that the community has an opportunity to provide feedback. This can anticipate objections, improve the design, and help head off challenges during the next phase.
5. Approval
Each institution may differ in what information must be provided to its governance body for approval of a new program. Usually, such an approval process requires submitting information about the program’s learning outcomes or target competencies, assessments, and formats. Therefore, this step is likely to happen in conjunction with the design phase or soon afterwards.
Most institutions have separate curricular and quality approval processes for credit-bearing and non-credit programs. The proposed micro-credential should follow the appropriate procedure.
6. Marketing
Once the micro-credential has been approved by the institution, it’s time to put in place the marketing plan and to promote the program. A best practice is to begin promotion as soon as the program is approved rather than wait until the program is developed and ready to accept registrations. It will likely take some time to spread the message in the community and to convert prospective learners into registered learners. Don’t forget that learners may need to re-adjust their busy lives to be able to take a micro-credential program. They may need time to secure the funds required for the tuition, take a leave from their work or apply for professional development funds from their employer, or make other arrangements to participate in the program. It’s never too early to start building awareness of the program with the target audience.
- Develop a marketing plan.
- Consider the following key questions:
- Who is the target audience?
- How does the micro-credential help them meet a need and reach their goals?
- What’s unique about this program that no other program will offer?
- Where is your audience / how can you reach them where they are?
- Research your audience.
- Conduct surveys or focus groups or interviews with prospective learners.
- Compile findings into learner profiles to envision the target audience.
- Reach out to your audience using multiple channels.
- Leverage your partners’ existing networks. They have the credibility and contacts to reach your target population. They may be able to include information about your program in their newsletter, on their website, or in their social media posts.
- Develop a website to provide information.
- Use social media marketing to build awareness, if it is appropriate for your audience.
- Use materials created for the micro-credential in your promotion. For example, consider including video clips of the subject matter expert or instructor.
- Participate in events where your audience is likely to be, e.g., a trade conference in the target industry or a college open day event.
- Reach out to prospective students through class visits, information sessions, and free webinars that include a teaser learning activity from the program.
- Don’t forget to include industry or community endorsement, recognition, or validation in your promotional materials. Micro-credential learners have concrete goals for their training, and they will want to know that the credential will be a tangible investment of their time and money.
- Develop marketing materials that reflect your micro-credential’s brand. Be sure to enlist the help of (or at least consult with) the marketing department to ensure that your materials comply with your institution’s marketing and brand guidelines.
- Assign someone as the contact for the program. This person will provide individualized assistance and respond to the questions of prospective learners.
7. Build
In ADDIE-speak, this is called the development stage. This is where the plans (created during the design phase) are converted into concrete training materials. Typically, this is led by the instructional designer but the subject matter experts are doing the detailed work.
Some of the considerations in developing this material include:
- They should be authentic to the context in which they will ultimately be used in the workplace or community. For example, it may include real-world case studies from the target industry.
- They should acknowledge that adult learners come to the training with experience and have concrete goals of where to apply new knowledge and skills (e.g., activities may give learners the chance to develop plans for their workplace).
- The materials must take into consideration the target audience’s expectations for format and polish. This will be based on who they are (e.g., are the learners professional adults or young adults right out of high school?), as well other related products available to them (i.e., your competition) (e.g., if learners can obtain similar training on LinkedIn Learning, they may expect high-quality videos). Adopt a brand consistent with this audience and with the micro-credential.
- There should be ample opportunities for feedback on performance along the way. The assessment criteria and targets should be transparent from the start.
- The learner journey through the training should be seamless. Consider how learners will access the materials. If they plan to complete some of the course on their mobile phones during their daily commute to work, then choosing a learning management system that is compatible with, and offers a good user experience on, a mobile platform will be important.
Some of the materials developed may include:
- Course outline or syllabus.
- Assessment materials (e.g., assignment instructions, rubrics, etc.). Consider validating these with industry. Employers will ultimately recognize and accept these measures as evidence that learners have the required skills.
- Materials to transfer knowledge such as readings and handouts, lectures (including slides, videos, podcasts, etc.), demonstration and field videos, etc.
- Activities, practices, case studies, discussions, etc.
- Site visits or work-integrated learning opportunities, agreements to support them, and activities aligned with the learning goals (e.g., reflection).
- The online course built in a suitable learning management system.
- The digital badge on a suitable open badge platform. This includes meta-data about, among other things, the competencies that a learner has successfully demonstrated and how they did so.
8. Launch and Delivery
Once the program is developed, it is ready to be offered. Consult with your partners and prospective learners to identify the best start date and to schedule the first offering. Accepting registrations will likely require collaboration with the registrar’s office. The following are best practices for piloting and delivering a micro-credential:
- Hire an instructor to facilitate the program. It may be the subject matter expert involved in the design and development of the course.
- Decide whether you plan to engage in a splash launch or a soft launch.
- Schedule the program and accept registrations.
- Offer the program, providing timely feedback to learners and support as needed.
- Ensure all invoices are promptly paid.
- Update partners along the way – they have invested a lot of resources into this training and will want to be kept in the loop as it is implemented.
- Monitor delivery and take note of what’s working and what can be improved. Consider including learner surveys about the program to improve the current and future offerings.
9. Recognition of Learning
The successful completion of a micro-credential may be recognized in a number of ways by the institution, but the most common one is by awarding a digital badge. Digital badges are digital objects (usually an image) accompanied with meta-data containing information about what the learner demonstrated to earn it. It provides a greater depth of information to prospective users (e.g., a hiring manager) than a traditional transcript. Once issued by the awarding institution, learners control with whom they share the badge.
- The institution should maintain a permanent record of each learner’s completion of the program.
- If a learner demonstrates the micro-credential’s competencies at the required level, they are issued a digital badge.
- As this form of learning attestation is new, learners may need to be educated about how to use it. Encourage learners to share the digital badge on their social media accounts, such as LinkedIn, to not only celebrate their achievements but also help potential employers find them. They may also share the digital badge in their job searches (e.g., in a résumé).
- Industry partners may also need to be educated about the digital badge. If the partner was involved at each step in the development and design of the program, they will have buy-in in the validity of the badge as an indicator of competencies. This step is then simply about helping them use the technology and interpret the information (e.g., teaching them how to search for prospective employees on LinkedIn who have completed the training). This is also an opportunity to promote the graduating class with prospective employers who are looking to hire employees with these skills.
- Explain to learners the opportunities for stacking and laddering micro-credentials into other programs, expanding the learners’ options for pursuing their education.
10. Evaluation
The final stage in offering a micro-credential is a debrief. It’s an opportunity for the team to review data and take stock of what worked, what could be improved, and how. It’s also an opportunity to revisit the value of the micro-credential. Did it achieve its goals? Should it be offered again? Should it be retired? What general lessons were learned and could be applied to other programs?
- Conduct a debrief meeting with all stakeholders. Some meetings may seek to review performance on the micro-credential as a whole. Others may examine specific aspects of it, e.g., the partnership with an industry collaborator.
- Collect data to analyze. This may come from key performance indicators for each channel of the marketing plan, learner surveys, employer surveys of satisfaction with their employees’ training, registration and demand data, program completion data, classroom observations, learning management system analytics, and observations and/or reflections made by the team during the planning and offering of the program. Although it can be more challenging to collect, try to find data about the impacts of the program. For example, how many learners were hired as a result of the training? How many used the micro-credential as a springboard to return to post-secondary education?
- Discuss what went right. Use data to back up conclusions. Celebrate those achievements.
- Discuss what could be improved. Use data to support assertions. What are solutions to make these improvements?
- What are the unleveraged opportunities? For example, is there another type of industry that may be interested in taking this course? Could parts (modules) of this program be used in other programs? Can this micro-credential be stacked with others toward a greater set of competencies needed in industry?
- What were some of the lessons learned? Some of these lessons may be specific to this program while others may be more general to offering micro-credentials.
- Consider whether the program is sustainable in its current incarnation. Does it depend on grant funding to maintain its tuition level? What sources of revenue may be untapped? Are there ways to make this program more sustainable?
- Decide whether the micro-credential should be re-offered or retired. Is the need for this training still there? Are there pools of prospective learners who have yet to take this training? Is it sustainable to offer the program again? Is it possible to obtain funding to support it again? Is the effort worth it?
- If the decision is to re-offer the program, determine the frequency of offering (e.g., next month, next year, or in three years?)
- Depending on the purpose of a micro-credential, some may have hard expiry dates when the content is no longer up to date as determined by industry partners (e.g., when a software taught in a micro-credential is no longer used by that industry). Others may become out of date over time, and require consistent content and curricular review to remain relevant (e.g., ensuring that the micro-credential keeps up with changing legislations and best practices over time).
- Share the outcomes and impacts of the program, as well as the lessons learned, with the community. This includes your industry partners but also other members of your institutional community.
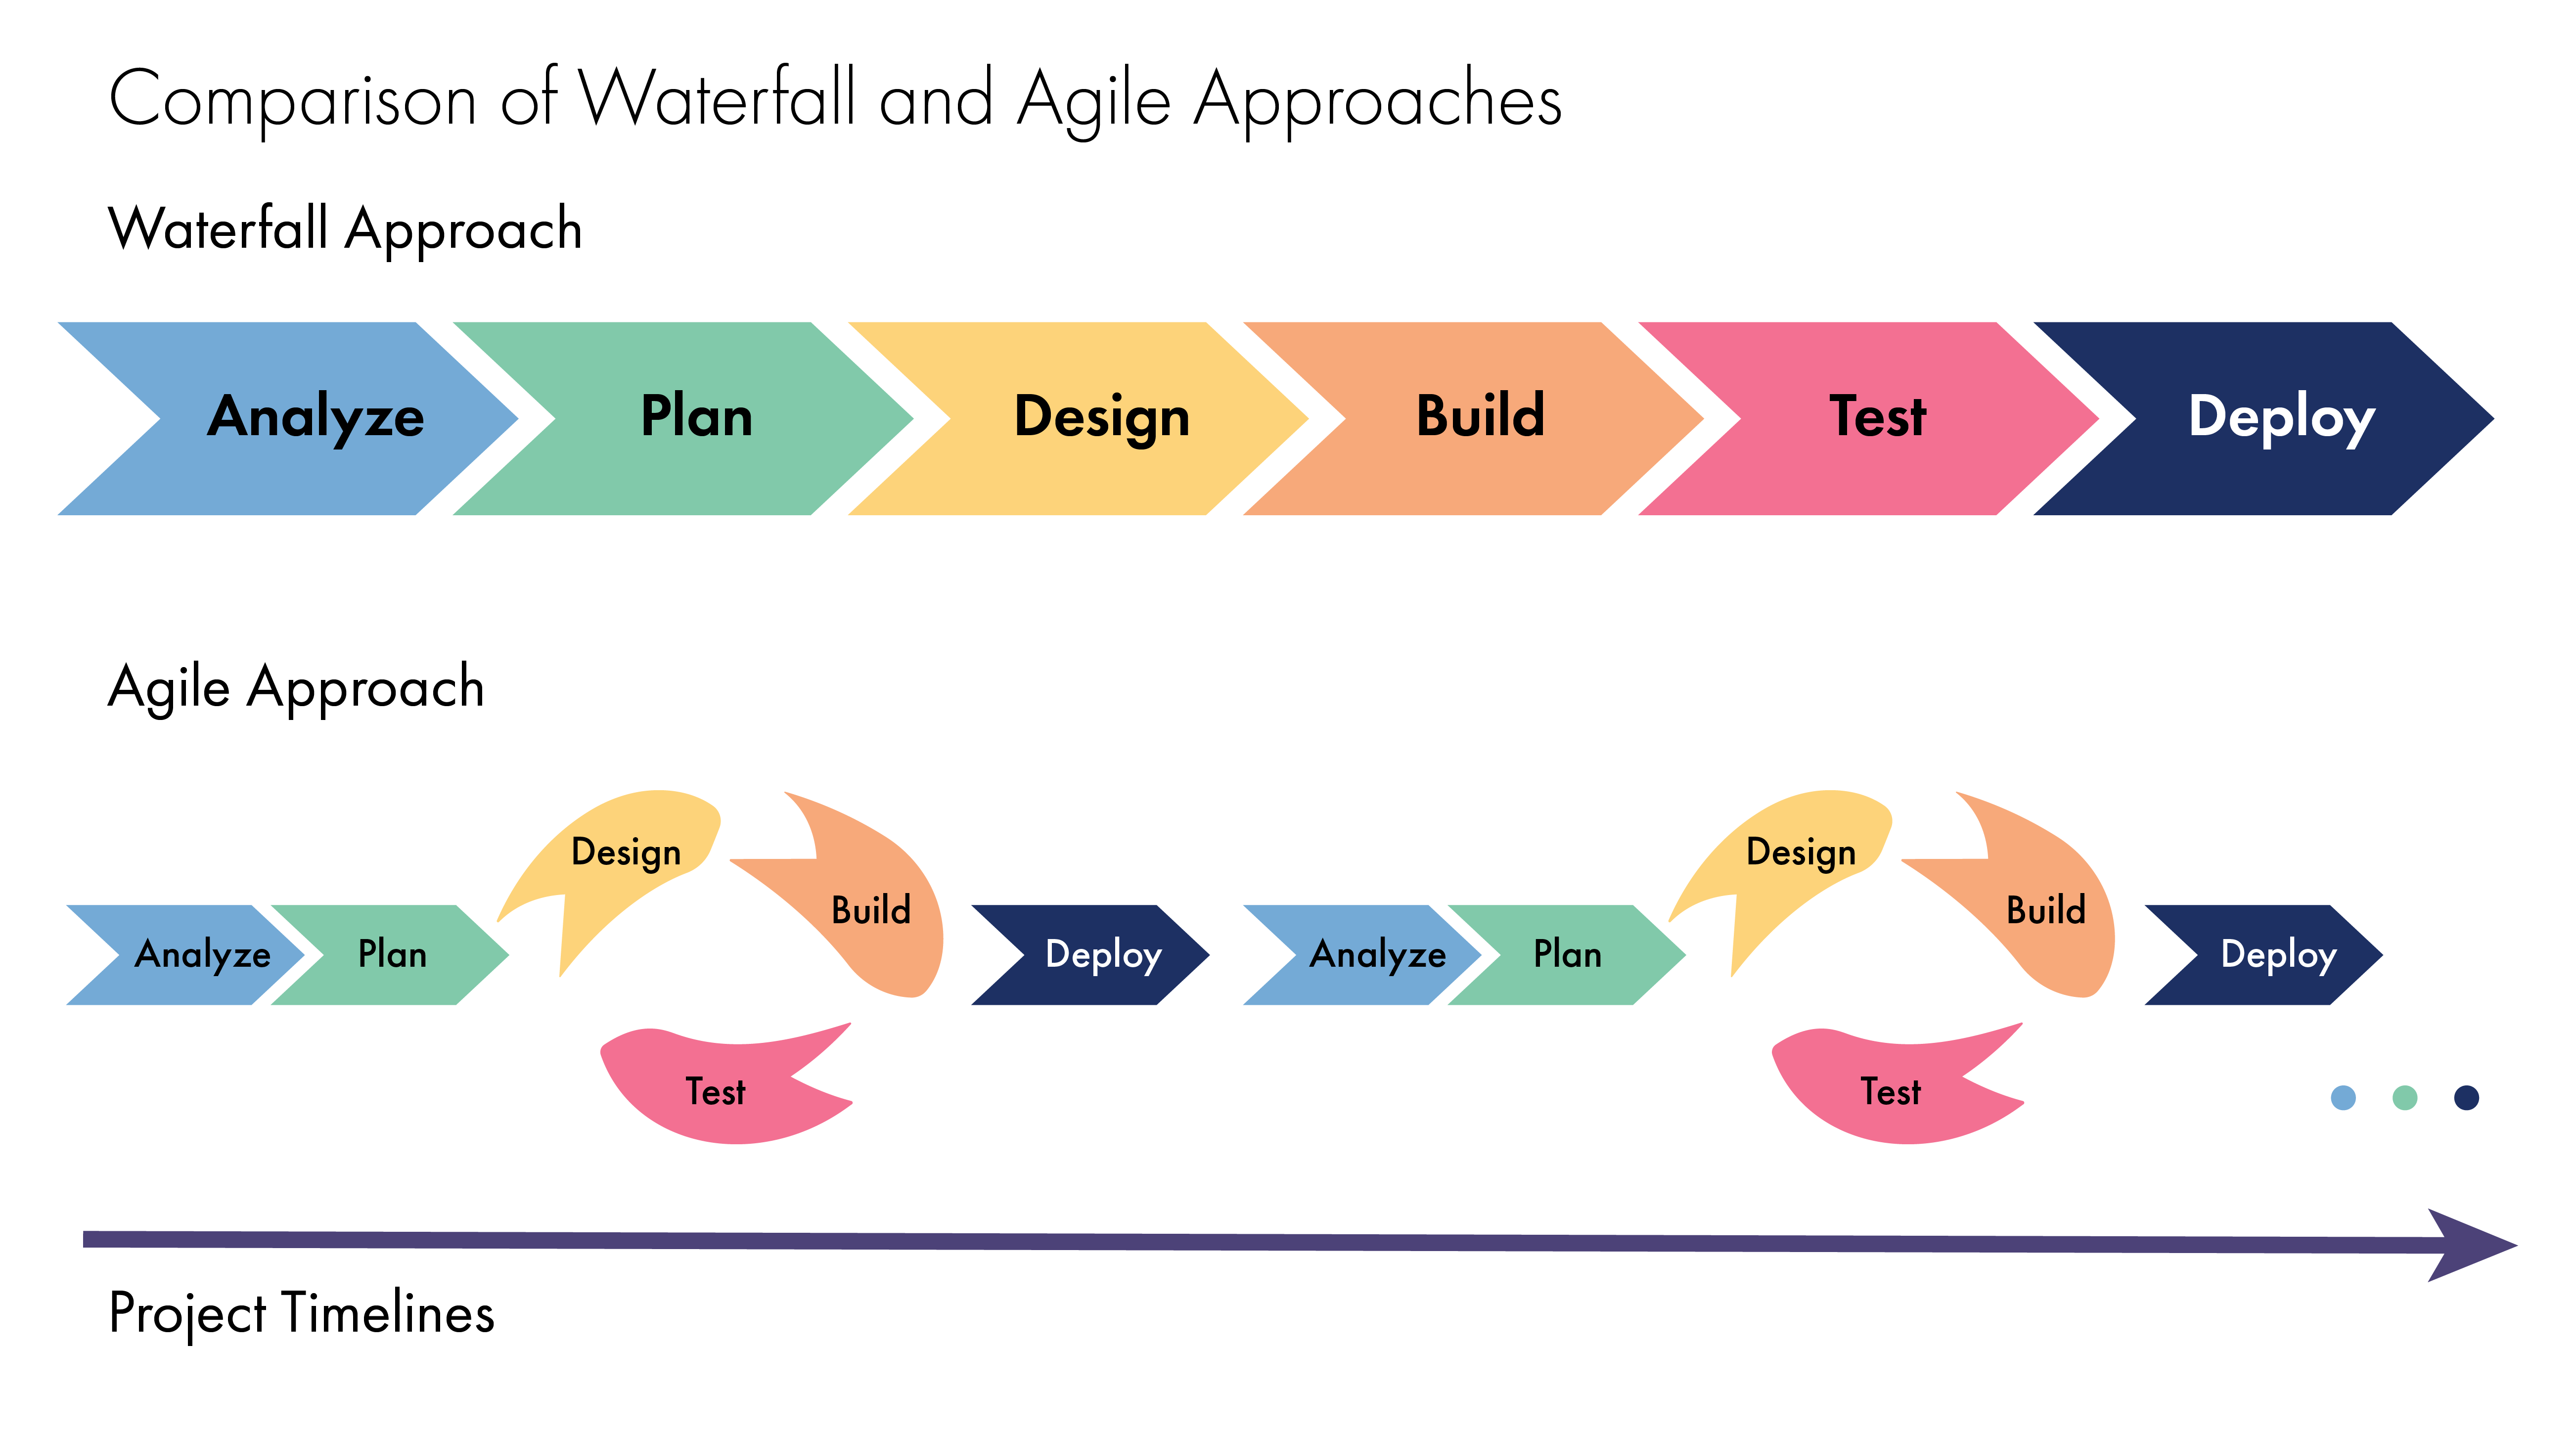
Waterfall or Iterative?
There are two philosophies guiding project management. One develops a project in a linear fashion. It describes a sequence of steps to reach the end goal. This is called waterfall project management. ADDIE is an example of such a method, applied to instructional design (and thus the micro-credential life cycle presented above would constitute an example of waterfall project management). A strength of this approach is that it is logical, chronological, repeatable, and provides clear sequential steps in progressing toward the goal. The drawback is that errors in the assumptions of the project only become visible once the end product is usable and it may be too late to course-correct (e.g., once an online course is completely designed and learners experiences the course for the first time, the team discovers that most of the learners do not have sufficient internet bandwidth to access the materials, or that the learners do not find reading to be engaging and that they would prefer video delivery).
In response, an alternative project management technique has emerged called iterative or AGILE (Align, Get set, Iterate and Implement, Leverage, Evaluate) or SAM (Successive Approximation Model). While initially created for the software development industry, an iterative approach to project management has been used in education. The method starts by identifying the minimum viable product. Then, in a short period of time called a sprint (usually one week), the team works to create a finished product. This is not a prototype – it is a fully usable product. The product is presented to the client for review and feedback. The product is then either revised in the next sprint or added to. In the software industry, for example, developers of a word-processing program might set out to first meet the most basic needs of potential users — to type and record words — in order to create a minimal viable product that meets customer expectations. Once that goal is achieved, the developer can use any remaining time and resources to add additional features to the program, such as a spell-checking tool or a thesaurus. The developer then repeats this process to add additional capabilities to the software in an iterative and incremental way.
In an instructional setting, after identifying all the competencies needed for a micro-credential, this could take the form of completely creating one of the modules in the program over the course of a sprint. This module would then be presented to industry partners or prospective learners to test it. The team would take the feedback to improve this module, and then turn their attention to the next module.
Whether choosing a waterfall or an iterative (i.e., agile) approach, each of the steps described in this chapter will need to be performed. The two methods simply dictate a different order for completing these steps. Figure 1 shows a diagram of the two approaches. You should select the one that best suits your institutional context, skills, and needs.
Suggested Resources
Field guides for the creation of micro-credentials
The following document provides concrete information on some of the steps required to develop workforce-aligned training and is set in an American context. The checklists are particularly helpful.
Credly. (2021). Partnering with employers to create workforce-relevant credentials. A field guide. https://cdn2.hubspot.net/hubfs/2629051/Credly_Employer_Engagement_Field_Guide.pdf?submissionGuid=efbae8cf-0166-45d4-a9ca-1dd9e20b5f86
Comparing waterfall (ADDIE) with iterative (AGILE, SAM)
Not sure which approach – waterfall or iterative – might be best for your project? Look at this short article that reviews the pros and cons of each project management technique for instructional design projects.
Pappas, C. (2021). ADDIE model vs SAM model: Which is best for your next elearning project. Elearning Industry. https://elearningindustry.com/addie-vs-sam-model-best-for-next-elearning-project
ADDIE
A detailed description of the early versions of the ADDIE model and its current incarnation.
Allen, W. C. (2006). Overview and evolution of the ADDIE training system. Advances in Developing Human Resources, 8(4), 430-441. https://doi.org/10.1177/1523422306292942
This blog post goes through each step of the ADDIE model, providing a set of questions that users can ask themselves at each stage.
Kurt, S. (2017). ADDIE model: Instructional design. Frameworks & Theories. Educational Technology. https://educationaltechnology.net/the-addie-model-instructional-design/
This blog post describes each of the five stages of ADDIE, including sub-stages for each one. This can help practitioners cover their bases when implementing ADDIE.
Van Vulpen, E. (n.d.). The ADDIE model for instructional design explained. Academy to Innovate HR. https://www.aihr.com/blog/addie-model/
This article argues that ADDIE should be called ARDDIE, integrating “Research” as an initial step.
Ruark, B. E. (2008). The year 2013: ARDDIE is IN, ADDIE is OUT. Talent Development. 62(7), 44-49.
AGILE
The BCcampus web development team utilizes AGILE project management. Read this account of the benefits and drawbacks in moving this type of instructional project forward.
Ebeattie. (2018). Agile software development at BCcampus. https://bccampus.ca/2018/02/06/agile-software-development-at-bccampus/
This book is a great little toolkit with concrete step-by-step guides for managing an instructional design project using agile techniques.
Torrance, M. (2019). Agile for instructional designers. Association for Talent Development.
Another great little toolkit providing concrete resources for applying an agile project management ethos to instructional design.
Allen, M. W., & Sites, R. (2012). Leaving ADDIE for SAM: An agile model for developing the best learning experiences. American Society for Training and Development.
This very short blog post describes agile instructional design methods in comparison to ADDIE and clarifies some of its defining steps and features.
Culatta, R. (2023). Rapid prototyping. Instructional Design. https://www.instructionaldesign.org/models/iterative_design/rapid_prototyping/
This article describes using an agile process to manage the development of an educational program. It focuses on the team dynamics and offers lessons learned from its application.
Sweeney, D. S., & Cifuentes, L. (2010). Using agile project management to enhance the performance of instructional design teams. Educational Technology, 50(4), 34-41.
Review of several models for project management of instructional design
Looking for an alternative way to project manage your micro-credential? This scholarly article argues that Master of Education programs do not provide sufficient project management background, and reviews some of the project management models that have been applied to the design of educational programs.
Van Rooij, S. W. (2010). Project management in instructional design: ADDIE is not enough: Project management in instructional design. British Journal of Educational Technology, 41(5), 852-864. https://doi.org/10.1111/j.1467-8535.2009.00982.x
Works Cited
Branson, R. K. (1978). The interservice procedures for instructional systems development. Educational Technology, 18(3), 11-14.
Young, J. R. (2017). More colleges are offering microcredentials—And developing them the way businesses make new products. EdSurge. https://www.edsurge.com/news/2017-10-05-more-colleges-are-offering-microcredentials-and-developing-them-the-way-businesses-make-new-products
Image Descriptions
Figure 1. Overview of the micro-credential life cycle
The ADDIE framework align with 10 phases of micro-credential life cycle as well as to the chapters in this toolkit
- Analysis
- Ideation
- Background
- Definition
- Institutional Governance
- Team Formation
- Campus Collaborations
- Employers, Indigenous and Community Partners
- Inter-Institutional Collaborations
- Feasibility
- Financial Matters
- Ideation
- Design
- Design
- Learners
- Design Considerations
- Educational Pathways
- Recognition of Learning
- Approval
- Institutional Governance
- Quality Assurance
- Design
- Development
- Marketing
- Launch and Marketing
- Build
- Design Considerations
- Marketing
- Implementation
- Launch and Delivery
- Launch and Marketing
- Recognition of Learning
- Recognition of Learning
- Educational Pathways
- Launch and Delivery
- Evaluation
- Evaluation
- Design Considerations
- Evaluation
Media Attributions
- Administrators icon by Minh Do, Program Managers icon by Thuy Nguyen, Faculty icon by ProSymbols, are under a CC BY 3.0 licence.
- Figure 2 Waterfall vs Agile was adapted from Agile vs. Waterfall Method by Sean pyle under the public domain.
