Chapter 2 – The Consultation
2.3 Colour Assessment
A good colour consultation covers the following bases:
- Existing level, tone, and percentage of grey
- Target level and tone
- Underlying pigment at target level (if going lighter).
Below is an example of a colour consultation template:
| Existing level and tone | |
| Grey % | |
| Target level and tone | |
| Darker or Lighter? | |
| Underlying pigment |
Existing Colour
To begin with, you must assess the client’s existing level and tone. Consider the hair’s existing colour as your starting point, which is essential to know before making a plan to achieve the desired result!
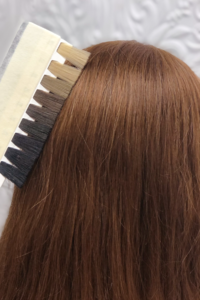
Level can be determined by using the natural swatches in your preferred colour line. Hold the natural swatch against the hair, starting at the root level and proceeding along the hair strand, to assess the closest level match between 1-10.
Remember to look for variances of level in different areas of the head, as well as throughout the length of the hair strand. If there is previous artificial colour, it should be fairly simple to spot these discrepancies. It is important to determine whether there is artificial colour present, as this will have an impact on the structure of the hair as well as the colouring process itself. Ask your client to give you an overview of their colour history, including all colour services performed in the previous two years. Having knowledge of your client’s colour history will allow you to determine any surprises that may be hiding underneath their current hue.
To assess the tone of the existing hair, hold a section of hair towards the light, and look for the predominant tone where the light hits the hair strand. Use your colour wheel and colour manufacturer’s swatches to help you determine whether you are seeing a warm or cool tone. If the hair reflects neither predominantly warm nor cool, you can consider it neutral.
If there are multiple areas with different levels and tonalities, such as in a colour correction service, assess each area individually. You may need multiple steps and formulations in such a case. Chapter 7 – Corrective Colour will address this process in more detail.
Grey Percentage
Next step is to determine whether the client’s hair contains any grey, and if so, at what percentage. The percentage of grey will affect your formulation. This is because grey hair tends to be more resistant and requires the replacement of missing melanin.
| Percent Grey | Developer | Natural shade | Fashion shade |
|---|---|---|---|
| 0-30% grey | 40ml 20vol | 10ml | 30ml |
| 30-60% grey | 40ml 20vol | 20ml | 20ml |
| 60-100% grey | 40ml 20vol | 30ml | 10ml |
In the chart above, you will see a general mixing ratio for grey coverage. Most colour lines offer distinct mixing ratios and products for varying concentrations of grey hair, but the general rule is that you must include a “natural” shade, along with your fashion shade choice, within your formula. It is these natural colours that contain the balanced amount of pigment to effectively replace the missing melanin in the cortex of the grey hair strand.
Target Colour
Now that we have assessed our starting point, we can finally move on to the fun task of creating our colour formulas!
Most likely, your client will have a precise idea of the colour result that they would like to achieve, but keep in mind that everyone sees colour differently, and clients can often get the terminology wrong. It is up to you as the professional to ensure that you and the client are on the same page.
Encourage your clients to bring pictures of hair colours that they like. Consider that shadows and reflections in the picture may change the look of the colour drastically throughout the photo, so be sure that you are both looking at the same area of the photo. Use colour swatches to zero in on which tones stand out to your guest. The colour that looks great on the model in the photo may not be right for your client, and swatches held up to the face can help to tactfully show your client some options that may be more flattering for them.
Keep an eye out for photoshopping and lighting tricks. Clients may show you a colour result online that has been altered. Use this as an opportunity to kindly educate your client about how to spot altered photos and why the results may not be achievable. This strategy will help you and your client avoid any future disappointments.
Lighting can also have a drastic affect on colour!
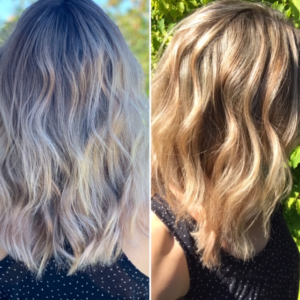
It is important to inform the client that although you may be able to achieve a similar outcome, the colour will look different in the salon versus the lighting that is in the photo.
On that note, be sure that the model in the photo has a similar natural level to the client. If your client shows you a photo of a lightened result on a model with a natural level 7 base, but they have a natural level 4 base, you will need to explain the difference in processing time, underlying pigment, and achievable outcomes. The same is true for a client with existing artificial colour. In this case, it is important that the client know their desired result may not be possible in one appointment. The best way to continue such a service in a positive manner is to create a timeline for your client. Let them know what you can achieve today and what will be done in future appointments in order to achieve their goal. It is always better to under-promise and over-deliver! Be honest and upfront, and you will gain your client’s trust and respect.
Once you have decided on a final colour result, there are a couple more factors to consider:
- If you are depositing to a darker level, keep in mind the ways in which hair texture, porosity, and overall structure can affect how the hair will respond to the colour.
- If you are lifting to a lighter level, you will need to choose between an oxidative colour or a bleach product. Remember that oxidative colour is formulated to remove natural melanin and will not lift artificial colour! If you are working with virgin hair, you will need to consider the underlying pigment at your target level in order to achieve your final result by either enhancing or neutralizing.
Budget and Lifestyle
Now that you have assessed your client’s hair and scalp, and discussed and formulated a plan, you’re good to go, right?
Not so fast!
Before you proceed, you must have an honest conversation about the cost of the service that you’ve planned, as well as the cost of future appointments should they be required in order to meet a specific goal. Budget need not be an awkward topic if you handle it like a professional. After all, you wouldn’t hire someone to plan and build your house without knowing the cost up front, and as a professional hair stylist, you should not assume your client will be okay with a charge that is larger than they were expecting!
Break down the cost in a straightforward manner. Include colour services, treatments, and products required to maintain their new look. This gives the client the chance to consider their budget before proceeding and avoids any awkward questions at the end of the appointment. You do not want your guests to leave their service feeling uncomfortable. If a client is hesitant about the cost, this gives you the opportunity to offer them alternative options, such as a partial foil instead of a full head, or breaking down a large service into a series of appointments.
Budget goes hand in hand with lifestyle and priorities. If your guest is a laid-back type who generally only schedules an appointment once or twice a year and is requesting a drastic colour change, be honest and upfront about the cost and frequency of maintaining the new look. If life and responsibilities don’t allow for frequent bookings, let the client know how this will affect the look of their hair. Often, a guest that does not visit the salon regularly ends up requiring more work and spending more money due to excessive regrowth or colour fade.
Patch Test and Strand Test
Now that we have covered all our bases, we can proceed with making our client beautiful, right? Yes, unless there are conditions that call for one more step.
A predisposition, or patch test, is recommended to determine whether a client has sensitivities or allergies to a colour product. This is especially important when a client has complained of discomfort in the past or if they are new to having their hair coloured.
A patch test should be conducted 24–48 hours prior to their service and is done by applying a small amount of colour product to the inside of the elbow and behind the ear. If there is any evidence of redness, swelling or discomfort such as itching, burning, blisters, or respiratory problems, this would be considered a positive reaction, and may require medical assistance. Do not proceed with the service!
A strand test allows us to test a colour formula directly on the hair in uncertain conditions and is advisable in the following circumstances:
- You are lifting an artificial colour with a bleach product. In this case, a strand test will tell you whether the hair will lift evenly, what level it will lift to, and what underlying pigment will be exposed. This information is crucial in order to either choose the appropriate strength of product, or, shift gears and opt for an alternative goal. If your client is hoping for a neutral level 9 but their hair can only be safely lifted to a level 7, then you now have a visual to help guide your client’s decision. For example, in this case you could find a level 7 end result that they are happy with, or you could create or adapt your long-term plan for subsequent appointments.
- You have assessed the hair’s porosity as either extreme, uneven or resistant, and want to ensure that you can successfully create an ideal result. Hair with extreme porosity is more at risk for damage and tends to process darker or soak up cool tones. Uneven porosity usually requires multiple formulas. Resistant porosity generally processes lighter than intended. It is advisable to test your formula to see how the hair will look and feel before committing to colouring the whole head. This extra step will avoid having the result turn out poorly. A strand test is conducted by applying your chosen formula(s) to a strand of hair, usually in a concealed area of the head. If you are dealing with multiple hair conditions and formulas, you should do a strand test in each area of concern. Apply and process your test formula according to manufacturers guidelines to ensure you will get an accurate result. Then, assess the results and work together with the client to decide on a course of action.
Congratulations! Your consultation is complete and you have gathered all the information necessary to perform a successful colour service!
In Chapter 3: Product Selection and Formulation, you will learn how to apply this information to determine your choice of colouring product and to formulate your colour, In addition, we will review the various tools used for a variety of colour techniques and services.
Media Attributions
- All images in this chapter are by A. Magtiza and are under a CC BY 4.0 Licence.
The darkness or lightness of colour in relationship to other colours.
The shade or hue.
Any pigments that are exposed as hair is lightened through the 10 levels of lift.
The hue, level, and intensity that exists in a client's hair prior to a colour service. This could refer to natural colour or previous artificial colour.
Oxidative or non-oxidative colour products that are added to the hair in order to change its hue, level, or intensity.
A tool used by stylists for hair colour assessment and formulating
Colours that reflect red, orange, or yellow.
Colours that reflect blue, violet, or green.
Colour that does not predominantly reflect a warm or cool tone.
Colouring products that require a developing agent, such as hydrogen peroxide, to oxidize and introduce colour molecules into the hair strand.
Pigment that resides in the hair's cortex which gives hair its hue.
To add to the intensity or vibrance of a colour.
To counteract or drab the intensity or hue of a colour.
The intended colour product is applied to the inside of the elbow and behind the ear to determine if there are any sensitivities or allergies.
The intended colour formula is applied to a strand of hair to help determine end result.
