Chapter 3 – Product Selection and Formulation
3.1 Colouring Products
Now comes time to choose a colouring product to use. But first, recap the necessary steps that got you to this point!
- Assess hair and scalp
- Porosity, elasticity and texture
- Existing level and tone
- Percentage of grey
- Perform a thorough client consultation
- Determine target level and tone
- Discuss maintenance, commitment, and budget
Next, you must:
- Select an appropriate colouring product based on:
- Lift or deposit
- Grey coverage
- Hair assessment
- Lasting ability
- Application technique
- Consider existing tone/ underlying pigment
- Select appropriate tools and supplies for selected application technique
Depositing, or Going Darker
Let’s first compare options for depositing, or going darker:
| Oxidative | Non-oxidative | |||
|---|---|---|---|---|
| Permanent | Demi-permanent | Semi-permanent | Temporary | |
| pH | 9–11 + | 6–9 | 6–8 | 6–8 |
| Regrowth | Yes | Subtle | No | No |
| Grey hair | Full coverage | Blending | Light blending | No |
| Lasting ability* | Until colour grows out | 4–6 weeks | 2–4 weeks | Until hair is shampooed |
| Mixing ratio[1] | 1:1 | 2:1 | No mixing required | No mixing required |
| Processing time[2] | 30–40 minutes | 20–30 minutes | 20–30 minutes | 0–20 minutes |
| Uses/Ideal hair types |
|
|
|
|
| Techniques |
|
|
|
|
*Lasting ability is calculated under ideal circumstances. Durability can be affected by:
- Porosity – hair that is overly porous tends to lose artificial colour and fade more quickly.
- Products – shampoos and products that are not formulated for coloured hair may cause fading. Hair that is frequently heat styled without heat protective products will also fade more quickly.
- Environment – factors such as sun exposure, pollution and poor water quality will all have an adverse effect on colour durability.
Some additional factors to think about when considering hair type and condition:
Depositing colour on healthy, medium textured hair is usually a pretty straightforward and predictable process. This is because the condition of this hair type does not generally have any porosity concerns, which means you may follow the manufacturers guidelines for your colour line to achieve optimal results.
Fine Hair Considerations
When depositing colour/going darker on fine hair:
- Fine hair is generally not resistant to absorbing colour. Choose a colouring product with a lower pH, such as Semi or Demi-Permanent, to maintain the integrity of the hair strand.
- Fine hair tends to process darker than the intended level, especially if extreme porosity is present. It is recommended to formulate a colour that is one level lighter than the desired level.
- Fine hair that has been previously treated with oxidative colour products is more likely to be highly porous. A colouring product that is too alkaline will swell the already compromised hair strand and result in breakage or further damage.
Coarse Hair Considerations
When depositing colour/ going darker on coarse hair:
- Coarse hair with resistant porosity requires a higher level of developer, and a higher amount of ammonia within the formula in order to swell the hair strand and open up the cuticle layers effectively. Opt for an oxidative colour, with a 10 or 20vol developer. A non-oxidative colour product, such as a semi permanent, may not process effectively.
- Remember that coarse hair tends to process one level lighter than the intended level, especially if resistant porosity is also present. It is recommended to formulate a colour that is one level darker than the desired level.
Hair with uneven porosity must be formulated carefully, as each differing section will absorb and process colour differently. Generally speaking, more than one colour formula is advised in this case in order to achieve an even end result.
Existing Colour Considerations
Because the final colour result is the result of existing colour + artificial colour, you should take into account the existing tone of the hair. If the client is a copper-tinged level 6 to begin with and would like to be a level 5, we will formulate differently depending on whether they desire a warm result, a neutral result, or a cool result.
This is where the Colour wheel comes in handy.
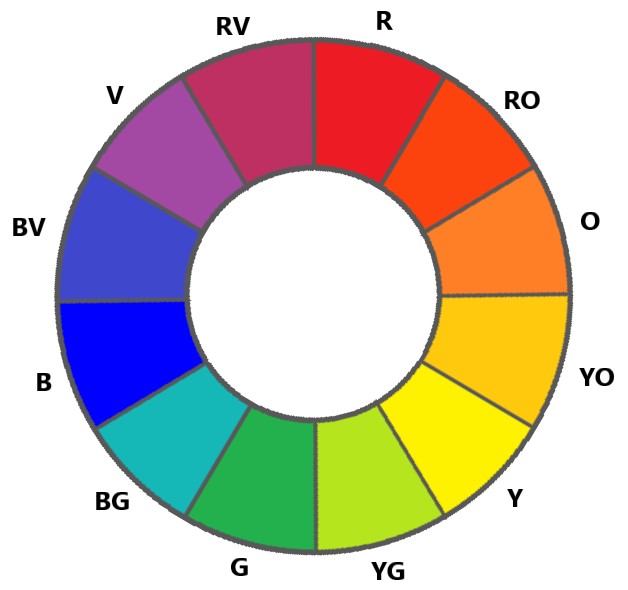
If the client would like a warm result, formulate with the warm side of the colour wheel, by adding some gold, copper, or red to the formula to enhance the warm tone present in the hair.
If you want to neutralize the tone of the hair while you deposit, use the colour wheel to choose which corrective pigment to add to your formula. Remember that complimentary colours, colours that sit opposite on the colour wheel, neutralize each other. In the case of the copper-tinged level 6 client that would like to be a level 5, you would add some blue to your formula, as that is the complimentary shade used to neutralize orange.
If this client would like a cool result, you could add more of a blue-green tone to the formula, to over tone it. Keep in mind that this may create a “muddy” or dull appearance, as warmth in the hair is what reflects light and gives it shine. In cases of extreme porosity, care must be taken to not add too much of the cool tone to your colour formula, as porous hair has a tendency to absorb cool tones and reject warmth.
Lifting, or Lightening
Now let’s compare the options for lifting or lightening hair.
| Oxidative Colour | Bleach | ||
|---|---|---|---|
| Permanent or high-lift | On-scalp Cream or oil |
Off-scalp Powder or clay |
|
| pH | 9–11 | ~9[3] | ~10–11[4] |
| Levels of lift | 1–4 (on virgin hair) | 4+ (on virgin or coloured hair) | 4+ (On virgin or coloured hair) |
| Mixing ratio[5] | 1:1 permanent 2:1 high-lift |
1:1–3:1 | 1:1–3:1 |
| Processing time[6] | 30–50 minutes | Up to 1 hour | Up to 1 hour Max lift speed |
| Conditioning agents | n/a | Yes | No |
| Techniques |
On virgin hair |
|
|
Some additional factors to think about when considering hair type and condition:
Fine Hair Considerations
When lifting/going lighter on fine hair:
- Factor in any structural effects that previous colour services have had on the hair, such as a higher porosity or weakened state. A lightening product that is too alkaline will swell the already compromised hair strand and result in breakage or further damage.
- If using oxidative hair colour, choose the lowest level of developer needed to achieve desired lift.
- If using a bleach product, use a low level developer, such as 10 or 20vol. Most colour lines will offer a gentler bleach option as well. If many levels of lift are required, it is best to use a low level developer for a longer period of time. Note: You may also opt to use a higher developer to bleach ratio, as this will reduce the pH of the lightening product.
Coarse Hair Considerations
When lifting colour/ going lighter on coarse hair:
- Whether using an oxidative hair colour or a bleaching product, you may need to bump up your developer to achieve the required lift. For example, if lifting 2 levels with an oxidative colour, opt for 30volume. This will increase the alkalinity to allow for adequate swelling of the hair strand and better penetration of colour into the cortex. This is especially important when dealing with resistant porosity.
- Coarse hair has a larger diameter, and a larger cortex, which results in a higher melanin concentration. For this reason, coarse hair will generally take longer to lighten, and will expose more underlying pigment as you lift.
Underlying Pigment Considerations
Anytime you are lightening, you must be conscious of the ten levels of lift, and the underlying pigment that is exposed as the hair lightens.

When formulating, you must determine the underlying pigment at your target level. For example, if lifting from a level 4 to a level 6, the tone that must be considered is orange.
So what will you do with that orange? Do you want to enhance or neutralize it? Remember, this decision depends on your desired result. The second most important tool, along with the underlying pigment chart, is the colour wheel. This is where you will find pertinent information to help you formulate with consideration to the underlying pigment.
Enhancing the Underlying Pigment
If the desired result is warm-toned, as in golden, copper, or red, you can enhance the exposed underlying pigment to create a beautiful warm or vivid result. Once you determine the underlying pigment that will be exposed, choose a tone from the same side of the colour wheel to add to your formula. The more warmth you add, the brighter and more vivid the result. If you are looking for a more natural and subtle warm effect, add less. Alternatively, use a neutral natural colour, and let the exposed pigment do all the work.
A general guideline:
|
|
Natural | Warm tone |
|---|---|---|
| Ultra vibrant | 10 ml | 30 ml |
| Vibrant natural | 20 ml | 20 ml |
| Natural warm | 30-40ml | 0-10 ml |
Neutralizing the Underlying Pigment
If the desired result is neutral or cool toned, you will need to neutralize or overcorrect the exposed underlying pigment. You can do this by selecting a tone from the opposite side of the colour wheel to add to your formula. If your goal is a neutral result, add the complimentary tone. For example, neutralize yellow with some violet in your colour formula.
The amount of correcting pigment that you add to your formula will vary by level. Note: Generally, levels 3–6 contain a stronger underlying pigment, and will need more neutralizing pigment than lighter levels 7–10.
If you want an ash or cool tone result, select a complimentary tone appropriate for a darker level. For example, neutralize and overcorrect yellow with blue-violet or blue. Keep in mind that over correcting may create a “muddy” or dull result, as warmth in the hair is what reflects light and adds shine.
When using bleach for a double process technique, your corrective tones will be added to the toner, depending on which level you have lifted to.
Media Attributions
- All images in this chapter are by A. Magtiza and are under a CC BY 4.0 Licence.
- Mixing ratios may vary. Follow manufacturers guidelines. ↵
- Processing time may vary. Follow manufacturer's guidelines. ↵
- pH of lightener will depend on mixing ratio/consistency ↵
- pH of lightener will depend on mixing ratio/consistency ↵
- Mixing ratios may vary. Follow manufacturer's guidelines. ↵
- Processing time may vary. Follow manufacturer's guidelines. ↵
The hair's ability to absorb moisture or chemicals.
The hair's ability to stretch and return to its original shape without snapping.
The diameter of the hair strand. Texture can be described as fine, medium, or coarse.
The darkness or lightness of colour in relationship to other colours.
The shade or hue.
To add to the intensity or vibrance of a colour.
To counteract or drab the intensity or hue of a colour.
Hair readily absorbs moisture and chemical products. Cuticle scales are lifted and/or damaged.
Hair that does not readily absorb moisture or chemical products. Cuticle scales are tightly packed and smooth.
Colouring products that require a developing agent, such as hydrogen peroxide, to oxidize and introduce colour molecules into the hair strand.
Colouring products that do not require the use or mixing of a developing agent such as hydrogen peroxide.
Hair that displays one or more types of porosity at different areas among the hair.
The hue, level, and intensity that exists in a client's hair prior to a colour service. This could refer to natural colour or previous artificial colour.
Oxidative or non-oxidative colour products that are added to the hair in order to change its hue, level, or intensity.
Colours that reflect red, orange, or yellow.
Colour that does not predominantly reflect a warm or cool tone.
Colours that reflect blue, violet, or green.
A tool used by stylists for hair colour assessment and formulating
Colours which sit across from eachother on the colour wheel, and when mixed, cancel eachother out to create a grey/brown neutral colour.
An acidic product that is mixed with oxidative colour in order to oxidize and produce colour molecules.
The second layer of a hair strand, which provides hair with its strength and elasticity.
Pigment that resides in the hair's cortex which gives hair its hue.
Any pigments that are exposed as hair is lightened through the 10 levels of lift.
