7.5 Ostomies
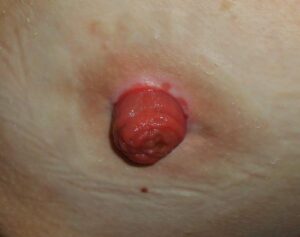
An ostomy is a surgical procedure that creates an opening (stoma) from an area inside the body to the outside of the body. In ostomies related to elimination, a stoma is an opening on the abdomen that is connected to the gastrointestinal or urinary system to allow waste (urine or feces) to be collected in a pouch. See Figure 7.5.1 for an image of a stoma. A stoma can be permanent, such as when an organ is removed, or temporary, such as when an organ requires time to heal. Ostomies are created for clients with conditions such as cancer of the bowel or bladder, inflammatory bowel diseases, or perforation of the colon.
There are several different kinds of ostomies related to elimination. Common types of ostomies include the following:
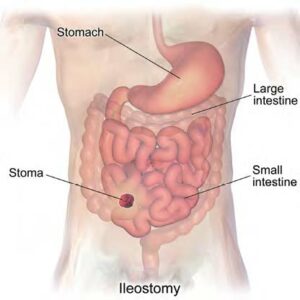
- Ileostomy: The lower end of the small intestine (ileum) is attached to a stoma to bypass the colon, rectum, and anus.
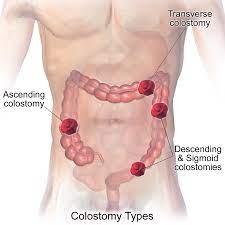
- Colostomy: The colon is attached to a stoma to bypass the rectum and the anus.
- Urostomy: The ureters (tubes that carry urine from the kidney to the bladder) are attached to a stoma to bypass the bladder.
Figures 7.5.2 and 7.5.3 show the anatomical locations of ileostomies and various sites of colostomies. It is important to understand the site of a client’s colostomy because the site impacts the characteristics of the waste. For example, due to the natural digestive process of the colon and absorption of water, waste from an ileostomy or a colostomy placed in the anterior ascending colon will be watery compared to waste from an ostomy placed in the descending colon.
 |
 |
The tissue of a stoma is very delicate. Immediately after surgery, a stoma is swollen, but it will shrink in size over several weeks. A healthy, healed stoma appears moist and dark red or pink in colour. Stomas that are swollen; dry; have malodorous discharge; or are bluish, purple, black, or pale should be reported to the provider. The skin surrounding a stoma can easily become irritated from the pouch adhesive or leakage of fluid from the stoma, so the nurse must perform interventions to prevent skin breakdown. Any identified signs of skin breakdown should be reported to the provider.
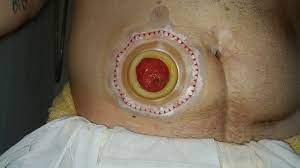
Stoma appliances are supplied as a one- or two-piece set. A two-piece set consists of an ostomy barrier (also called a wafer) and a pouch. The ostomy barrier is the part of the appliance that sticks to the skin with a hole that is fitted around the stoma. The pouch collects the waste and must be emptied regularly. It attaches to the ostomy barrier in a clicking motion to secure the two parts, similar to how a plastic storage container cover snaps to a container to create a seal. The pouching system must be completely sealed to prevent the leaking of the waste and to protect the surrounding peristomal skin. The pouch has an end with an opening where the waste is drained and is closed using a plastic clip or Velcro strip.
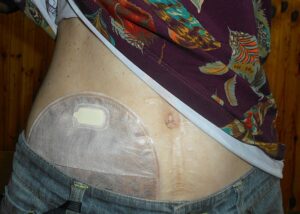
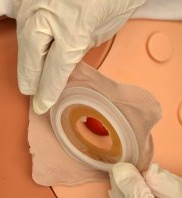
In a one-piece stoma appliance set, the ostomy barrier and the pouch are one piece. See Figure 7.5.4 for an image of a stoma with an ostomy barrier in place. See Figure 7.5.5 for an image of a client with an ileostomy appliance with a pouch attached. The flange is the adhesive part of the ostomy pouching system that secures it to the body.
Individuals with colostomies, ileostomies, and urostomies have no sensation and no control over the output of the stoma. Depending on the type of system, the ostomy appliance can last from four to seven days, but the pouch must be changed if there is leaking, odour, excessive skin exposure, or itching or burning under the skin barrier. Clients with pouches can swim and take showers with the pouching system on.
Changing an Ostomy Appliance (Flange and Pouch)
Safety Considerations
- Pouching system should be changed every 4 to 7 days, depending on the client and type of pouch. Notify supervisor if there is skin breakdown, if there are challenges with flange adhesion, or if there are other concerns related to the pouching system.
- Clients should participate in the care of their ostomy, if able, and health care providers should promote client and family involvement.
- Encourage the client to empty the pouch when it is one-third to one-half full of urine, flatus, or feces as they become heavy and have increased risk of spillage.
- Ostomy product choices may be limited in acute care settings. Other choices are available in community retail settings. Encourage the client/family to explore other options.
- Observe the centre of the flange for evidence of leaking. Waste on the peristomal skin can cause skin breakdown. Leaking flanges must be changed immediately.
- An ostomy belt may be used to help hold the ostomy pouch in place.
- Factors that affect the pouching system include sweating, high heat, moist or oily skin, and physical exercise.
- Always report minor skin irritations immediately. Skin that is sore, wet, or red is difficult to seal with a flange.
- Change ileostomy appliances prior to eating to decrease the likelihood that a bowel movement will occur during appliance change.
| STEP | ACTION | ADDITIONAL INFORMATION |
|---|---|---|
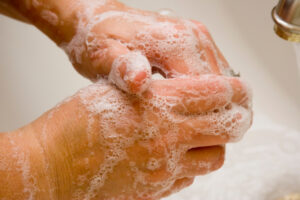
| 1. | Perform hand hygiene. | This prevents the spread of microorganisms.
 |
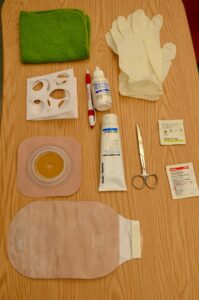
| 2. | Gather supplies, including:
|
 |
| 3. | Identify the client and review the procedure. Encourage the client to participate as much as possible, or observe and assist client as they complete the procedure. | Proper identification complies with agency policy. Encouraging clients to participate helps them adjust to having an ostomy. |
| 4. | Create privacy. Place waterproof pad under pouch. | The pad prevents the spilling of effluent on client and bed sheets. |
| 5. | Apply gloves. Remove the ostomy bag, and measure and empty contents. Place the old pouching system in a garbage bag. |
 |
| 6. | Remove the flange by gently pulling it toward the stoma. Support the skin with your other hand. An adhesive remover may be used. | Gentle removal helps prevent skin tears. An adhesive remover may be used to decrease skin and hair stripping.
 |
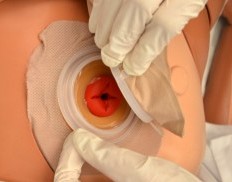
| 7. | Clean the stoma gently by wiping with warm water. Do not use soap. | Aggressive cleaning can cause bleeding. If removing the stomahesive paste from the skin, use a dry cloth first.
Clean the stoma and peristomal skin. 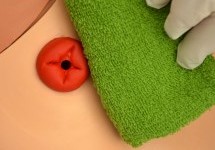 |
| 8. | Observe the stoma and peristomal skin. | A stoma should be pink to red in colour, preferrably moist and raised above skin level.
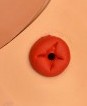 Observe stoma Skin surrounding the stoma should be intact and free from wounds, rashes, or skin breakdown. Notify your supervisor if you are concerned about the condition of the peristomal skin. |
| 9. | Measure the stoma diameter using the measuring guide (tracing template) and cut out stoma hole.
Trace diameter of the measuring guide onto the flange, and cut on the outside of the pen marking. |
The opening should be 2 mm larger than the stoma size.
Keep the measurement guide with the client’s supplies for future use. Trace template. 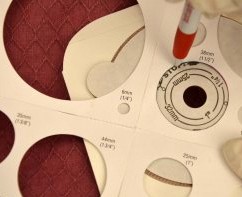 Once the size is traced onto back of flange, cut out the size to fit the stoma. 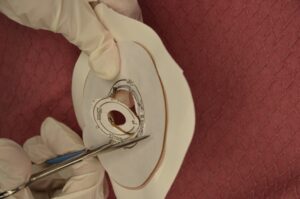 Check the flange to ensure a proper fit to the stoma. 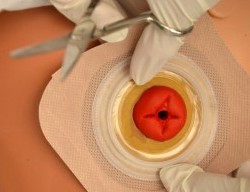 |
| 10. | Prepare skin and apply accessory products as required or according to agency policy. | Peristomal skin prep.
Accessory products may include stomahesive paste, stomahesive powder, or products used to create a skin sealant to adhere pouching system to skin to prevent leaking. Wet skin will prevent the flange from adhering to the skin. 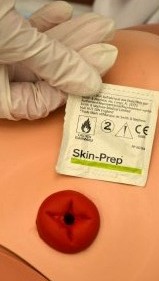 Apply stomahesive paste. 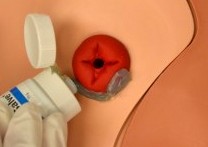 |
| 11. | Remove the inner backing on the flange and apply flange over stoma. Leave the border tape on. Apply pressure. Hold in place for 1 minute to warm the flange to meld to the client’s body. Then remove outer border backing and press gently to create seal. | The warmth of the hand can help the appliance adhere to the skin and prevent leakage.
Remove backing from flange. 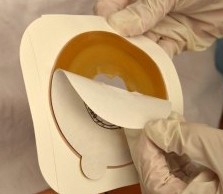 Apply flange around stoma. Press gently to create seal. 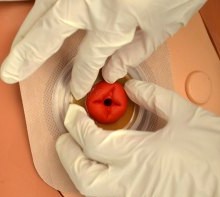 |
| 12. | Apply the ostomy bag. Attach the clip to the bottom of the bag. | Apply ostomy pouch. This step prevents the effluent from soiling the client or bed.
 Attach clip to bottom of bag. 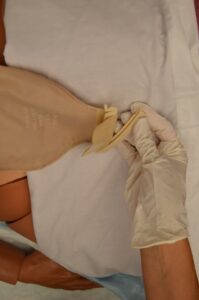 |
| 13. | Hold palm of hand over ostomy pouch for 2 minutes to assist with appliance adhering to skin. | Some flanges are heat activated and adhere better when warmth is applied. |
| 14. | Clean up supplies, and place the client in a comfortable position. Remove garbage from the client’s room. | Removing garbage helps decrease odour. |
| 15. | Perform hand hygiene. | This minimizes the transmission of microorganisms. |
| 16. | Document procedure. | Follow agency policy for documentation. Document the appearance of the stoma and peristomal skin, products used, and the client’s ability to tolerate procedure and assistance with procedure. |
Watch the video:
Ostomy Bag Pouch Change | Ostomy Care Nursing | Colostomy, Ileostomy Bag Change by RegisteredNurseRN (2017).
Procedure Video
The following video provides the best demonstration of the skills for how to empty and change an ostomy flange and bag.
Watch the video:
Some elements of ostomy care involve restricted activities. HCAs must have client-specific delegation from a regulated health professional to perform any restricted activities.
How To Empty & Change An Ostomy Bag by CareChannel (2019)
Stool Specimen Collection
Stool samples are collected from clients to test for cancer, parasites, or occult blood (i.e., hidden blood). Follow specific instructions from the facility/agency where you are working for collecting the sample.
To collect a sample, perform the following steps:
- Explain the procedure to the client. Instruct them to flush the toilet before defecating to remove any potential chemicals and to not place toilet paper in the toilet after defecating. Request they notify you when they have had a bowel movement.
- Review the manufacturer’s instructions because different test kits may have different instructions.
- Contact the laboratory with any questions.
- Label the card with the patient’s name and medical information as per agency policy. Open the flap of the guaiac test card.
- Apply non-sterile gloves. Use the applicator stick to apply a thin smear of the stool specimen to one of the squares of filter paper on the card. Obtain a second specimen from a different part of the stool and apply it to the second square of filter paper on the card. (Occult blood isn’t typically equally dispersed throughout the stool.)
- Place the labelled test card in a transport bag and send it to the laboratory for analysis.
- If you are working in an agency where nurses apply the guaiac developer solution to the card, allow the specimen to dry for 3–5 minutes. Open the reverse side of the card and apply two drops of guaiac developer solution to each square. A blue reaction will occur within 60 seconds if the test is positive. The absence of a blue colour after 60 seconds is considered a negative test.
- Document the date and time of the test and any unusual characteristics of the stool sample.
Summary
Helping to ensure your clients maintain health urinary and bowel elimination are essential medical and psychosocial aspects of providing quality care. The HCA can help clients maintain regular and healthy elimination and prevent complications such constipation, infections, and incontinence.
- Which term describes the process of emptying urine from the bladder? (Select one or more)
- Voiding
- Defecation
- Urination
- Micturition
- Urine should be observed for colour, clarity, odour, amount, and particles
- False
- True
- Which of the following is your responsibility when supporting Mrs. Daliwal who has an indwelling catheter?
- Keep the drainage bag below the level of her bladder.
- Hide the tubing by placing it underneath the client.
- Hook the drainage bag to the bed rail.
- Try to comfort her by saying that her urge to void is all in her head.
- The prolonged retention and accumulation of feces in the rectum is called:
- Fecal incontinence
- Fecal impaction
- Constipation
- Diarrhea
- Which statement about ostomies is true?
- Good skin care around the stoma is essential.
- The client does not need to wear a pouch.
- Feces are always liquid.
- Deodorants cannot control odours.
- Which position should the client be in when the HCA gives an enema?
- Right position
- Prone position
- Sims’ position
- Semi-Fowler’s position
Chapter 7 Attributions and References
Unit 7.2 Image Attributions
- Figure 7.2.1 Urine Hydration Chart by Aishik Rehman, via Wikimedia Commons, is licensed under a CC BY-SA 4.0 licence.
- Figure 7.2.2 Home Care Bedpans & Urinals by BruceBlaus, via Wikimedia Commons, is licensed under a CC BY-SA 4.0 licence.
- Figure 7.2.3 Condom Catheter by BruceBlaus, via Wikimedia Commons, is licensed under a CC BY-SA 4.0 licence.
- Figure 7.2.4 Urinary Drainage Bag by Kim Morris, HCA Program/ Thompson Rivers University, is used under a CC BY 2.0 licence.
- Figure 7.2.5 Drainage Bag Position by BruceBlaus, via Wikimedia Commons, is licensed under a CC BY-SA 4.0 licence.
- Figure 7.2.6 Empty the Drainage Bag by BruceBlaus, via Wikimedia Commons, is licensed under a CC BY-SA 4.0 licence.
- Figure 7.2.7 Incontinence product by Hadifn, via Wikimedia Commons, is licensed under a CC BY-SA 4.0 licence.
Unit 7.3 Image Attributions
- Figure 7.3.1 Bristol Stool Chart by John C Bullas, via Flickr, is licsensed under a CC BY-NC-ND 2.0 licence.
- Figure 7.3.2 Gloves by CDC, via Wikimedia Commons, is in the public domain.
- Figure 7.3.3 Disposable Enema by Helena4780, via Wikimedia Commons, is licensed under a CC BY-SA-4.0 licence.
- Figure 7.3.4 Lubricate tip of suppository or enema from Anderson, Doyle & McCutcheon (2018), via BCcampus, is used under a CC BY 4.0 licence.
- Figure 7.3.5 Dispose of gloves from Anderson, Doyle & McCutcheon (2018), via BCcampus, is used under a CC BY 4.0 licence.
- Figure 7.3.6 Using an ABHR by Kelly Sikkema on Unsplash, is used under the Unsplash License.
- Figure 7.3.7 Ensure call bell is available to client by Kim Morris, HCA Program/ Thompson Rivers University, is used under a CC BY 2.0 licence.
Unit 7.4 Image Attributions
- Figure 7.4.1 Urine Specimen by Turbotorque, via Wikimedia Commons, is in the public domain.
Unit 7.5 Image Attributions
- Figure 7.5.1 Stoma by Salicyna, via Wikimedia Commons, is licensed under a CC BY-SA-4.0 licence.
- Figure 7.5.2 Location of Ileostomy by BruceBlaus, via Wikimedia Commons, is licensed under a CC BY-SA-4.0 licence.
- Figure 7.5.3 Colostomy Types by BruceBlaus, via Wikimedia Commons, is used under a CC BY 3.0 licence.
- Figure 7.5.4 Ostomy Barrier by Eric Polsinelli, via Wikimedia Commons, is licensed under a CC BY-SA-4.0 licence.
- Figure 7.5.5 Ostomy Pouch by Salicyna, via Wikimedia Commons, is licensed under a CC BY-SA-4.0 licence.
- Figure 7.5.6 Hand Hygiene by Arlington County, via Flickr, is licensed under CC BY-SA 2.0 licence.
- Figure 7.5.7 Ostomy Supplies from Anderson, Doyle & McCutcheon (2018), via BCcampus, is used under a CC BY 4.0 licence.
- Figure 7.5.8 Removing an Ostomy Bag, from Anderson, Doyle & McCutcheon (2018), via BCcampus, is used under a CC BY 4.0 licence.
- Figure 7.5.9 Removing a Flange, from Anderson, Doyle & McCutcheon (2018), via BCcampus, is used under a CC BY 4.0 licence.
- Figure 7.5.10 Cleaning a Stoma, from Anderson, Doyle & McCutcheon (2018), via BCcampus, is used under a CC BY 4.0 licence.
- Figure 7.5.11 Healthy Stoma, from Anderson, Doyle & McCutcheon (2018), via BCcampus, is used under a CC BY 4.0 licence.
- Figure 7.5.12 Measuring Stoma Size, from Anderson, Doyle & McCutcheon (2018), via BCcampus, is used under a CC BY 4.0 licence.
- Figure 7.5.13 Cutting Flange to Size, from Anderson, Doyle & McCutcheon (2018), via BCcampus, is used under a CC BY 4.0 licence.
- Figure 7.5.14 Fitting Flange to Stoma, from Anderson, Doyle & McCutcheon (2018), via BCcampus, is used under a CC BY 4.0 licence.
- Figure 7.5.15 Prepping Peristomal Skin, from Anderson, Doyle & McCutcheon (2018), via BCcampus, is used under a CC BY 4.0 licence.
- Figure 7.5.16 Applying Stomahesive Paste, from Anderson, Doyle & McCutcheon (2018), via BCcampus, is used under a CC BY 4.0 licence.
- Figure 7.5.17 Preparing Flange, from Anderson, Doyle & McCutcheon (2018), via BCcampus, is used under a CC BY 4.0 licence.
- Figure 7.5.18 Applying Flange, from Anderson, Doyle & McCutcheon (2018), via BCcampus, is used under a CC BY 4.0 licence.
- Figure 7.5.19 Applying Ostomy Pouch, from Anderson, Doyle & McCutcheon (2018), via BCcampus, is used under a CC BY 4.0 licence.
- Figure 7.5.20 Applying Ostomy Pouch, from Anderson, Doyle & McCutcheon (2018), via BCcampus, is used under a CC BY 4.0 licence.
- Figure 7.5.21 Closing Ostomy Pouch, from Anderson, Doyle & McCutcheon (2018), via BCcampus, is used under a CC BY 4.0 licence.
Videos
- What Your Urine Colour Says About Your Health | Urinary System Breakdown | #DeepDives by Health (2021) is licensed under a Standard YouTube License.
- Urinary Tract Infections, Animation by Alila Medical Media (2016) is licensed under a Standard YouTube License.
- How to use a Bedpan – Tips for Caregivers by CareChannel (2019) is licensed under a Standard YouTube License.
- Assisting with a Urinal by Ashraf Z Qotmosh (2020) is licensed under a Standard YouTube License.
- How to Apply a Condom Catheter, by University of Manitoba Nursing Skills (2018) is licensed under a Standard YouTube License.
- How to Perform Perineal Care with an Indwelling Catheter, by University of Manitoba Nursing Skills (2018) is licensed under a Standard YouTube License.
- Empty Urinary Drainage Bag CNA Skill NEW, by 4yourCNA (2016) is licensed under a Standard YouTube License.
References
Anderson, R., Doyle, G. R., & McCutcheon, J. A. (2018). Clinical Procedures for Safer Patient Care – Thompson Rivers University Edition. Thompson Rivers University. https://pressbooks.bccampus.ca/clinicalproceduresforsaferpatientcaretrubscn//
Berman, A. J., & Snyder S. (2016). Skills in clinical nursing (8th ed.). Pearson.
British Columbia Institute of Technology (BCIT). (2015b). Clinical techniques. In NURS 2020. BCIT. https://circuit.bcit.ca/islandora/object/coutlines%3A400
Blausen.com Staff. (2014). Medical gallery of Blausen Medical 2014. Wikijournal of Medicine, 1(2). DOI:10.15347/wjm/2014.010. ISSN 2002-4436.
Convatech. (2018). Ostomy care video library. https://www.convatec.com/videos/ostomy-videos/.
Lilley, L., Rainforth Collins, S., Snyder, J., & Swart, B. (2016). Pharmacology for Canadian health care practice (3rd Canadian ed.). Elsevier.
Perry, A. G., Potter, P. A., & Ostendorf, W. R. (2018). Clinical nursing skills and techniques (9th ed.). Elsevier-Mosby.
United Ostomy Association of America. (2017). Ileostomy guide. http://www.ostomy.org/uploaded/files/ostomy_info/IleostomyGuide.pdf?direct=1.
- (Data source: BCIT, 2015; Berman & Snyder, 2016; Convatec, 2018; Perry, et al., 2018; United Ostomy Association of America, 2017) ↵
A surgically created artificial opening in the abdomen for elimination of feces or urine.
A surgically created opening on the surface of the skin that allows the passage of bodily waste out of the body. It is often used when a portion of the digestive or urinary system needs to be bypassed, as in cases of colostomy, ileostomy, or urostomy.
A surgically created artificial opening between the ileum (final section of the small intestine) and the abdominal wall.
A surgically created artificial opening between the colon and the abdominal wall.
