7.2 Urinary Elimination
Normal Urinary Elimination
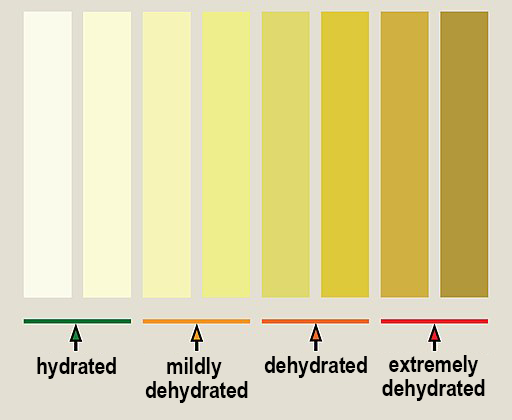
The kidneys filter the blood to remove waste products and also assist in maintaining fluid balance in the body. The result is the production of urine. Healthy adults produce between 1–2 litres of urine per day. Urine production is affected by a variety of factors such as disease process, age, medications, diet, and exercise. It is important for the HCA to monitor the client’s urinary output, colour, clarity, odour, frequency, and any complaints of pain or discomfort when voiding. Any abnormalities or changes should be documented and reported, as these can indicate health related changes. Therefore, it is important to know what the range of normal is for each observation.
Characteristics of Urine
| Characteristic | What is Normal? |
|---|---|
| Colour | Can range from pale/light yellow to straw- coloured (see Figure 7.2.1: Urine Hydration Chart) |
| Clarity | Clear; no visible particles |
| Odour | Faint, mild odour |
| Frequency |
|
| Urgency |
|
| Pain or discomfort | Normally, there should be no pain or discomfort with urination. |
| Characteristic | Abnormal Characteristics | Possible Causes |
|---|---|---|
| Colour | Amber, orange, brown, or red |
|
| Clarity | Cloudy, shreds of mucous, blood clots | Could indicate a urinary tract infection (UTI) or other kidney disorder |
| Odour | Strong, foul |
|
| Frequency/urgency | Increased frequency (more than 7 times in 24 hours) and feeling a constant need to void | Can indicate a UTI or other medical condition such as diabetes or prostate problems in men |
| Pain or discomfort | Burning, stinging sensation on voiding | Can indicate a UTI or other infection. |
Explore More
The following video provide you with more information about urine and urinary infections.
Videos: Characteristics of Urine and Urinary Tract Infections
Watch What Your Urine Colour Says About Your Health | Urinary System Breakdown | #DeepDives by Health (2021) on YouTube.
Next, watch the video, Urinary Tract Infections, Animation by Alila Medical Media (2016) on YouTube.
Assisting with Urinary Elimination
The Health Care Assistant plays an important role in assisting clients to maintain normal elimination patterns. By following the guidelines below, you can support independence and possibly prevent urinary elimination problems. Always check the care plan.
HCA Guidelines for Urinary Elimination
- Follow routine practices when assisting with elimination.
- Encourage fluids as per the care plan.
- Provide assistance promptly.
- Encourage clients to call when feeling the need to void.
- Provide comfort and privacy to the client as necessary.
- Utilize adaptive devices as per the care plan (e.g., raised toilet seat, mechanical lifts, commode, and urinal).
- Ensure the safety of the client (provide call bell, stand by if client is unsteady).
- Provide peri-care after if the client is unable to do it themselves.
- Ensure to wash the client’s hands afterwards, as well as your own.
- Note characteristics of urine and report anything abnormal to supervisor.
Urinary Elimination: Using Equipment and Devices
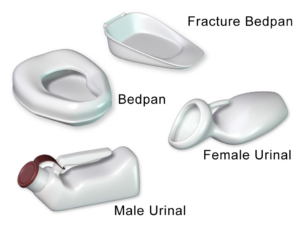
Clients may need to use a variety of different devices and equipment to assist them with their urinary elimination needs. Clients who are unable to get out of bed due to mobility issues or injury may benefit from using a bedpan. Clients with a penis may benefit from using a urinal at the bedside to prevent having to walk to the bathroom. Some clients need a urinary catheter. Clients with a penis may require condom catheters, which are external urinary drainage systems where a condom is applied to the penis and attached to a urinary drainage bag. Other clients may have indwelling catheters in which the catheter is inserted into their bladder. The catheter is attached to an external urinary drainage bag.
The Health Care Assistant has an important role in providing assistance with elimination and cleansing the genital area after elimination. This section discusses how to offer a client a bedpan or urinal, how to apply a condom catheter, and how to cleanse the genital area and catheter tubing. Instruction is provided about how to empty urinary drainage bags that are attached to condom catheters and indwelling catheters, and how to properly measure urine output.
Using a Bedpan
Clients who are unable to get out of bed due to mobility issues or surgery may need to use a bedpan when urinating or for bowel movements. The standard bedpan looks like a toilet seat and has a wide, high rim. These types of bedpans are placed under the client with the widest end under their buttocks. The fracture pan has a lower, thinner rim. The smaller, flatter end is placed under the buttocks. The higher end with the handle is placed facing the client’s feet. The fracture pan should be used for clients who are unable to lift their hips for bedpan placement after back or spinal injuries or surgeries.
| STEP | ACTIONS | REASON |
|---|---|---|
| 1. | Check the client’s care plan. | Ensures you have information specific to this client’s care. |
| 2. | Perform hand hygiene before preparing supplies. | Follows routine practices to prevent the spread of pathogens. |
| 3. | Assemble equipment and supplies:
|
Gloves are needed for contact with blood/body fluids.
Incontinent pad or waterproof pad protects bed linens. |
| 4. | Provide privacy for the client by closing doors and/or curtains. | Maintains the privacy and dignity of the client. |
| 5. | Explain the procedure to the client. | Clients have a right to information about their care. |
| 6. | Raise the bed to working height. | Positioning helps prevent injury to the HCA. |
| 7. | Fold down the top linens just enough to slide the bedpan under the client. | Maintains privacy and dignity of the client. |
| 8. | Place an incontinent pad or waterproof pad under the client as needed. | Protects bed linens from urine or feces in case of accidental spilling of bedpan contents. |
| 9. | Assist the client with removing their pants and undergarments if they are unable to do so. | |
| 10. | Place a bedpan near the client’s hips.
Position a standard bedpan with the wider edge aligned with the buttocks. Position a fracture pan with the flatter end under the client’s buttocks and the handle toward the foot of the bed. |
|
| 11. |
|
|
| 12. |
|
Correct positioning ensures client comfort and prevents spillage of bedpan contents. |
| 13. |
|
Ensures bacteria from the anal area and the feces do not enter the vaginal area and cause a possible infection. |
| 14. |
|
Provides safety and comfort. |
| 15. |
|
Decreases odours and ensures cleanliness of client’s environment. |
| 16. |
|
Ensures communication of client’s health status to other team members. |
| 17. | Dispose of your gloves, and wash and dry your hands. | Follows routine practices to prevent the spread of pathogens. |
| 18. | Document the procedure and any observations or changes you noticed in the client’s condition or behaviour. | Ensures communication of the client’s health status to other team members. |
Watch the video:
How to use a Bedpan – Tips for Caregivers by CareChannel (2019) by CareChannel. CareChannel is developed by the Saint Elizabeth Foundation, presented by Elizz, and funded by The Ontario Ministry of Health Long Term Care.
Using a Urinal
The use of a urinal helps a clients with penises privately and safely urinate, without having to ambulate to the bathroom or commode. Many clients with a penis find it easier to urinate in a high sitting or standing position. Assist the client into the position they are most comfortable with, and which they can safely assume during urination. Health Care Assistants may need to assist some clients with positioning and holding the urinal while they urinate.
| STEP | ACTION | REASON |
|---|---|---|
| 1. | Check the client’s care plan. | Ensures you have information specific to this client’s care. |
| 2. | Perform hand hygiene before preparing supplies. | Follows routine practices to prevent the spread of pathogens. |
| 3. | Assemble equipment and supplies:
|
Gloves are needed for contact with blood/body fluids.
Incontinent pad or waterproof pad protects bed linens. |
| 4. | Provide privacy for the client by closing doors and/or curtains. | Maintains privacy and dignity of the client. |
| 5. | Explain the procedure to the client. | Clients have a right to information about their care. |
| 6. | Raise the bed to working height. | Positioning helps prevent injury to the HCA. |
| 7. |
|
Some clients with penises may find it easier to void when in a standing position. |
| 8. | Place an incontinent pad or waterproof pad under client’s hips as needed. | Helps protect bed linens from urine in case of accidental spilling of urinal contents. |
| 9. | If the client is able, hand them the urinal. | Promotes independence. |
| 10. |
|
|
| 11. |
|
Maintains the privacy and dignity of the client. |
| 12. |
|
Maintains the privacy and dignity of the client. |
| 13. | Discard gloves and wash your hands. | Follows routine practices to prevent the spread of pathogens. |
| 14. | When the client has finished using the urinal, wash your hands and don clean gloves. | Follows routine practices to prevent the spread of pathogens. |
| 15. | Close the cap on the urinal. | Prevents spillage of contents. |
| 16. |
|
Ensures client safety. |
| 17. | Remove the urinal and supplies. | Ensures cleanliness of the client’s environment. |
| 18. | Measure urine and record output as required. | Ensures communication of the client’s health status to other team members. |
| 19. |
|
Decreases odours and ensures cleanliness of the client’s environment. |
| 20. | Dispose of gloves and wash your hands. | Follows routine practices to prevent the spread of pathogens. |
| 21. | Document the procedure and any observations or changes in the client’s condition or behaviour that you’ve observed. | Ensures communication of the client’s health status to other team members. |
Watch the video,
Assisting with a Urinal by Ashraf Z Qotmosh (2020).
Condom Catheter
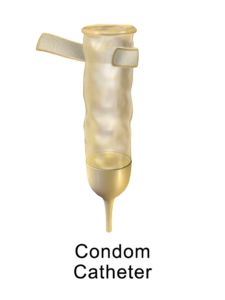
Condom catheters are worn by some clients with penises to assist with urination. This urinary drainage system allows a client to engage in their normal activities, without being concerned about problems with urination, such as incontinence. It is a less invasive urinary drainage system than an indwelling catheter and has a low risk of infection. It is important for Health Care Assistants to ensure the tubing to this urinary drainage system is not kinked or twisted, and that the drainage collection bag is worn below the level of the bladder.
| STEP | ACTION | REASON |
|---|---|---|
| 1. | Check the client’s care plan. | Ensures you have information specific to this client’s care. |
| 2. | Perform hand hygiene before preparing supplies. | Follows routine practices to prevent the spread of pathogens. |
| 3. | Assemble equipment and supplies:
|
Gloves are needed for contact with blood/body fluids. |
| 4. | Provide privacy for the client by closing doors and/or curtains. | Maintains privacy and dignity of the client. |
| 5. | Explain the procedure to the client. | Clients have a right to information about their care. |
| 6. | Raise bed to working height; place client in a supine position. | Positioning helps prevent injury to the HCA. |
| 7. | Only expose genital area. | Maintains privacy and dignity of the client. |
| 8. | Remove the old condom catheter if one is in place by detaching it from the drainage system tubing and rolling the condom down and off the penis, starting at the base of the penis and rolling towards the tip of the penis. Dispose of the old condom catheter. | Ensures cleanliness of the client’s environment. |
| 9. | Wash the penis carefully with soap and warm water (temperature no greater than 40ºC Celsius). For uncircumcised clients, push the foreskin down the shaft of the penis and clean the head (glans) of the penis. The glans of the penis should be washed using a circular motion from the opening of the urinary meatus outward. Wash the shaft of the penis using downward strokes. Remember to move the foreskin back up. If the foreskin is not reduced (put back into its original place), swelling will result due to circulation of blood to the penis being cut off. | If the foreskin is not reduced (put back into its original place), swelling will result due to circulation of blood to the penis being cut off. |
| 10. | Observe the penis for sores, open or red areas, and broken skin. | |
| 11. | Attach the condom catheter to the tubing of the collection system.
Note: If a drainage bag is being reused, swab the end of the drainage bag tubing with an alcohol wipe prior to connecting to the condom catheter. |
Swabbing with an alcohol wipe will decrease the risk of a urinary tract infection from contaminated tubing. |
| 12. | Push pubic hair away from the shaft of the penis. | Prevents the pubic hair from sticking to the condom. |
| 13. |
|
|
| 14. | If tape is being used to secure the condom in place, apply it in a spiral manner, starting at the top of the penis, and working downward. | |
| 15. | Ensure the tubing for the collection system is connected to the condom. | |
| 16. |
|
|
| 17. |
|
Ensures urine from the drainage bag does not move back up to the penis. |
| 18. | Lower the bed to its lowest position.
If required by the client’s care plan, ensure the bed rails are raised. |
Provides safety for the client. |
| 19. | Discard used supplies. | Ensures cleanliness of the client’s environment. |
| 20. | Discard gloves and wash your hands. | Follows routine practices to prevent the spread of pathogens. |
| 21. | Document the application of the condom catheter and any skin conditions that you’ve observed on your client, such as sores, swelling, red, or raw areas. | Ensures communication of the client’s health status to other team members. |
Watch the video:
How To Apply A Condom Catheter by Kim Morris, RN, BN, MN; Tracy Christianson, RN, BSN, MN, DHEd, CCNE; Lynnette Fleury, RN, BSN, MSN; and Leon Racicot is licensed under a CC BY 4.0 licence.
Cleaning the Skin and Indwelling Catheter Tubing
Providing personal hygiene care is an important part of the Health Care Assistant’s job. Cleaning the catheter tubing should be completed daily, when providing bathing and perineal care for the client. Providing perineal care and cleaning the catheter tubing are both tasks. However, some elements of catheter care involve restricted activities. HCAs must have client-specific delegation from a regulated health professional to perform any restricted activities.
| STEP | ACTION | REASON |
|---|---|---|
| 1. | Check the client’s care plan. | Ensures you have information specific to this client’s care. |
| 2. | Perform hand hygiene before preparing supplies. | Follows routine practices to prevent the spread of pathogens. |
| 3. | Assemble equipment and supplies:
|
Gloves are needed for contact with blood/body fluids. |
| 4. | Provide privacy for the client by closing doors and/or curtains. | Maintains privacy and dignity of the client. |
| 5. | Explain the procedure to the client. | Clients have a right to information about their care. |
| 6. |
|
Prevents injury to the HCA. |
| 7. | Only expose genital area. | Maintains privacy and dignity of the client. |
| 8. | Position the client on their back to expose the perineal area and catheter tubing. | |
| 9. | Place a towel or disposable protective pad under the client. | Prevents bed linens from becoming soiled. |
| 10. | Wash the client’s genital area gently with soap and warm water (no greater than 40°C).
Clients with a Penis
Clients with a Vulva
|
|
| 11. |
|
Take care to avoid pulling on the catheter at any time, as this could cause injury to the client. |
| 12. | Hold the tubing with one hand close to the meatus, while gently cleansing the length of the tubing — starting from the point of entry (urinary opening) and moving down the tubing. | Prevents the pubic hair from sticking to the condom. |
| 13. |
|
Never clean the bottom part of the tubing and move toward the urinary opening. This could introduce bacteria into the urinary system. |
| 14. |
|
Ensures communication of the client’s health status to other team members. |
| 15. | Ensure the catheter tubing is taped or that a catheter securement device is in place, according to the care plan. | Prevents kinking of the tubing. |
| 16. |
|
|
| 17. |
|
Ensures cleanliness of the client’s environment. |
| 18. | Lower the bed to its lowest setting, and if required by care plan, ensure the side rails are raised. | Provides safety for the client. |
| 19. | Discard gloves and wash your hands. | Follows routine practices to prevent the spread of pathogens. |
| A20. | Record the time of procedure and any observations or changes observed in the client’s behaviour or condition. | Ensures communication of the client’s health status to other team members. |
Watch the video:
How to Perform Perineal Care with an Indwelling Catheter, by University of Manitoba Nursing Skills (2018).
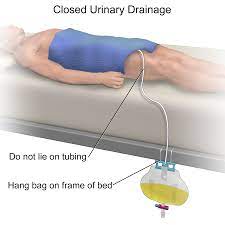
Emptying the Urinary Drainage Bag
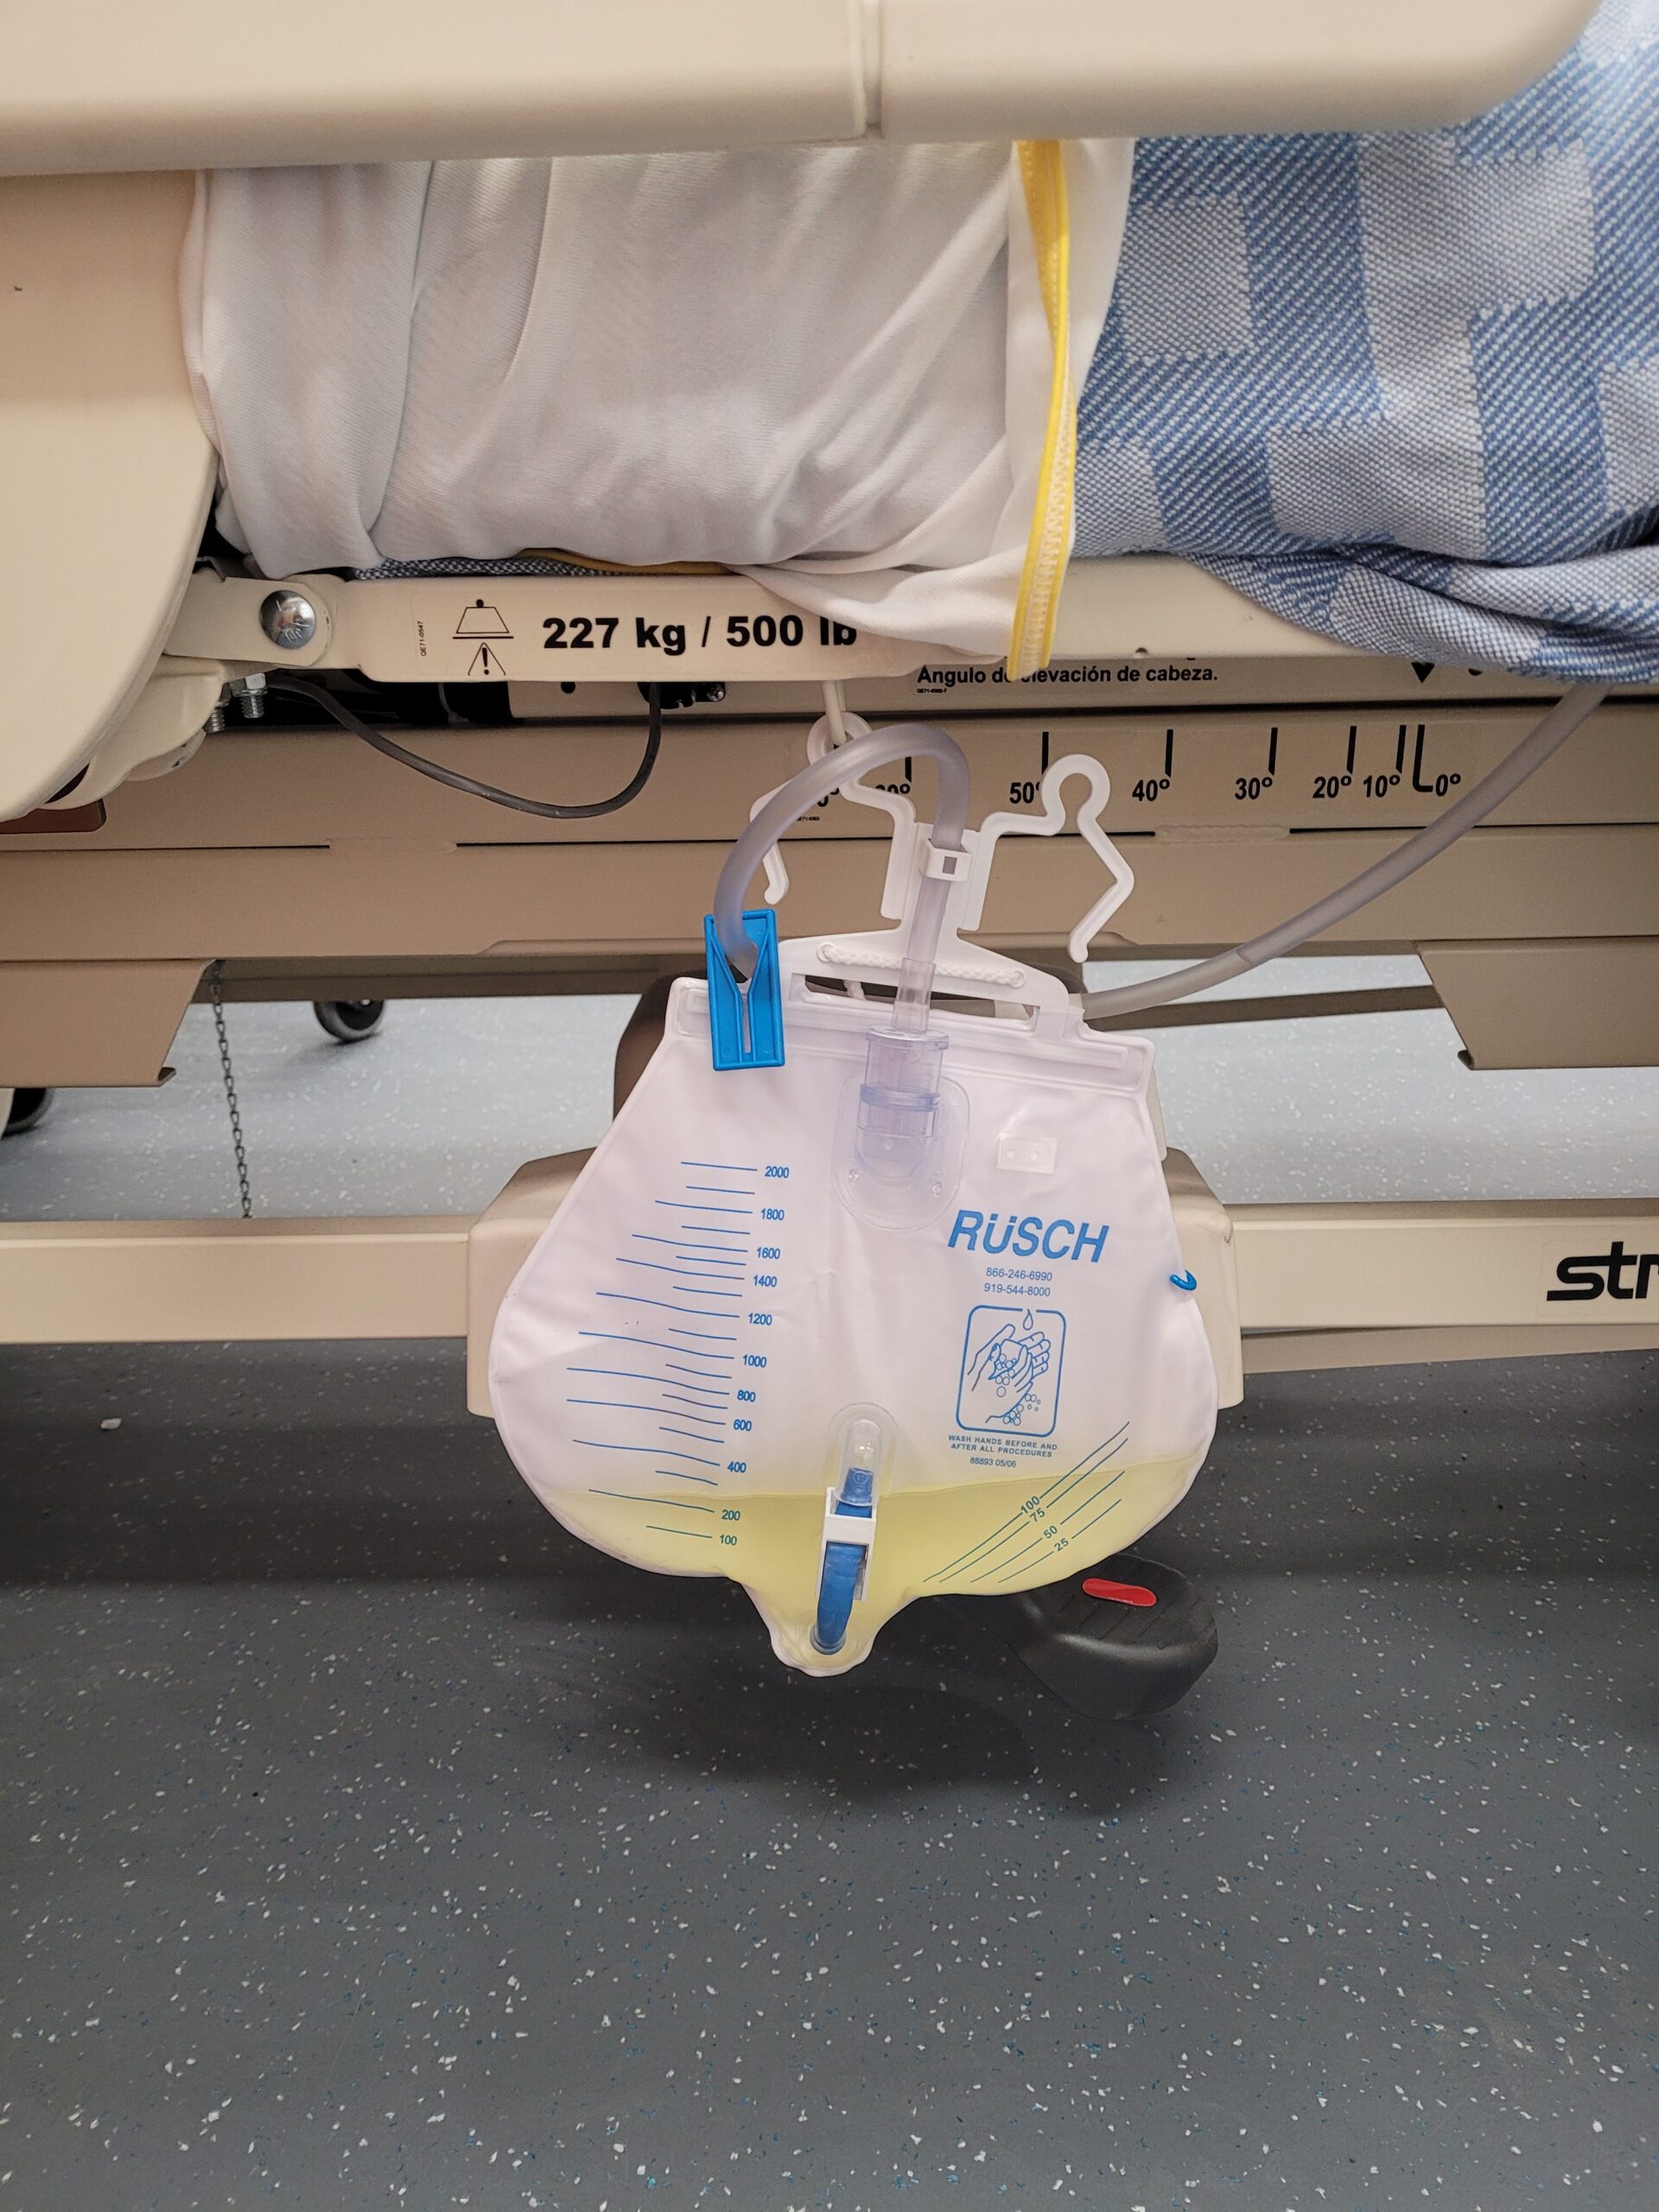
Drainage bags on urinary collection systems, such as those from indwelling catheters or condom catheters, need to be emptied regularly. Health Care Assistants should frequently check that the tubing on the catheter system is not twisted or kinked, and ensure that drainage bags are below bladder level. Never hang them from the client’s bed rails, as the bag will move when the bed rails are raised or lowered.
 |
|
| STEP | ACTION | REASON |
|---|---|---|
| 1. | Check the client’s care plan. | Ensures you have information specific to this client’s care. |
| 2. | Perform hand hygiene and don gloves. | Follows routine practices to prevent the spread of pathogens.
Gloves are needed for contact with blood/body fluids. |
| 3. | Assemble equipment and supplies:
|
|
| 4. | Provide privacy for the client by closing doors and/or curtains. | Maintains the privacy and dignity of the client. |
| 5. | Explain the procedure to the client. | Clients have a right to information about their care. |
| 6. | Place the measuring pitcher or graduate cylinder below the drainage bag on a paper towel. | Protects floor from contamination. |
| 7. | Release the drain from the holder. | |
| 8. | Open the clamp on the drainage bag without allowing the drain to touch the measuring cylinder. | Prevents transfer of bacteria from cylinder to drain. |
| 9. | Allow contents to pour into a measuring container. | |
| 10. | Take care to prevent urine from splashing onto your face or clothing. | |
| 11. | Clamp the drainage bag and clean the end of the drain with an alcohol wipe. | Prevents transfer of bacteria to drainage bag. |
| 12. | Position the clamp back into its holder. | |
| 13. |
|
Measuring at eye level ensures greater accuracy of measurement. |
| 14. |
|
Decreases odours and ensures cleanliness of the client’s environment. |
| 15. | Discard gloves and wash your hands. | Follows routine practices to prevent the spread of pathogens. |
| 16. |
|
Ensures communication of the client’s health status to other team members. |
Measuring Urinary Output
Fluid taken into the body must be eliminated from the body. The urine that is excreted from the body is called output. It is important for Health Care Assistants to measure the output of their clients to ensure optimal health. A client may have a condition in which the health care provider wants to ensure that their intake equals their output. This helps to maintain adequate fluid balance. Fluids are usually measured using millilitres (ml). The agency will specify the unit of measurement for Health Care Assistants.
Urinals and catheter drainage systems have measuring lines on the system. The amount of urine at the number indicates the amount of output. For clients who use a toilet, commode, or bedpan, urine contents can be emptied into a graduated or other measuring pitcher to provide an accurate measurement of output. Contents can be disposed of down the toilet once the urine has been measured.
| STEP | ACTION | REASON |
|---|---|---|
| 1. | Explain to the client the importance of measuring urinary output. | Clients have a right to information about their care. |
| 2. | Always wash hands and don gloves when measuring urinary output. | Following routine practices prevents the spread of pathogens.
Gloves are needed for contact with blood/body fluids. |
| 3. | Pour urine from a bedpan, commode, urinal, or urinary drainage bag into a measuring pitcher or cylinder. | |
| 4. | Place the measuring pitcher on a paper towel on a flat surface. | Measuring on a flat surface ensures accuracy. |
| 5. | Note the amount of urine at eye level. Record amount. Amount of urine should be documented in millilitres (ml). | Measuring at eye level ensures greater accuracy of measurement. |
| 6. | Discard urine into the toilet, unless the urine is needed for a specimen. | |
| 7. | If you notice anything unusual about the urine, save the urine to be inspected by a supervisor. | Ensures communication of the client’s health status to other team members. |
| 8. | Flush the toilet. | Decreases odours. |
| 9. | Rinse bedpans, commodes, urinals, and measuring pitchers that were used. | Decreases odours. |
| 10. | Store equipment in the appropriate place. | Ensures cleanliness of the client’s environment. |
| 11. | Discard gloves and wash your hands. | Following routine practices prevents the spread of pathogens. |
| 12. |
|
Ensures communication of the client’s health status to other team members. |
| 13. | Record and report changes in the characteristics of the client’s urine, including colour, amount, odour, blood or mucus in the urine, or if the client has difficulty or pain while urinating. | Ensures communication of the client’s health status to other team members. |
Watch the video:
Empty Urinary Drainage Bag CNA Skill NEW, by 4yourCNA (2016)
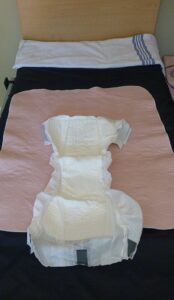
Urinary Incontinence
Urinary incontinence is the involuntary loss of urine. Although abnormal, it is a common symptom that can seriously affect the physical, psychological, and social well-being of affected individuals of all ages. It has been estimated that one in five women develop urinary incontinence, but many are too embarrassed to discuss the condition with their health care providers. Some believe it’s a normal part of aging and something that they have to live with. The result can be isolation and depression when they limit their activities and social interactions because of embarrassment due to incontinence. Health care assistants can decrease incontinence by providing regular toileting opportunities to the client. This will greatly impact the client’s dignity and self-esteem. There are a variety of incontinence products available. They can provide the client with a sense of continence, and help to keep clothing and bed linens dry. Changing the incontinence products when wet and providing thorough and frequent skin care will prevent odour, discomfort, and skin breakdown.
Types of Urinary Incontinence
Continence is achieved through an interplay of the physiology of the bladder, urethra, sphincter, pelvic floor, and the nervous system coordinating these organs. A disruption in any of these areas can cause several types of urinary incontinence.
- Stress urinary incontinence is the involuntary loss of urine with intra-abdominal pressure (e.g., laughing and coughing) or physical exertion (e.g., jumping). It is caused by weak pelvic floor muscles that are often the result of pregnancy and vaginal delivery, menopause, and vaginal hysterectomy.
- Urge urinary incontinence (also referred to as “overactive bladder”) is urine leakage caused by the sensation of a strong desire to void (urgency). It can be caused by increased sensitivity to stimulation by the detrusor muscle in the bladder or decreased inhibitory control of the central nervous system.
- Mixed urinary incontinence is a mix of urinary frequency, urgency, and stress incontinence.
- Overflow incontinence occurs when small amounts of urine leak from a bladder that is always full. This condition tends to occur in clients with enlarged prostates that prevent the complete emptying of the bladder.
- Functional incontinence occurs in older adults who have normal bladder control, but have a problem getting to the toilet because of arthritis or other disorders that make it hard to move quickly or manipulate zippers or buttons. Clients with dementia also have an increased risk for functional incontinence.
Refers to how often a person voids over 24 hours.
To empty urine from the bladder.
The feeling of needing to urinate.
A muscular organ which stores urine.
A container into which bowel or bladder elimination may occur. These devices are helpful for people who have mobility issues and have difficulty getting out of bed.
A container or receptacle into which the client urinates. Handheld urinals are available to assist clients who have mobility issues.
A tube inserted into the bladder through the urethra to drain urine.
A soft, flexible sheath that is placed over the penis and connected to tubing leading to a drainage bag. It is used to manage urinary incontinence.
A urinary tube (catheter) that is left in the bladder to drain urine. It is held in place by a water-filled balloon, which prevents it from falling out.
To empty urine from the bladder.
A person who has not had the foreskin of the penis removed.
The outer skin that covers the end of the penis and can be retracted.
The long part of the penis.
Urinary opening.
Eliminated or removed from the body.
Measuring by percentage how much food and liquid has been consumed.
Loss of bladder control.
