Learning Task 1
Types of Irrigation Systems
Types of Irrigation Systems
An irrigation system is simply one that supplies water to plants of different varieties. They can be broadly classed as being agricultural (crops such as hay, alfalfa, etc.), commercial (large-scale building sites, golf courses) or residential (single family dwellings, duplexes and small townhouses). This guide will focus on a single-family house in its descriptions, but it should be noted that the design considerations covered can be applied to installations of any size.
There are two different styles of irrigation systems, which are traditional sprinkler-based systems and drip irrigation systems. They are often used together to ensure that the watering needs of all plants are met.
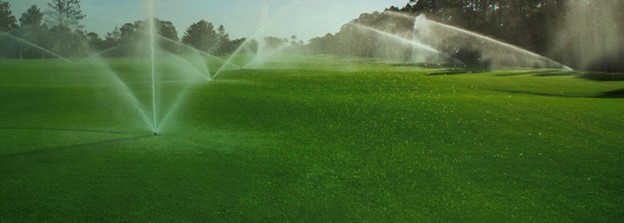
Traditional sprinkler-based systems are well suited for large areas of grass and plants that have similar watering needs. They water uniformly by broadcasting water in well-defined patterns which are often 1.5m (5′) or more in diameter.
Drip irrigation complements traditional systems by targeting smaller, more specific areas such as planters on patios, hanging baskets and such. They use very little water and, in doing so, are effective in discouraging weed growth.

Because drip systems are quite simple and easy to install, with little piping or trades knowledge required, we will leave their considerations alone and will instead concentrate on traditional sprinkler-based systems. Within that context, we will describe the steps involved in the installation of an irrigation system in a logical sequence that will span from the investigation and planning process through installation, testing and commissioning. The steps in this procedure should be taken in this order to reduce the chances of overlooking important factors in the process.
The steps are:
- Obtaining site information
- Determining the irrigation requirement
- Determining water and power supply
- Selecting and locating sprinklers
- Layout of zone valves and main lines
- Sizing pipe and valves and calculating total system pressure loss
- Locating controllers and sizing wire
- Installing the system
- Flushing, testing and commissioning
- Routine maintenance and troubleshooting
Step 1: Site Information
Before embarking on any installation, contact the local Authority Having Jurisdiction (AHJ) for information regarding any permits and other requirements such as backflow prevention. It is also imperative that you recognize the need to “call before you dig”. In British Columbia, a service known as “BC 1 Call” is available that will gather and relay to interested parties the information that is archived with utility providers. It will show the approximate location and depth of known underground services such as hydro, water, telephone, gas and sewer. This information usually takes a couple of business days to reach the inquirer so be sure to make the request well in advance of the intended work.
This is the logical point where a sketch of the site should be created. For newer buildings there may already be one that could be utilized; if not, it should be drawn as accurately as possible, and to scale. This will assist in the selection and placement of the types of sprinklers to be used as well as the number and location of zones and zone valves. The use of graph paper is the best choice for the sketch. Each square of graph paper should represent one square foot of property if possible. Alternatively, choose a scale such as 1 inch = 10 feet, or 1 inch = 20 feet. Try to use a scale that will represent the proposed site with as much detail as possible. Remember to:
- Measure and show the perimeter of the property including landmarks and benchmarks
- Outline the house, garage and any other structures
- Identify trees and other obstacles to water streams from sprinklers
- Show walkways, driveways, slabs, patios and any other areas that are not intended to be watered
- Show all areas to be watered, including groundcover, grass, landscaping shrubs and flower beds
- Indicate slopes
- Identify the irrigation system’s water supply location and size of pipe
Again, make the sketch as accurate as possible and make a few copies. The system layouts will be drawn directly onto this paper so ensure there are enough clean spare copies.
Step 2: The Irrigation Requirements
A few factors need to be considered to determine how much water is needed for the plant material, which in turn determines how often and how long the system needs to operate (see Step 9). The local climate is one of the main factors that influences how much water is needed to maintain good plant growth. Another factor is the plant water requirement which includes the water lost by evaporation into the atmosphere from the soil and soil surface, and by transpiration, which is the amount of water used by the plant. The combination of these is known as evapotranspiration (ET). The table below is a “ballpark” estimate that takes into consideration the average amount of water, in inches or mm per day, that satisfies the evapotranspiration (ET) needs of most plants in conjunction with the local climate.
| Cool Humid | .10 to .15 in (3 to 4 mm) |
| Cool Dry | .15 to .20 in (4 to 5 mm) |
| Warm Humid | .15 to .20 in (4 to 5 mm) |
| Warm Dry | .20 to .25 in (5 to 6 mm) |
| Hot Humid | .25 to .30 in (6 to 8 mm) |
| Dot Dry | .30 to .45 in (8 to 11 mm) “worst case” |
Cool = under 70° F (21˚ C) as an average midsummer high
Warm = between 70° and 90° F (21˚ and 32˚ C) as midsummer highs
Hot = over 90° F (32˚C)
Humid = over 50% average midsummer relative humidity
Dry = under 50%
Where larger agricultural watering needs are concerned there are other more accurate calculations that should be performed but for most residential scenarios the table above is adequate.
Soil absorbs and holds water in much the same way as does a sponge. A given texture of soil will hold a certain amount of moisture and will influence the precipitation rate and type of sprinkler to be used, whereas the ability of the soil to hold moisture and the amount of moisture it can hold will influence the irrigation schedule. Soil is comprised of particles of sand, silt and clay, and the percentage of each determines the soil’s texture. Because the percentage of any one of these three particles can differ, there is virtually an unlimited number of soil types possible.
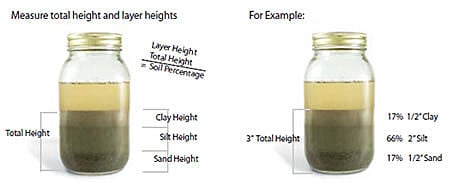
An accurate way to determine the amount of sand, silt and clay in soil is to conduct a jar test as laid out below.
- Remove 1 to 2 cups of soil from the zone to be irrigated. Take it from a point 6 to 8 inches (150 mm to 200 mm) below the ground’s surface. Place it into a clear glass jar, like a mason jar.
- Fill the jar halfway with water. Replace the lid, shake and let sit for 2 hours so the particles can settle. The heavier sand particles will settle to the bottom, then silt, then clay on top.
- Measure the height of all 3 layers of the soil then the height of each layer. Divide the height of each layer by the total liquid height to compute the percentage of each soil in the jar (see the graphic below).
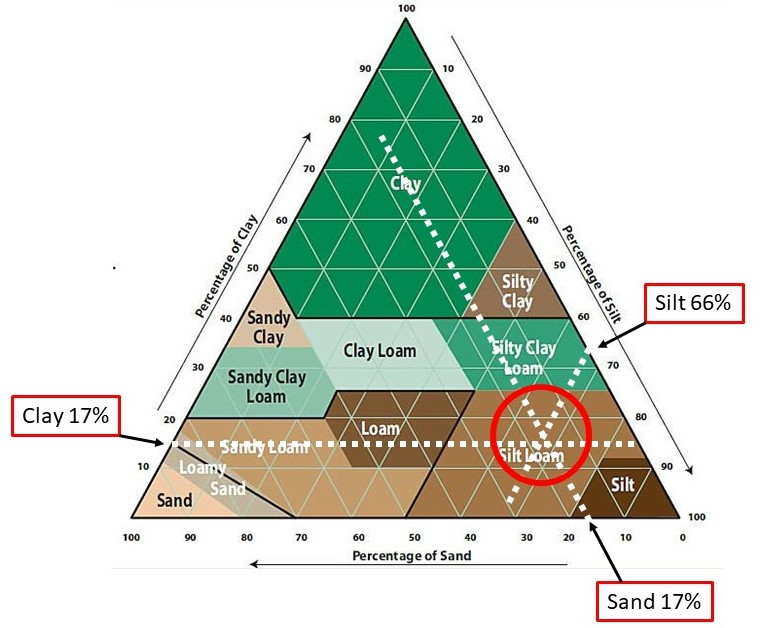
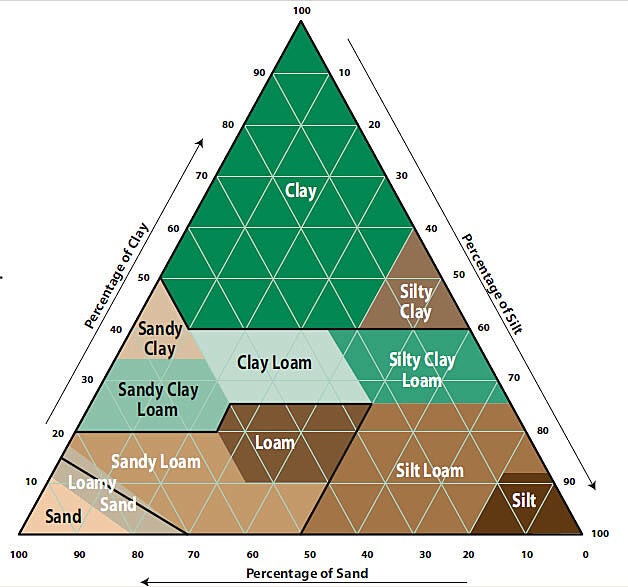
Apply these figures to the “Soil Classification” chart shown below.

To use the chart, start with the clay content. Estimate where its percentage amount lies on the left of the chart and draw a horizontal line across to the right. Next, estimate where the percentage of sand is at the bottom of the chart and draw a line diagonally upward to the left. Finally, estimate where the silt percentage is on the right side of the triangle and draw a diagonal line downward and to the left. The approximate point where the three lines intersect will be the texture of the soil. The sample shown in the jar test above would be classed as mainly silt loam.
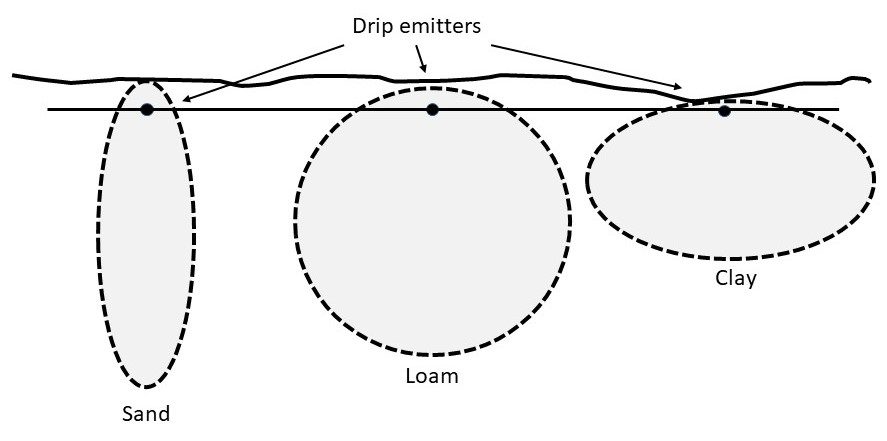
One of the most significant differences between soil types is the way in which they absorb and hold water. Capillary action is the primary force in spreading water horizontally through the soil. Both gravity and capillary action influence vertical movement of water. Sandy or coarse soils allow water to sift through them rather quickly and have a hard time retaining moisture, requiring more frequent watering.
The opposite is true for finer soils. Soils that are heavy in clay content will have a much slower percolation rate than the other two types. Its soil absorption pattern is shallow and wide. What this means is that water will take longer to be absorbed into the ground but will be retained longer as well, so less frequent watering is required.
Loamy soils are preferred for water absorption and retention. Their soil absorption pattern would be more rounded and less deep than that of a sandy soil but deeper than clay soil.
A representation of the soil moisture profiles is shown below. Underground drip emitters are used for this illustration, but the concept applies to the soil types regardless of the application method.
Sloping ground further complicates the issue of soil absorption and contributes to erosion if not recognized and allowed for. The table below shows the estimated maximum precipitation rates, in inches/hr for various soil textures and ground slopes. To convert the figures within the table to mm/hr, multiply the table value by 25 (25mm = 1 inch). Remember that these are estimates only.
| Soil Texture | 0 to 5% slope – cover | 0 to 5% slope – bare | 5 to 8% slope – cover | 5 to 8% slope – bare | 8 to 12% slope – cover | 8 to 12% slope – bare | 12%+ slope – cover | 12%+ slope – bare |
|---|---|---|---|---|---|---|---|---|
| Coarse sandy soils | 2.00 | 2.00 | 2.00 | 1.50 | 1.50 | 1.00 | 1.00 | 0.50 |
| Coarse sandy soils over compact subsoils | 1.75 | 1.50 | 1.25 | 1.00 | 1.00 | 0.75 | 0.75 | 0.40 |
| Light sandy loams uniform | 1.75 | 1.00 | 1.25 | 0.80 | 1.00 | 0.60 | 0.75 | 0.40 |
| Light sandy soils over compact subsoils | 1.25 | 0.75 | 1.00 | 0.50 | 0.75 | 0.40 | 0.50 | 0.30 |
| Uniform silt loams | 1.00 | 0.50 | 0.80 | 0.40 | 0.60 | 0.30 | 0.40 | 0.20 |
| Silt loams over compact subsoils | 0.80 | 0.30 | 0.50 | 0.25 | 0.40 | 0.15 | 0.30 | 0.10 |
| Heavy clay or clay loam | 0.20 | 0.15 | 0.15 | 0.10 | 0.12 | 0.08 | 0.10 | 0.06 |
Instead of being represented by numbers, as in the previous table, the table below describes the various soil characteristics and compares the intake rate, water retention rate and tendency for water to either be absorbed by (drain) or run off (erode) the soils.
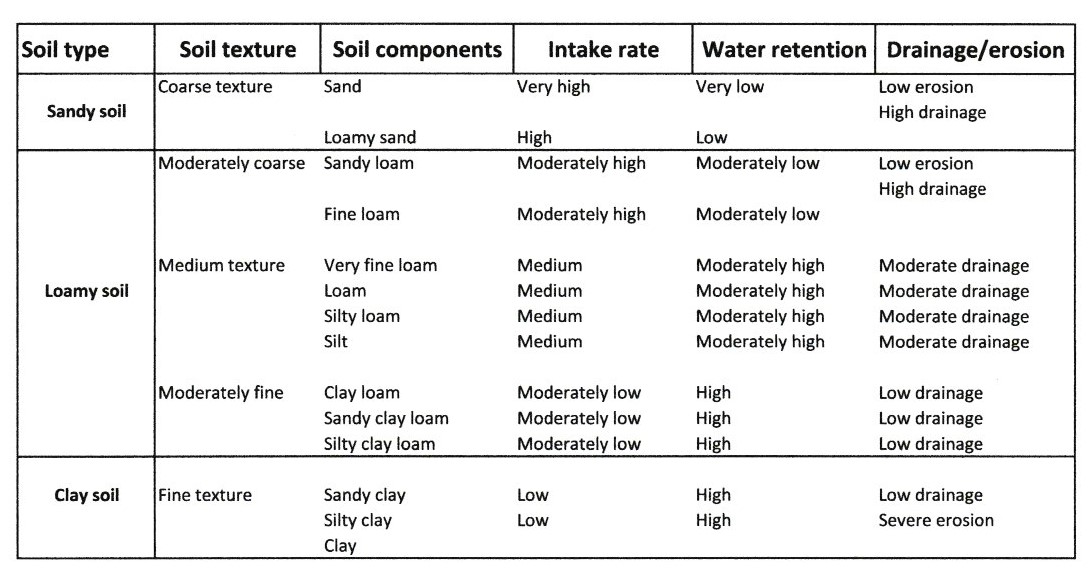
Of note is the information in the last three columns. The soil’s intake rate, or how fast it absorbs water, dictates how quickly water can be applied by the irrigation system. This will impact the length of a watering cycle. Coarse, sandy soil absorbs water very quickly and will not have much of a chance to puddle. Silts and clays have a very low intake rate so extended run times will no doubt cause puddling and runoff. The fine textured soils, once wet, retain moisture longer than do the coarse-grained soils. The main problem we wish to avoid is applying water faster than the soil can receive it. Puddling and runoff are signs of overwatering which tend to waste water and cause soil erosion. These conditions must be avoided.
Identifying soil types and setting zone run times and cycles correctly will help to prevent these issues.
Step 3: Determine the Water and Power Supplies
Water Supply
The available water flow and pressure must be determined before any design work can be started. To do this, use one of the two following methods.
Method #1: Using a flow/pressure gauge
A combination flow/pressure gauge can be obtained through irrigation equipment companies such as Toro® and Rainbird®. They attach to a common ¾″ male hose thread and will measure pressures to 160 psi (1100 kPa) at flow rates of up to 13 GPM (0.91 L/S). The following is a description of the use of such a gauge as supplied by Toro©.
Firstly, measure the static pressure. To do this, make sure no water is being used inside or outside the home. Attach the flow gauge to the outside hosebibb nearest to where the main line enters the house. Make sure the flow gauge is closed by completely turning the handle clockwise. Open the outside faucet slowly to avoid damaging the flow gauge. When the outside faucet is fully opened, read the system static pressure, and record it. Next, measure the dynamic (flow) pressure and gallons-per-minute rates. With the flow/pressure gauge still attached, open the flow gauge slowly by turning the handle counter clockwise. As the flow gauge opens, pressure will drop from the static reading and the flow rate in GPM (l/s) will rise. Open the flow gauge until the pressure reading drops to 50 PSI (350 kPa) and record the GPM (l/s) reading. Continue to close the gauge to 45 (315 kPa) and then 40 PSI (280 kPa) and record the flow rate readings at those pressures. If the pressure does not drop to 40 PSI (280 kPa) after opening the flow gauge all the way, take the flow and pressure reading at the full-open position.
*Note that most sprinklers need a minimum of 35 PSI (245 kPa) to operate properly.
Method #2: Using a bucket and standard pressure gauge
If a flow/pressure gauge is not available, use the following procedure:
Find the outside hosebibb that is closest to your water supply line (call this Faucet 1). Find a different outside hosebibb on your house and attach a pressure gauge to it (call this Faucet 2). With Faucet 1 closed, open Faucet 2 all the way and record the static water pressure. Next, open Faucet 1 all the way and check the pressure reading on the gauge at Faucet 2. If it is less than 40 PSI, turn down the water flow from Faucet 1 until the reading reaches 40 PSI. Place a 5-gallon bucket under Faucet 1 and time how long it takes to fill it (use the chart below to convert to GPM). This test tells you what the home’s water capacity is, measured in GPM, at 40 PSI. Repeat this procedure at 45 PSI and 50 PSI and record these three results. This is how much water is available with a working pressure of 40 PSI or the higher readings that you recorded.
| Time to fill 5-gallon bucket | Gallons per minute |
|---|---|
| 15 seconds | 20 GPM |
| 20 seconds | 15 GPM |
| 25 seconds | 12 GPM |
| 30 seconds | 10 GPM |
| 40 seconds | 7.5 GPM |
*Note: If you use a different size bucket, time how long it takes to fill it. Convert this to GPM using the following formula:
(60 ÷ Seconds) × Gallons = GPM
For example: A 2-gallon bucket that fills in 15 seconds means the available flow is:
(60 ÷ 15) × 2 = 8 GPM
Record the flow rate in GPM and the corresponding pressure. These will be important factors which will be used when determining the number and placement of zones needed in Step 5.
Power Supply
The automatic operation of irrigation systems is sequenced by a controller, also known as a timer, that plugs into a 120VAC (120 volt alternating current) electrical outlet. An outlet should be chosen that is within the power cord’s length to the desired location of the controller. The controller is normally mounted on a wall indoors (e.g. inside a garage) or outdoors, provided it is approved for outdoor use and is protected from the elements as well as from spray from the operating sprinklers. Also, a consideration for the choice of controller location should be to allow the irrigation technician to easily view the zones in operation when setting up the controller while not being hit by the sprinklers’ discharge. Most homes have at least two 120 VAC exterior electrical “GFCI” (ground fault circuit interrupter) outlets which may be of use for this purpose. If the location doesn’t provide the timer enough protection from the elements, a lockable waterproof cabinet is available. Locking the cabinet also helps to prevent vandalism and unwanted adjustments of settings.
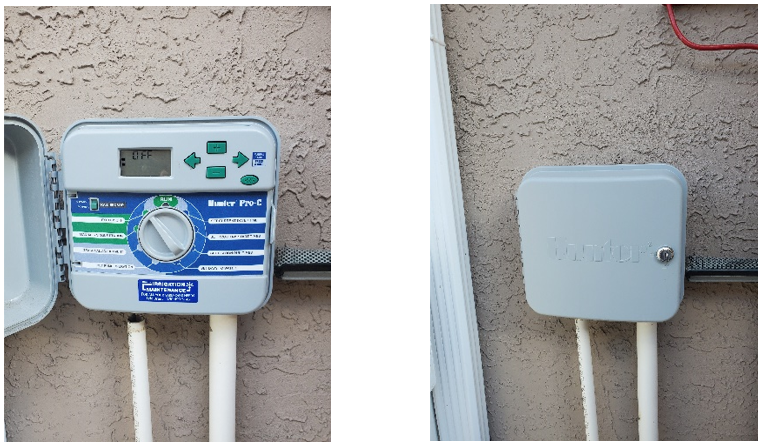
The controller should also be in as close a proximity as possible to the zone valve locations, in order to minimize the length of control wire needed between the two points.
Now complete Self Test 1 and check your answers. Answers are at the end of this learning guide.
Self-Test 1
Self-Test 1
- Which one of the following could be seen as a downside to installing an automatic sprinkler system rather than watering manually?
- Giving plants an exact amount of water
- Water conservation
- Cost of installation
- Cost of operation
- What style of irrigation system is installed to water small, specific areas such as planters and hanging baskets?
- Drip
- Deluge
- Stream rotor
- Fixed spray
- What is the service known as in British Columbia that will send information on any buried utilities to interested parties at no cost?
- IDigIt
- BC 1 Call
- DigAnywhere
- CallMeAMole
- Which one of the following would likely not need to be plotted on a site plan for a proposed irrigation system?
- Walkways, driveways, and patios
- Water supply connection
- Gutter downspouts
- Trees
- What is the term given to the water that is used by the plant and lost into both the air and the soil?
- Evapotranspiration
- Transpiration
- Evaporation
- Percolation
- According to the figures in the list on page 4, a daily water need of 0.23 inches (5.5 mm) would be classed as .
- Cool dry
- Warm dry
- Hot humid
- Warm humid
- Which one of the following can easily be used to determine the soil’s texture?
- Jar test
- Loam test
- Percolation test
- Evapotranspiration test
- What is the category of soil texture if it has these approximate contents: 30% clay, 40% sand and 30% silt? (Use the triangular chart on page 6)
- Sandy clay loam
- Silty clay loam
- Sandy loam
- Clay loam
- Which one of the following soil types is considered best for water absorption and retention?
- Silt
- Sand
- Loam
- Rock
- Which one of the following is the most likely result of applying water too fast to sloping ground?
- Puddling
- Sponginess
- Runoff and erosion
- Healthy stable plants
- If a 3-gallon pail takes 18 seconds to fill, what would this be in gallons per minute?
- 1.11
- 3.33
- 10
- 54
- Which one of the following would not be a consideration in the choice of location for mounting a residential timer/controller?
- Exposure to weather
- Proximity to 120 VAC
- Ability to view zones operating
- Proximity to the house water supply
Check your answers using the Self-Test Answer Keys in Appendix 1.
Image Attributions
- Figure 1 Traditional Sprinkler System © Irrigation Direct Canada. Used with permission.
- Figure 2 Drip irrigation © Irrigation Direct Canada. Used with permission.
- Figure 3 Jar test © Irrigation Direct Canada. Used with permission.
- Figure 4 Soil classification chart © Irrigation Direct Canada. Used with permission.
- Figure 5 Using the soil classification chart is adapted from Soil classification chart © Irrigation Direct Canada. Used with permission.
- Figure 6 Soil absorption patterns from drip emitters by ITA is licensed under a CC BY-NC-SA licence.
- Figure 7 Soil characteristics chart © Irrigation Direct Canada. Used with permission.
- Figure 8 Timer/controller with weatherproof cabinet by ITA is licensed under a CC BY-NC-SA licence.
