Unit 1 Use a Theme Template and Slide Layouts to Create a Presentation
3 Create a Slide Presentation
bpayne
 Create a Slide Presentation
Topics include:
- Choose a Theme Template
- Create Slide Content
- Create a New Slide
- Multi Level Bulleted Lists
A PowerPoint has two methods for creating a slide presentation:
- Choose a theme template
- Create a blank presentation (this method is covered in Unit 3)
PowerPoint software has built in and free online pre-designed templates that contain various color schemes and pre-arranged elements in a slide, eg. text and graphics. Select a template and PowerPoint will format the entire presentation according to that template.
Steps to choosing a theme template:
- Open PowerPoint.
- At the PowerPoint window, click the File tab, then click New.
- The Available Templates and Themes screen will appear, click on an available template or download a free template from the office.com online templates.
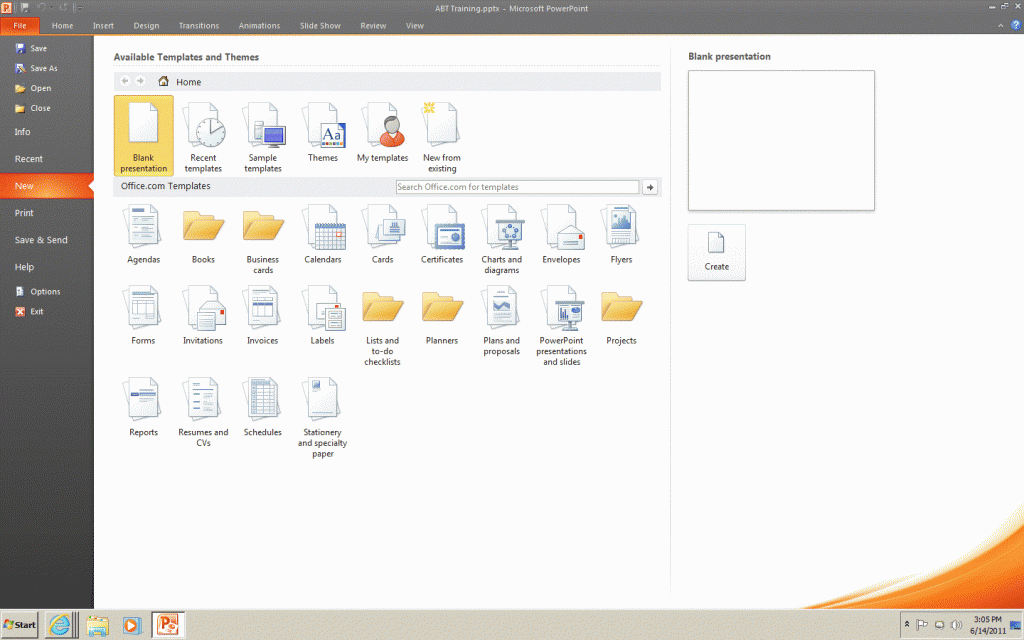
- Once you have selected the desired template, it will be displayed in normal view. New slides can be added as needed.
Tips & Tricks
A theme template can be added to a presentation before, during or after you have added the presentation content.
To apply various templates to a presentation, click the Design tab, then click on the desired template in the themes group.

Create a New Slide
Whether you are using a pre-made theme template or working from your own design, it is very easy to insert a new slide.
- In the slide pane click on the slide where you would like the new slide to appear below.
- Click on the New Slide button located on the Home tab in the Slides group.
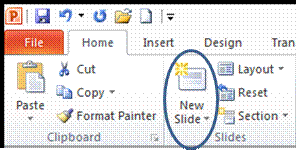
- The new slide should appear below the selected slide. If you want to add a new slide between two, select the first of the two slides and click New Slide.
- Notice the New Slide button contains a New Slide button arrow. Click on the arrow to view different slide layouts. Another way to change the slide layout is by clicking on the Layout button located in the Slides group. The slide layout option determines the position of the objects on a slide. Simply click on the layout you want to use and it will appear in the slide pane.
Create Slide Content
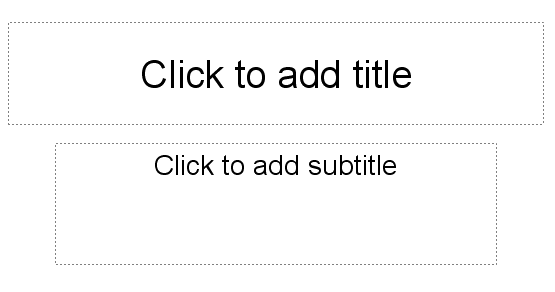
Entering text and images into your presentation slide is easy and fun. When using the theme template the first slide to appear in Normal view is called the Title Slide.
The title slide is the slide that is used to introduce the presentation to the audience. It has two text placeholders for text: title text placeholder and sub-title text placeholder. Placeholders are the building blocks for a PowerPoint slide.
To insert text in a placeholder, left click inside of the textbox and begin typing. Once you have entered text, click outside the text box to see how your text looks. The placeholder then becomes an object. An object is any item on a slide that can be manipulated. Objects are the building blocks that make up a slide. A text object can moved around and repositioned on a slide.
A object is selected when there is a gray, bold outline around the object, and when the cursor turns into a cross. Around the selected object are small white circles that are called sizing handles. You can drag the handles to position the object.
To apply formatting to text inside an object, select the text with your cursor, then click on the Home tab and in the Font group add text attributes such as bold, underline, and italics. The Paragraph group, located next to the Font group, contains commands that allow you to change the alignment of text, insert numbers or bullets to lists, and indent text.
You can also edit your text by accessing the Font dialogue box by clicking the Font group dialogue box launcher. (The dialogue box launcher is the small button containing a diagonal arrow that displays in the lower right corner of the group.) The Font dialogue box includes special effects such as: double strikethrough, superscript and subscript.

Another quick and easy way to format slides is by using a slide master. A Slide Master will reduce the steps needed to format all the slides in a presentation. Any changes made in the slide master will affect all slides in the presentation. This allows for consistency in any presentation.
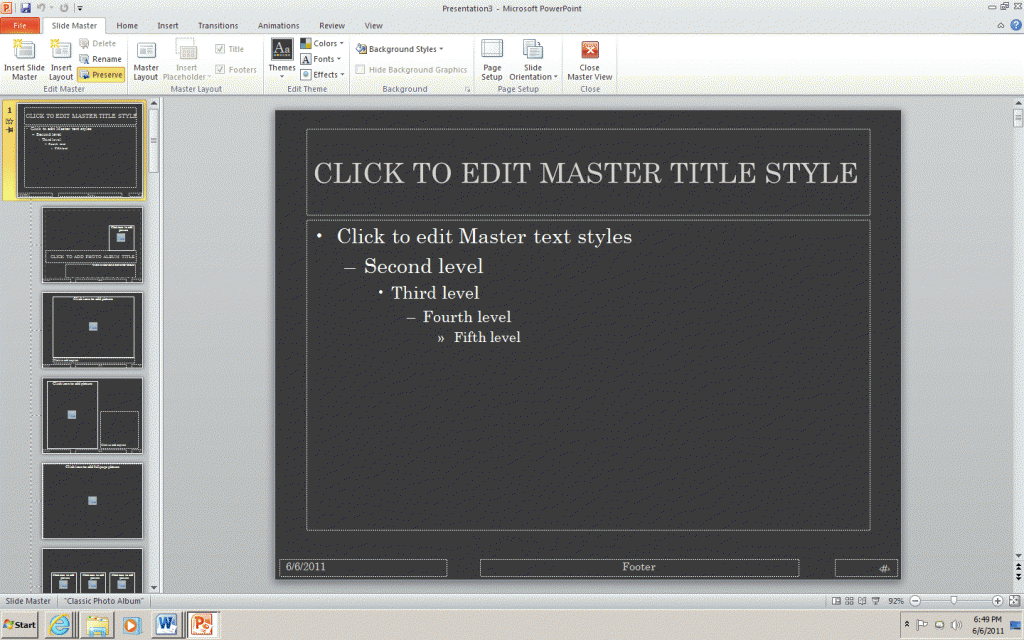
When you choose a theme template PowerPoint automatically adds a Slide master. To format the slide master click the View tab and then choose Slide Master located in the Presentation View group.
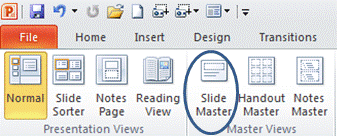
A slide master appears in the slide pane and in the Outline/Slide pane. The largest thumbnail in the pane is the slide master and the other thumbnails represent associated layouts.Click on the master slide or a specific layout to apply formatting or themes. Once formatting changes have been made click on Close Master View to return to the normal view.
For more information on Slide Masters take this link to Microsoft Tips for using Slide Masters.
Multi Level Bulleted Lists
PowerPoint allows information to be displayed as multilevel bulleted lists. Bulleted lists are used in PowerPoint to display levels of importance within the presentation. Various slide layouts in the Slide Layout task pane contain bullets. To add multi levels to a bulleted list you need to choose the appropriate layout.
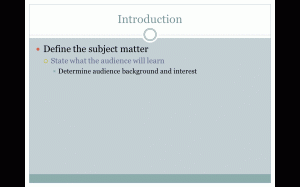
The first-level bullet will be displayed under the title placeholder. Once you have typed your text next to the first-level bullet press Enter on your keyboard. The new first-level bullet automatically appears. Press Tab on your keyboard and the first-level bullet becomes a second level bullet. Press Shift + Tab this will decrease the indent and bring the bullet back to first level.
![]()
Another method to add levels to your presentation is by clicking the decrease list level or increase list level buttons on the Paragraph group in the Home tab.
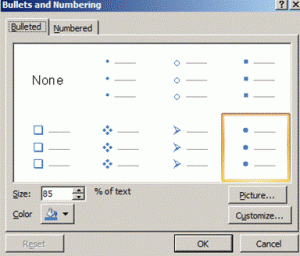
You can customize the bullets in your presentation by selecting the Bullets and Numbering dialogue box from Paragraph group located in the Home tab. Select the bullet text, click on the drop down arrow next to Bullets or Numbering, click on Bullets and Numbering, then choose the from the pre-designed bullets.
Now that you are able to create a presentation let us move on to view and save presentations.
