Unit 3 Using Outline View and Clip Art to Create a Slide Show
15 Practice Activity
bpayne
 Unit Three: Practice Activity
- Start a Blank Presentation
- Insert Objects
- Create a Title Slide
- Insert New Slides Using Outline Tab
- Add a Footer
Start a Blank Presentation
- Click on New Presentation.
- Select the Flow theme from the installed themes and change the theme color to Office.
- Ensure that the Outline tab is displayed.
Create a Title Slide
- In the slide pane, click in the title placeholder and type Employee Skills.
- Click in the subtitle placeholder and type: By “your name” (Note: Be sure to substitute your actual name in place of the words “your name”).
- Edit the text in the title placeholder by using the Outline tab. Select the text Employee by dragging the mouse over the text and type Employability.
- Click to the right of the subtitle text in the outline tab (your name).
- Press Enter the insertion point moved down to the next line .
- Type Applied Business Technologies.

Insert New Slides Using Outline Tab
- To insert a new slide after the current slide click the new slide button located on the Home tab in the Slides group. By default the Title and Text slide will be inserted.
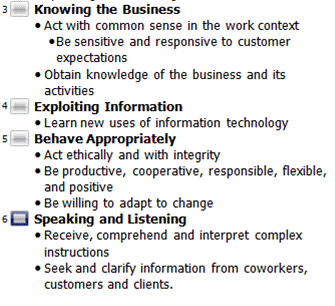
- In the outline tab type Top 13 skills most sought by recruiters include: press enter, PowerPoint automatically inserts another slide.
- To change the current outline level so that you can type a bulleted list on slide 2 do the following: press tab to move the current outline level to the next level or right click on the outline pane and click on demote.
- To create the bulleted list type: Knowing the business press enter.
- Type Exploiting Information press enter.
- Type Behaving appropriately press enter.
- Type Speaking and Listening press enter.
- Your outline view should appear as shown below but be sure to correct title case errors.

- Continue adding new slides and content provided below. Use the tab key to move to the next level. Your outline should appear as follows:
- Save the presentation as Employskills.
Add a Footer
- Click on Insert, Header and Footer located in the Text group.
- Check the slide number box and add ABT 2011 in the footer text box. Apply to all.
- View the slides to ensure that the footer has been added.
Insert Objects
- In the normal view, display the second slide in the slide pane. (Top 13 skills slide)
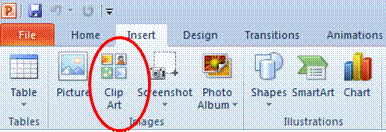
- Click on the Insert tab,then select Clip Art from the Images group.
- The Clip Art task bar will appear on the right side of the screen. In the search text box type business.
- Select a clip of your choice by double clicking on the graphic. (Clip art may vary)
- Place the clip art in a desired location on the slide.
- Resize the clip art.

- Move to the third slide in the presentation.
- Click on Shapes located in the Illustrations group, hover over block arrows. Under the Block arrows section select the up arrow.
- Move to the slide and draw the arrow.
- Position, resize, and rotate the arrow by clicking on the graphic to activate the nodes, then clicking on the green circle to rotate, the yellow diamond to adjust the proportions, and the white ciircles to adjust the size of the graphic.

- Change the fill color of the arrow, by using the fill color on the drawing toolbar.
- Repeat steps 8 to11 again with another shape of your choice.

- Save your Presentation.
