Unit 4 Preparing Presentation Based on Notes
19 Slide Transitions and Animations
bpayne
 Slide Transitions and Custom Animations
Topics include:
Slide Transitions
A slide transition is how one slide is removed from the screen and the next slide is displayed during a presentation. PowerPoint offers many entertaining and different slide transition schemes- the trick is to be careful not to use too many different schemes in one presentation. Be selective and consider the appropriateness of the scheme before you apply it to the different slides. Test them out by running the Slide Show and evaluate them for effectiveness. Quality rather then quantity is the key.
To add transitions to a presentation click on the slide sorter view, located at the bottom of the screen. Thumbnails of all the slides in your presentation will appear. Click on the Transitions tab. The transitions tab contains the Transitions to This Slide group. From this group choose a special effect to be applied during the transition between the previous slide to the next slide.
![]()
To apply transition schemes to all the slides in your presentation select Apply to All. You can also adjust the duration of the transitionby setting a time in the Duration box located above Apply To All.
When a transition is added to a slide, a transition icon (*) displays below the slide in all of the slide views.
To further enhance your slides you can apply animation to the text and objects. This feature adds a visual aspect to your presentation and can create focus on specific items. When an animation effect is applied to bulleted lists and clip art objects, you can animate one bulleted item or clip art object to appear on the screen with each successive mouse click.
Preset Animations Schemes are available in the Animation group of the Animations Tab.

You must have an object selected on your slide for the animation list to become available. Different types of objects will result in different animation options appearing in the list.
Custom Animation
Click on the Animation Pane in the Advanced Animation group on the Animations tab and the animation pane appears to the right of the slide pane. Click on Add Animation. There are four options to apply effects to: the entrance, emphasis, exit and motion paths. Choose a slide, select an object on the slide, then add your choice of animation. The effect displays in the Slide pane. Preview the slide show by selecting slide show located at the bottom of the task pane.
The Animation task pane allows you to control the order in which text and objects appear on the slide. Once you have applied a custom animation to each object on a slide the objects display in the task pane list box. Objects can be rearranged in the task pane list box, by clicking on the Re-Order arrows below the list.
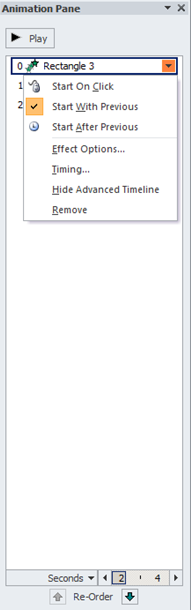
To adjust the speed click on the speed option box.
Run an Animated Slide Show
Unlike the slide show in Project 1, clicking the mouse button does not take you from slide to slide – it takes you from object to object. In order to have the bulleted items and clip art objects display on the screen it will be necessary for you to click each time. This is useful for speakers when giving a presentation as it allows them to guide the audience and have them focus on each inpidual point without the distraction of remaining text.
