Part 2
Module 11: Competency Test 2 Open Book
Learning Outcomes
When you have completed this module, you will be able to:
- Within a one-hour time limit, complete a written exam and a lab exercise without the aid of a key.
The AutoCAD 2D book was written with competency based modules. What that means is that you have not completed each module until you have mastered it. The Competency Test module contains multiple choice questions and a comprehensive lab exercise to test your mastery of the set of modules that you completed. There are no answers or keys supplied in a Competency Test module since it is meant to be checked by your instructor. If there are any parts of this module that you have trouble completing, you should go back and reread the module or modules containing the information that you are having trouble with. If necessary, redo as many lab exercises required until you fully understand the material.
If you are Completing this book:
- Without the Aid of an Instructor, complete the written test and the lab exercise.
- In a Classroom with an Instructor, the instructor will give instructions on what to do after this module has been completed.
Multiple Choice Questions
Select the BEST answer.
- What object snap mode is used to snap to the center point of a line?
- Halfpoint
- Center
- Quadrant
- Midpoint
- Endpoint
- What scale should almost all objects be drawn in an AutoCAD drawing?
- 1:50
- 1:10
- 1:2
- Full Scale
- You don’t draw in scale in AutoCAD
- What is the name of the visual aid that helps the user locate object snap modes more efficiently?
- Snapmode
- AutoSnap
- SnapAuto
- AutoCADSnap
- AutoMode
- What coordinates are the best to set the lower left corner of the limits of the drawing?
- 0,0
- 2,2
- 4,4
- 6,6
- 8,8
- What is the smallest rectangle that will fit around all of the existing objects in the drawing called?
- The drawing border
- The drawing grid
- The drawing mode
- The drawing extents
- The drawing size
- What command sets the number of vectors that AutoCAD uses when it regenerates circles and arcs?
- VIEWRES
- REGEN
- CIRCLE
- ARC
- VIEW
- What function key toggles Autosnap on and off?
- F1
- F2
- F3
- F4
- F5
- What is the name of the four object snap mode locations that are located around the circumference of a circle?
- Center
- Midpoint
- Endpoint
- Points
- Quadrants
- Which one of the following best describes the polar coordinate @10<125?
- From the last point, go 12.5 units at an angle of negative 10 degrees
- From the last point, go 10 units at an angle of negative 125 degrees
- From the last point, go 125 units at an angle of positive 10 degrees
- From the last point, go 10 units at an angle of positive 125 degrees
- From the last point, go 125 units at an angle of negative 10 degrees
- What polar coordinate would draw the same angle as @5<225?
- @5<-125
- @5<-225
- @5<-135
- @5<-145
- @5<-165
Lab Exercise 11-1 OPEN BOOK
| Drawing Name | Template | Units |
|---|---|---|
| AutoCAD 2D Lab 11-1 | 2D Metric | Millimeters |
| Layer Name | Objects on Layer | Color |
|---|---|---|
| Construction | Construction objects | 253 |
| Object | Line, circle and arcs | Red |
Step 1
Setup the layers using the Layering Scheme shown above.
Step 2
Draw the object shown in the figure using the layering scheme. (Figure Step 2A and 2B)
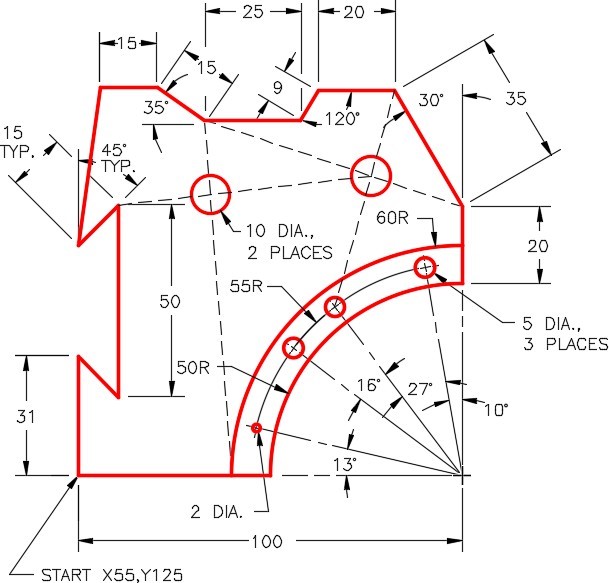

Step 3
Draw all construction objects on layer: Construction.
Step 4
When complete, freeze layer: Construction.
Step 5
Save and close the drawing.
