Part 8
Module 41: Competency Test 8 Open Book
Learning Outcomes
When you have completed this module, you will be able to:
- Within a two hour time limit, complete a written exam and the lab exercise without the aid of a key.
The AutoCAD 2D book was written with competency based modules. What that means is that you have not completed each module until you have mastered it. The Competency Test module contains multiple choice questions and a comprehensive lab exercise to test your mastery of the set of modules that you completed. There are no answers or keys supplied in a Competency Test module since it is meant to be checked by your instructor. If there are any parts of this module that you have trouble completing, you should go back and reread the module or modules containing the information that you are having trouble with. If necessary, redo as many lab exercises required until you fully understand the material.
If you are Completing this book:
- Without the Aid of an Instructor, complete the written test and the lab exercise.
- In a Classroom with an Instructor, the instructor will give instructions on what to do after this module has been completed.
Multiple Choice Questions
Select the BEST answer.
- What snap mode is used to snap to a point located on an object that is the closest to the current location of the cursor?
- Node
- Point
- Nearest
- Closet
- On
- What AutoCAD window is used to copy blocks from one drawing to another?
- Layer Property Manager
- Properties
- DesignCenter
- External Reference
- There is no window to do this.
- When associative dimensions are inserted, they insert points at the dimension’s location. What are these points called?
- Definition Points
- Dimension Points
- Extension Points
- Insert Points
- Assoc Points
- On what layer are the points in question 3 inserted on?
- The current layer
- Layer Dimpoints
- Layer 0
- Layer Defpoints
- Layer Dimension
- Which one of the following best describes one difference between an associative and an exploded dimension?
- Exploded dimensions are inserted as blocks.
- Associative dimensions are inserted as xrefs.
- Exploded dimensions are inserted as xrefs.
- Associative dimensions are inserted as blocks.
- Associative dimensions are inserted as individual objects.
- Which one of the following cannot be dragged and dropped from one drawing to another using DesignCenter?
- text style
- dimensioning style
- plot styles
- layouts
- layers
- If the scale of a viewport is set 1:800, what number is entered for the custom scale?
- 800
- 0.008
- 0.0125
- 0.00125
- 0.125
- What characters are used in the Text Override property to represent the actual dimension measured by AutoCAD?
- < >
- ” “
- { }
- [ ]
- # #
- Which one of the following statements is true?
- If a lineweight is not assigned to a layer, the layer is automatically set to zero lineweight.
- Color is used to assign lineweights to a drawing when plotted.
- Lineweights cannot be displayed in a drawing.
- Only layers can be used to assign lineweights in a drawing.
- Lineweights can only be assigned with layers.
- Which one of the following can be used to copy an object from model space to paper space?
- Copy and Paste
- COPY command
- COPYMODEL command
- MVIEW command
- This cannot be done.
Lab Exercise 41-1 OPEN BOOK
| Drawing Name | Template | Units |
|---|---|---|
| AutoCAD 2D Lab 41-1 | N/A | Millimeters |
Step 1
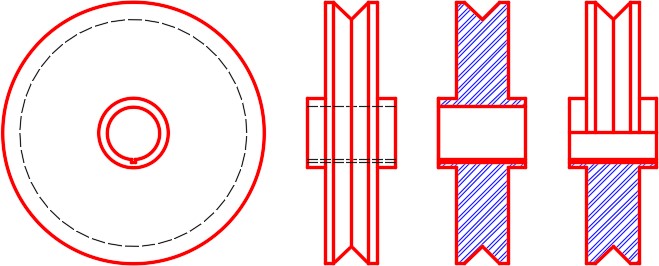
Open drawing: AutoCAD 2D Lab 34-1. (Figure Step 1)
Step 2
Using the SAVEAS command, save the drawing with the name: AutoCAD 2D Lab 41-1.
Step 3
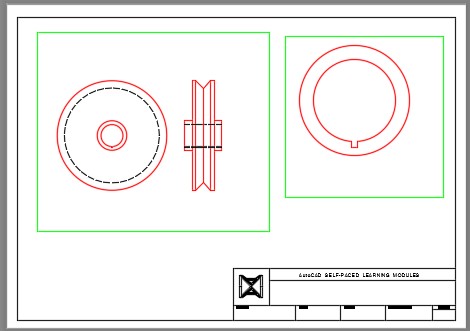
In the layout: Module Layout A3, on layer: Viewport, create two viewports as shown in the figure. Set the scale as follows and lock their display. (Figure Step 3)
Left Viewport Scale: 1:1.5
Right Viewport Scale: 2.5:1
Step 4
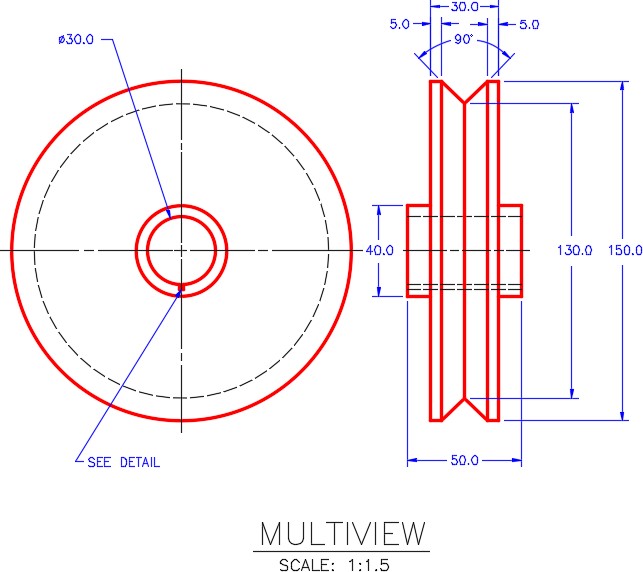
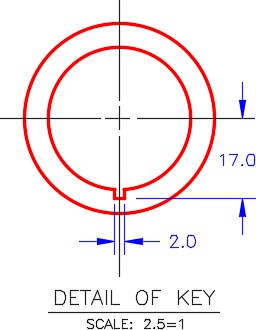
Using Figure Step 4:
- A In Paper space, on layer: Center Lines, add the center
- B In Paper space, on layer: Dimensions, add the dimensions in each
- C In Paper space, on layer: Text, add the title and scale of the views. Use your own text style and text height. (Figure Step 4)
Step 5
Turn Layer: Viewport off and fill in the titleblock. (Figure Step 5)

Step 6
Change to Model space. Your figure should match the figure. (Figure Step 6)

Step 7
Save and close the drawing.
